33 个版本 (13 个稳定版)
| 1.6.2 | 2024年7月23日 |
|---|---|
| 1.4.0 | 2024年4月30日 |
| 1.0.0 | 2024年3月30日 |
| 0.9.0 | 2024年3月17日 |
| 0.1.0 | 2021年6月22日 |
#39 in 数学
216 每月下载量
在 7 crates 中使用
1.5MB
24K SLoC
Russell Lab - 线性代数和数值数学的科学实验室
此 crate 是 Russell - Rust 科学库 的一部分
内容
介绍
此库实现了专门的数学函数(例如,贝塞尔、误差函数、伽马函数)和执行线性代数计算的函数(例如,矩阵、向量、矩阵-向量、特征分解、奇异值分解)。此库还实现了一套用于比较浮点数、测量计算机时间、读取表格格式数据等的实用函数。
代码应尽可能使用 原生 Rust 代码实现。然而,为一些在数值数学中最好的工具(包括 OpenBLAS 和 Intel MKL)实现了一些轻量级接口(包装器)。
代码组织在模块中
algo— 依赖于其他模块的算法(例如,拉格朗日插值)base— 帮助其他模块的“基本”功能check— 辅助单元和集成测试的函数math— 数学(专用)函数和常数matrix— [NumMatrix] 结构和相关函数matvec— 在矩阵和向量上操作的函数vector— [NumVector] 结构和相关函数
对于线性代数,主要结构是 NumVector 和 NumMatrix,它们是通用的向量和矩阵结构。矩阵数据以 列主序 存储的。向量 Vector 和矩阵 Matrix 分别是 f64 和 Complex64 的别名,对应于 NumVector 和 NumMatrix。
当前线性代数函数仅处理 (f64, i32) 对,即访问 (double, int) 的 C 函数。我们还考虑 (Complex64, i32) 对。
有许多线性代数函数,例如(对于实数和复数类型)
- 向量加法、复制、内积和外积、范数等
- 矩阵加法、乘法、复制、奇异值分解、特征值、伪逆、逆、范数等
- 矩阵-向量乘法,等等
- 解带对称或非对称系数矩阵的密集线性系统,等等
- 读取写入文件,
linspace,网格生成器,计时器,线性拟合等 - 检查结果、比较浮点数和验证导数的正确性;请参阅
russell_lab::check
文档
安装
这个 crate 依赖于一些非 Rust 的高性能库。 请参阅主 README 文件以了解安装这些依赖项的步骤。
配置 Cargo.toml
👆 检查 crate 版本并相应地更新 Cargo.toml
[dependencies]
russell_lab = "*"
可选功能
以下(Rust)功能可用
intel_mkl:使用 Intel MKL 而不是 OpenBLAS
请注意,主 README 文件 展示了根据每个功能编译所需库的步骤。
🌟 示例
本节说明了如何使用 russell_lab。另请参阅
使用 Intel MKL 运行示例
考虑以下 代码
use russell_lab::*;

fn main() -> Result<(), StrError> {
    println!("Using Intel MKL  = {}", using_intel_mkl());
    println!("BLAS num threads = {}", get_num_threads());
    set_num_threads(2);
    println!("BLAS num threads = {}", get_num_threads());
    Ok(())
}
首先,运行不带 Intel MKL 的示例(默认)
cargo run --example base_auxiliary_blas
输出如下
Using Intel MKL  = false
BLAS num threads = 24
BLAS num threads = 2
其次,以 intel_mkl 功能运行代码
cargo run --example base_auxiliary_blas --features intel_mk
然后,输出如下
Using Intel MKL  = true
BLAS num threads = 24
BLAS num threads = 2
对小的元组进行排序
use russell_lab::base::{sort2, sort3, sort4};
use russell_lab::StrError;

fn main() -> Result<(), StrError> {
    // sorting slices with the standard function
    let mut u2 = vec![2.0, 1.0];
    let mut u3 = vec![3.0, 1.0, 2.0];
    let mut u4 = vec![3.0, 1.0, 4.0, 2.0];
    u2.sort_by(|a, b| a.partial_cmp(b).unwrap());
    u3.sort_by(|a, b| a.partial_cmp(b).unwrap());
    u4.sort_by(|a, b| a.partial_cmp(b).unwrap());
    println!("u2 = {:?}", u2);
    println!("u3 = {:?}", u3);
    println!("u4 = {:?}", u4);
    assert_eq!(&u2, &[1.0, 2.0]);
    assert_eq!(&u3, &[1.0, 2.0, 3.0]);
    assert_eq!(&u4, &[1.0, 2.0, 3.0, 4.0]);

    // sorting small tuples
    let mut v2 = (2.0, 1.0);
    let mut v3 = (3.0, 1.0, 2.0);
    let mut v4 = (3.0, 1.0, 4.0, 2.0);
    sort2(&mut v2);
    sort3(&mut v3);
    sort4(&mut v4);
    println!("v2 = {:?}", v2);
    println!("v3 = {:?}", v3);
    println!("v4 = {:?}", v4);
    assert_eq!(v2, (1.0, 2.0));
    assert_eq!(v3, (1.0, 2.0, 3.0));
    assert_eq!(v4, (1.0, 2.0, 3.0, 4.0));
    Ok(())
}
检查一阶和二阶导数
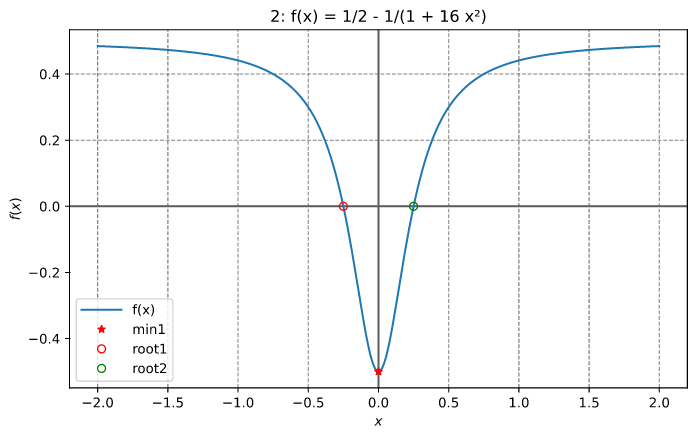
检查 f(x) 的第一和二阶导数的实现(如下所示)。
use russell_lab::algo::NoArgs;
use russell_lab::check::{deriv1_approx_eq, deriv2_approx_eq};
use russell_lab::{StrError, Vector};

fn main() -> Result<(), StrError> {
    // f(x)
    let f = |x: f64, _: &mut NoArgs| Ok(1.0 / 2.0 - 1.0 / (1.0 + 16.0 * x * x));

    // g(x) = df/dx(x)
    let g = |x: f64, _: &mut NoArgs| Ok((32.0 * x) / f64::powi(1.0 + 16.0 * f64::powi(x, 2), 2));

    // h(x) = d²f/dx²(x)
    let h = |x: f64, _: &mut NoArgs| {
        Ok((-2048.0 * f64::powi(x, 2)) / f64::powi(1.0 + 16.0 * f64::powi(x, 2), 3)
            + 32.0 / f64::powi(1.0 + 16.0 * f64::powi(x, 2), 2))
    };

    let xx = Vector::linspace(-2.0, 2.0, 9)?;
    let args = &mut 0;
    println!("{:>4}{:>23}{:>23}", "x", "df/dx", "d²f/dx²");
    for x in xx {
        let dfdx = g(x, args)?;
        let d2dfx2 = h(x, args)?;
        println!("{:>4}{:>23}{:>23}", x, dfdx, d2dfx2);
        deriv1_approx_eq(dfdx, x, args, 1e-10, f);
        deriv2_approx_eq(d2dfx2, x, args, 1e-9, f);
    }
    Ok(())
}
输出
   x                  df/dx                d²f/dx²
  -2   -0.01514792899408284  -0.022255803368229403
-1.5   -0.03506208911614317   -0.06759718081851025
  -1   -0.11072664359861592   -0.30612660289029103
-0.5                  -0.64                 -2.816
   0                      0                     32
 0.5                   0.64                 -2.816
   1    0.11072664359861592   -0.30612660289029103
 1.5    0.03506208911614317   -0.06759718081851025
   2    0.01514792899408284  -0.022255803368229403
贝塞尔函数
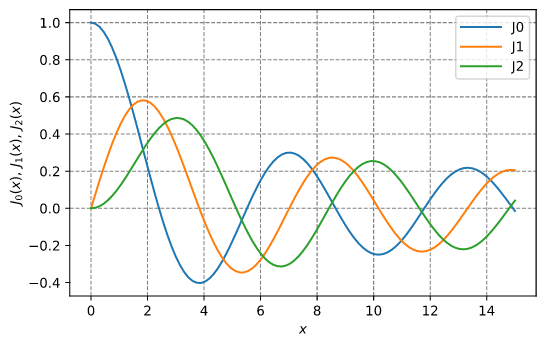
绘制贝塞尔 J0、J1 和 J2 函数的图像
use plotpy::{Curve, Plot};
use russell_lab::math::{bessel_j0, bessel_j1, bessel_jn, GOLDEN_RATIO};
use russell_lab::{StrError, Vector};

const OUT_DIR: &str = "/tmp/russell_lab/";

fn main() -> Result<(), StrError> {
    // values
    let xx = Vector::linspace(0.0, 15.0, 101)?;
    let j0 = xx.get_mapped(|x| bessel_j0(x));
    let j1 = xx.get_mapped(|x| bessel_j1(x));
    let j2 = xx.get_mapped(|x| bessel_jn(2, x));
    // plot
    if false { // <<< remove this condition
    let mut curve_j0 = Curve::new();
    let mut curve_j1 = Curve::new();
    let mut curve_j2 = Curve::new();
    curve_j0.set_label("J0").draw(xx.as_data(), j0.as_data());
    curve_j1.set_label("J1").draw(xx.as_data(), j1.as_data());
    curve_j2.set_label("J2").draw(xx.as_data(), j2.as_data());
    let mut plot = Plot::new();
    let path = format!("{}/math_bessel_functions_1.svg", OUT_DIR);
    plot.add(&curve_j0)
        .add(&curve_j1)
        .add(&curve_j2)
        .grid_labels_legend("$x$", "$J_0(x),\\,J_1(x),\\,J_2(x)$")
        .set_figure_size_points(GOLDEN_RATIO * 280.0, 280.0)
        .save(&path)?;
    }
    Ok(())
}
输出
线性拟合
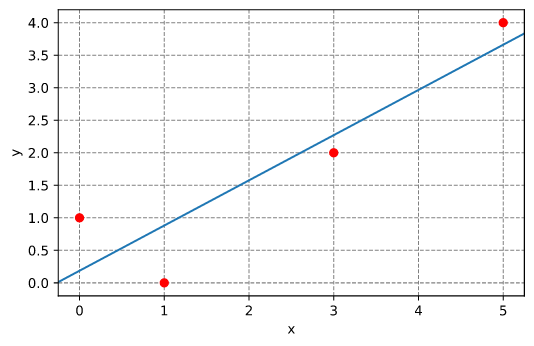
通过一组点拟合一条直线。该直线的斜率为 m,在 y 轴上的截距为 x=0,有 y(x=0) = c。
use russell_lab::algo::linear_fitting;
use russell_lab::{approx_eq, StrError, Vector};

fn main() -> Result<(), StrError> {
    // model: c is the y value @ x = 0; m is the slope
    let x = Vector::from(&[0.0, 1.0, 3.0, 5.0]);
    let y = Vector::from(&[1.0, 0.0, 2.0, 4.0]);
    let (c, m) = linear_fitting(&x, &y, false)?;
    println!("c = {}, m = {}", c, m);
    approx_eq(c, 0.1864406779661015, 1e-15);
    approx_eq(m, 0.6949152542372882, 1e-15);
    Ok(())
}
结果
切比雪夫自适应插值(给定函数)
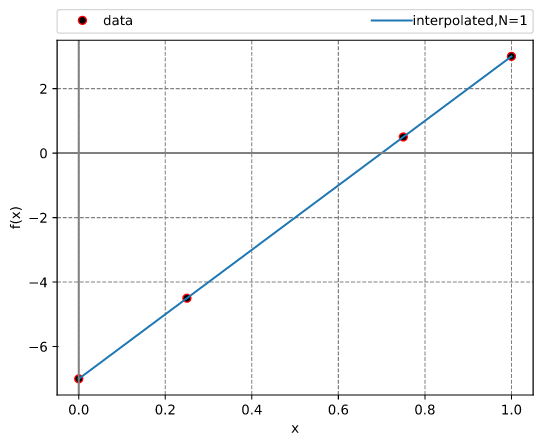
此示例说明了如何使用 InterpChebyshev 对给定函数的数据进行插值。
结果
切比雪夫自适应插值(给定数据)
此示例说明了如何使用 InterpChebyshev 对离散数据进行插值。
结果
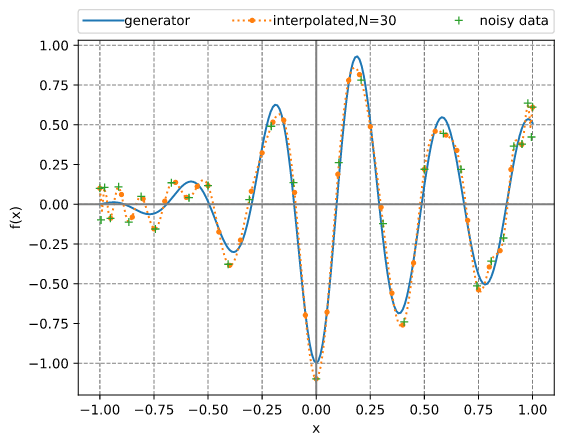
切比雪夫自适应插值(给定含噪声数据)
本例说明了使用InterpChebyshev进行噪声数据插值的用法。
结果
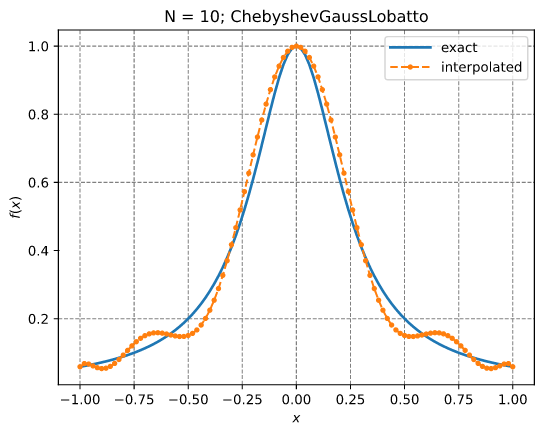
拉格朗日插值
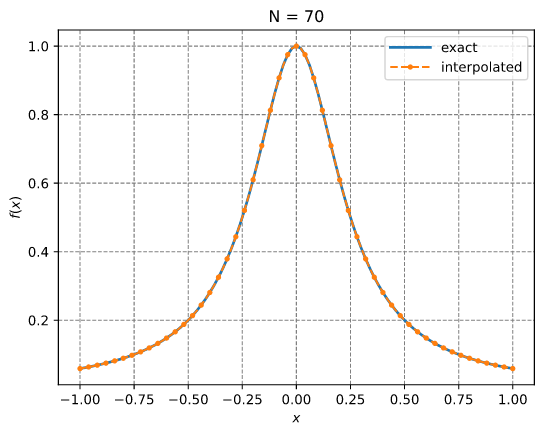
本例说明了使用InterpLagrange在Chebyshev-Gauss-Lobatto网格上插值Runge方程的用法。
结果
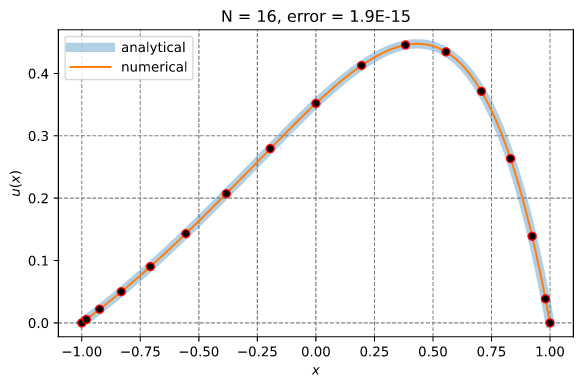
使用谱配置求解一维偏微分方程
本例说明了使用谱配置法求解一维偏微分方程的解。它使用了InterpLagrange结构体。
d²u     du          x
——— - 4 —— + 4 u = e  + C
dx²     dx

    -4 e
C = ——————
    1 + e²

x ∈ [-1, 1]
边界条件
u(-1) = 0 and u(1) = 0
参考解
        x   sinh(1)  2x   C
u(x) = e  - ——————— e   + —
            sinh(2)       4
结果
数值积分:椭圆的周长
use russell_lab::algo::Quadrature;
use russell_lab::math::{elliptic_e, PI};
use russell_lab::{approx_eq, StrError};

fn main() -> Result<(), StrError> {
    //  Determine the perimeter P of an ellipse of length 2 and width 1
    //
    //      2π
    //     ⌠   ____________________
    // P = │ \╱ ¼ sin²(θ) + cos²(θ)  dθ
    //     ⌡
    //    0

    let mut quad = Quadrature::new();
    let args = &mut 0;
    let (perimeter, _) = quad.integrate(0.0, 2.0 * PI, args, |theta, _| {
        Ok(f64::sqrt(
            0.25 * f64::powi(f64::sin(theta), 2) + f64::powi(f64::cos(theta), 2),
        ))
    })?;
    println!("\nperimeter = {}", perimeter);

    // complete elliptic integral of the second kind E(0.75)
    let ee = elliptic_e(PI / 2.0, 0.75)?;

    // reference solution
    let ref_perimeter = 4.0 * ee;
    approx_eq(perimeter, ref_perimeter, 1e-14);
    Ok(())
}
寻找局部最小值和根
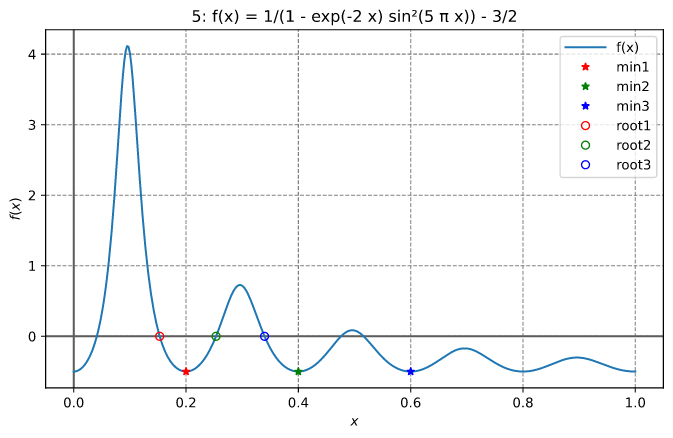
本例在0.1和0.3之间找到函数的局部最小值,在0.3和0.4之间找到根
输出看起来像
x_optimal = 0.20000000003467466

Number of function evaluations   = 18
Number of Jacobian evaluations   = 0
Number of iterations             = 18
Error estimate                   = unavailable
Total computation time           = 6.11µs

x_root = 0.3397874957748173

Number of function evaluations   = 10
Number of Jacobian evaluations   = 0
Number of iterations             = 9
Error estimate                   = unavailable
Total computation time           = 907ns
在区间内寻找所有根
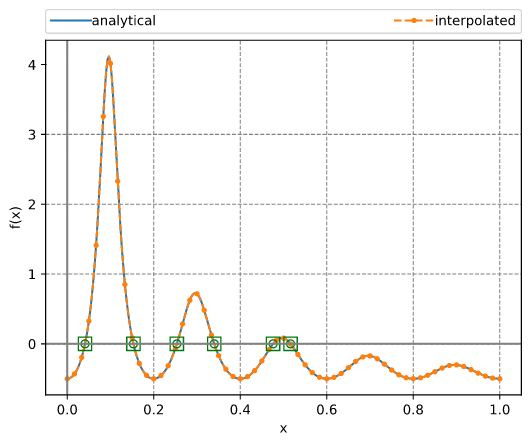
本例使用Chebyshev插值法在一个区间内找到函数的所有根。该方法使用自适应插值,然后计算伴随矩阵的特征值。这些特征值等于多项式的根。之后,应用简单的牛顿细化(抛光)算法。
输出看起来像
N = 184
roots =
┌                     ┐
│ 0.04109147217011577 │
│  0.1530172326889439 │
│ 0.25340124027487965 │
│ 0.33978749525956276 │
│ 0.47590538542276967 │
│  0.5162732673126048 │
└                     ┘
f @ roots =
┌           ┐
│  1.84E-08 │
│ -1.51E-08 │
│ -2.40E-08 │
│  9.53E-09 │
│ -1.16E-08 │
│ -5.80E-09 │
└           ┘
refined roots =
┌                     ┐
│ 0.04109147155278252 │
│ 0.15301723213859994 │
│ 0.25340124149692184 │
│   0.339787495774806 │
│ 0.47590538689192813 │
│  0.5162732665558162 │
└                     ┘
f @ refined roots =
┌           ┐
│  6.66E-16 │
│ -2.22E-16 │
│ -2.22E-16 │
│  1.33E-15 │
│  4.44E-16 │
│ -2.22E-16 │
└           ┘
函数和根在下图中所示。
参考文献
- Boyd JP (2002) 通过Chebyshev展开和多项式根查找在实区间上计算零点,SIAM数值分析杂志,40(5):1666-1682
- Boyd JP (2013) 查找单变量方程的零点:代理根查找器,Chebyshev插值和伴随矩阵,SIAM数值分析杂志,55(2):375-396.
- Boyd JP (2014) 解超越方程:Chebyshev多项式代理和其他数值根查找器,扰动级数,占卜师,第460页
计算伪逆矩阵
use russell_lab::{mat_pseudo_inverse, Matrix, StrError};

fn main() -> Result<(), StrError> {
    // set matrix
    let mut a = Matrix::from(&[
      [1.0, 0.0], //
      [0.0, 1.0], //
      [0.0, 1.0], //
    ]);
    let a_copy = a.clone();

    // compute pseudo-inverse matrix
    let mut ai = Matrix::new(2, 3);
    mat_pseudo_inverse(&mut ai, &mut a)?;

    // compare with solution
    let ai_correct = "┌                ┐\n\
                      │ 1.00 0.00 0.00 │\n\
                      │ 0.00 0.50 0.50 │\n\
                      └                ┘";
    assert_eq!(format!("{:.2}", ai), ai_correct);

    // compute a ⋅ ai
    let (m, n) = a.dims();
    let mut a_ai = Matrix::new(m, m);
    for i in 0..m {
        for j in 0..m {
            for k in 0..n {
                a_ai.add(i, j, a_copy.get(i, k) * ai.get(k, j));
            }
        }
    }

    // check: a ⋅ ai ⋅ a = a
    let mut a_ai_a = Matrix::new(m, n);
    for i in 0..m {
        for j in 0..n {
            for k in 0..m {
                a_ai_a.add(i, j, a_ai.get(i, k) * a_copy.get(k, j));
            }
        }
    }
    let a_ai_a_correct = "┌           ┐\n\
                          │ 1.00 0.00 │\n\
                          │ 0.00 1.00 │\n\
                          │ 0.00 1.00 │\n\
                          └           ┘";
    assert_eq!(format!("{:.2}", a_ai_a), a_ai_a_correct);
    Ok(())
}
矩阵可视化
我们可以使用名为vismatrix的神奇工具来可视化矩阵非零值的模式。使用vismatrix,我们可以点击每个圆圈并调查数值。
mat_write_vismatrix函数写入vismatrix的输入数据文件。
生成“dot-smat”文件后,运行以下命令
vismatrix /tmp/russell_lab/matrix_visualization.smat
输出

计算特征值和特征向量
use russell_lab::*;

fn main() -> Result<(), StrError> {
    // set matrix
    let data = [[2.0, 0.0, 0.0], [0.0, 3.0, 4.0], [0.0, 4.0, 9.0]];
    let mut a = Matrix::from(&data);

    // allocate output arrays
    let m = a.nrow();
    let mut l_real = Vector::new(m);
    let mut l_imag = Vector::new(m);
    let mut v_real = Matrix::new(m, m);
    let mut v_imag = Matrix::new(m, m);

    // perform the eigen-decomposition
    mat_eigen(&mut l_real, &mut l_imag, &mut v_real, &mut v_imag, &mut a)?;

    // check results
    assert_eq!(
        format!("{:.1}", l_real),
        "┌      ┐\n\
         │ 11.0 │\n\
         │  1.0 │\n\
         │  2.0 │\n\
         └      ┘"
    );
    assert_eq!(
        format!("{}", l_imag),
        "┌   ┐\n\
         │ 0 │\n\
         │ 0 │\n\
         │ 0 │\n\
         └   ┘"
    );

    // check eigen-decomposition (similarity transformation) of a
    // symmetric matrix with real-only eigenvalues and eigenvectors
    let a_copy = Matrix::from(&data);
    let lam = Matrix::diagonal(l_real.as_data());
    let mut a_v = Matrix::new(m, m);
    let mut v_l = Matrix::new(m, m);
    let mut err = Matrix::filled(m, m, f64::MAX);
    mat_mat_mul(&mut a_v, 1.0, &a_copy, &v_real, 0.0)?;
    mat_mat_mul(&mut v_l, 1.0, &v_real, &lam, 0.0)?;
    mat_add(&mut err, 1.0, &a_v, -1.0, &v_l)?;
    approx_eq(mat_norm(&err, Norm::Max), 0.0, 1e-15);
    Ok(())
}
Cholesky 分解
use russell_lab::*;

fn main() -> Result<(), StrError> {
    // set matrix
    let sym = 0.0;
    #[rustfmt::skip]
    let mut a = Matrix::from(&[
        [  4.0,   sym,   sym],
        [ 12.0,  37.0,   sym],
        [-16.0, -43.0,  98.0],
    ]);

    // perform factorization
    mat_cholesky(&mut a, false)?;

    // define alias (for convenience)
    let l = &a;

    // compare with solution
    let l_correct = "┌          ┐\n\
                     │  2  0  0 │\n\
                     │  6  1  0 │\n\
                     │ -8  5  3 │\n\
                     └          ┘";
    assert_eq!(format!("{}", l), l_correct);

    // check:  l ⋅ lᵀ = a
    let m = a.nrow();
    let mut l_lt = Matrix::new(m, m);
    for i in 0..m {
        for j in 0..m {
            for k in 0..m {
                l_lt.add(i, j, l.get(i, k) * l.get(j, k));
            }
        }
    }
    let l_lt_correct = "┌             ┐\n\
                        │   4  12 -16 │\n\
                        │  12  37 -43 │\n\
                        │ -16 -43  98 │\n\
                        └             ┘";
    assert_eq!(format!("{}", l_lt), l_lt_correct);
    Ok(())
}
读取表格格式的数据文件
目标是读取以下文件(clay-data.txt)
# Fujinomori clay test results

     sr        ea        er   # header
1.00000  -6.00000   0.10000
2.00000   7.00000   0.20000
3.00000   8.00000   0.20000   # << look at this line

# comments plus new lines are OK

4.00000   9.00000   0.40000
5.00000  10.00000   0.50000

# bye
以下代码说明了如何实现它。
每个列(sr,ea,er)可以通过[HashMap]的get方法访问。
use russell_lab::{read_table, StrError};
use std::collections::HashMap;
use std::env;
use std::path::PathBuf;

fn main() -> Result<(), StrError> {
    // get the asset's full path
    let root = PathBuf::from(env::var("CARGO_MANIFEST_DIR").unwrap());
    let full_path = root.join("data/tables/clay-data.txt");

    // read the file
    let labels = &["sr", "ea", "er"];
    let table: HashMap<String, Vec<f64>> = read_table(&full_path, Some(labels))?;

    // check the columns
    assert_eq!(table.get("sr").unwrap(), &[1.0, 2.0, 3.0, 4.0, 5.0]);
    assert_eq!(table.get("ea").unwrap(), &[-6.0, 7.0, 8.0, 9.0, 10.0]);
    assert_eq!(table.get("er").unwrap(), &[0.1, 0.2, 0.2, 0.4, 0.5]);
    Ok(())
}
关于列主序表示的说明
这里只考虑了列主序表示。
    ┌     ┐  row_major = {0, 3,
    │ 0 3 │               1, 4,
A = │ 1 4 │               2, 5};
    │ 2 5 │
    └     ┘  col_major = {0, 1, 2,
    (m × n)               3, 4, 5}

Aᵢⱼ = col_major[i + j·m] = row_major[i·n + j]
        ↑
COL-MAJOR IS ADOPTED HERE
使用列主序表示的主要原因是为了让代码更好地与用Fortran编写的BLAS/LAPACK一起工作。尽管这些库有处理行主序数据的函数,但它们通常由于临时内存分配和复制而增加开销,包括转置矩阵。此外,某些BLAS/LAPACK库的行主序版本产生错误的结果(特别是DSYEV)。
基准测试
需要安装
cargo install cargo-criterion
使用以下命令运行基准测试
bash ./zscripts/benchmark.bash
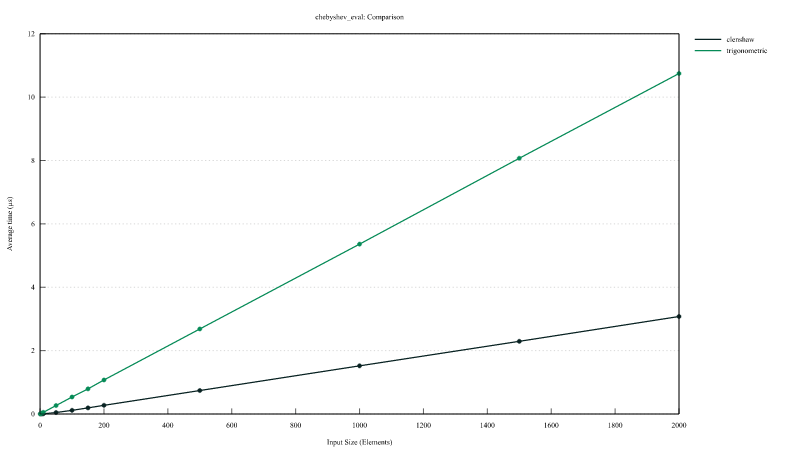
切比雪夫多项式评估
InterpChebyshev::eval实现Clenshaw算法和InterpChebyshev::eval_using_trig使用三角函数实现的功能的性能比较。
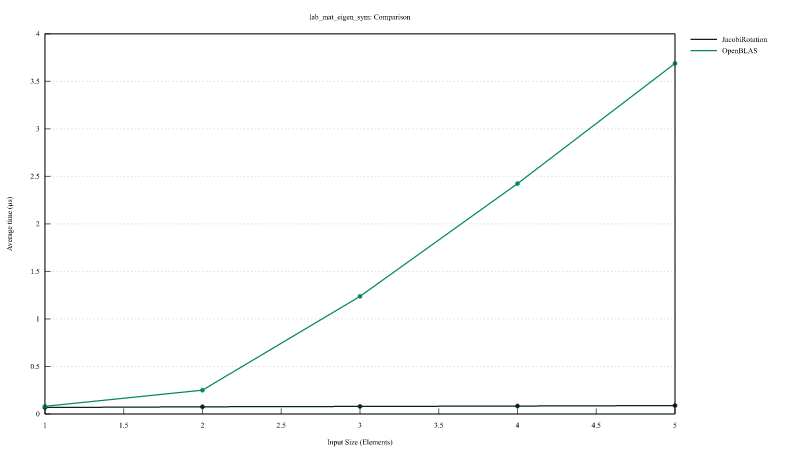
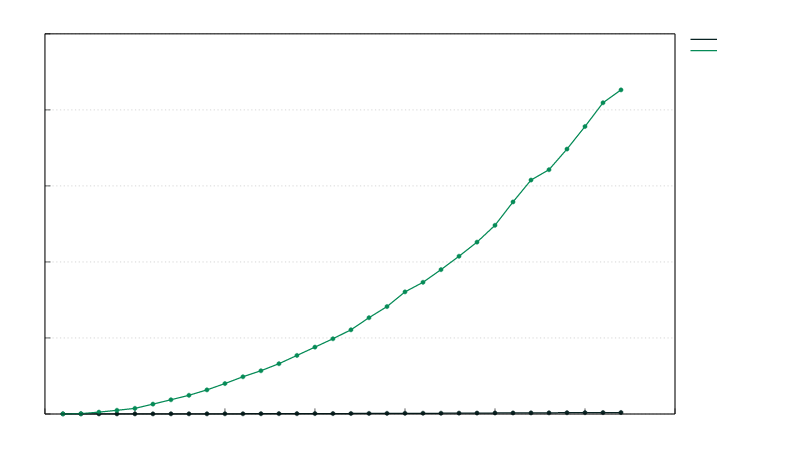
雅可比旋转与 LAPACK DSYEV 的比较
mat_eigen_sym_jacobi(Jacobi旋转)与mat_eigen_sym(调用LAPACK DSYEV)的性能比较。
开发人员注意事项
c_code目录包含对BLAS库(OpenBLAS或Intel MKL)的薄包装器c_code目录还包含对C数学函数的包装器build.rs文件使用cratecc来构建C包装器
