6个稳定版本
| 1.5.0 | 2020年11月8日 |
|---|---|
| 1.4.0 | 2020年11月7日 |
| 1.3.0 | 2020年10月12日 |
#1798 在 算法 中
每月40次 下载
在 4 个crate(3 个直接) 中使用
48KB
1K SLoC
图像密度/高度图到网格生成器
![]()
关于
用于从表示密度/高度图的图像生成2D网格的crate。
算法获取源图像

将其转换为密度/高度值(此处从alpha通道)

然后制作陡度值

并根据最高陡度点构建网格

Rust API
重要模块
- https://crates.io/crates/density-mesh-core - 用于从密度图生成网格的模块。
- https://crates.io/crates/density-mesh-image - 用于从图像生成密度图的模块。
典型用例是使用这两个模块从图像创建网格,但如果您有自己的图像处理程序,则可以坚持使用核心模块并自行生成密度图。
处理块
过去,有一种使用块来优化大图工作的方式,但这些块没有提供可靠的拓扑,因此必须删除。
实时密度网格修改
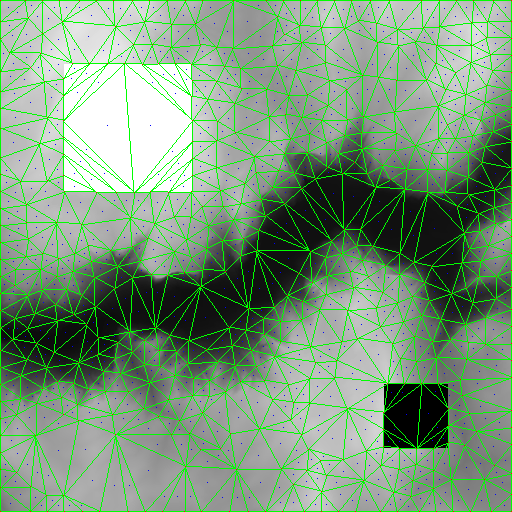
想象一下,您有一个大网格,您想修改网格的可变大小区域,而不想将其分成块 - 对于这种用例,有一个专门的 DensityMeshGenerator 类型。请注意,目前,即使只修改地图的非常智能的部分,整个网格也将被重建,这意味着对于大地图,这可能需要很长时间,这意味着,目前不应使用此crate进行高性能、高清地图生成。
let image = DynamicImage::ImageRgba8(
    image::open("../resources/heightmap.png")
        .expect("Cannot open file")
        .to_rgba(),
);
let settings = GenerateDensityImageSettings::default();
let map = generate_densitymap_from_image(image.clone(), &settings)
    .expect("Cannot produce density map image");
let settings = GenerateDensityMeshSettings {
    points_separation: 16.0.into(),
    keep_invisible_triangles: true,
    ..Default::default()
};
let mut generator = DensityMeshGenerator::new(vec![], map, settings.clone());
generator.process_wait().expect("Cannot process changes");
generator
    .change_map(64, 64, 128, 128, vec![255; 128 * 128], settings.clone())
    .expect("Cannot change live mesh map region");
generator
    .process_wait()
    .expect("Cannot process live changes");
generator
    .change_map(384, 384, 64, 64, vec![0; 64 * 64], settings)
    .expect("Cannot change live mesh map region");
generator
    .process_wait()
    .expect("Cannot process live changes");
let mut image = DynamicImage::ImageRgba8(
    generate_image_from_densitymap(generator.map(), false).to_rgba(),
);
apply_mesh_on_map(&mut image, generator.mesh().unwrap());
image
    .save("../resources/heightmap.live.png")
    .expect("Cannot save output image");
因此,我们添加了两个实心矩形,结果看起来像这样

地图区域更改的优化
旧版本有一个实时网格生成器,它只重新生成给定区域更改的网格部分 - 目前不再支持此功能,因为存在网格生成器在内部使用此功能时崩溃的边缘情况,使得使用此功能不可靠。此功能将在重新设计后添加。
命令行界面
安装/更新
cargo install density-mesh-cli --force
示例
density-mesh mesh -i image.png -o mesh.obj --obj
选项
density-mesh-cli 1.4.0
Patryk 'PsichiX' Budzynski <psichix@gmail.com>
CLI app for density mesh generator

USAGE:
    density-mesh.exe [SUBCOMMAND]

FLAGS:
    -h, --help       Prints help information
    -V, --version    Prints version information

SUBCOMMANDS:
    help     Prints this message or the help of the given subcommand(s)
    image    Produce density map image
    mesh     Produce density mesh
density-mesh.exe-image
Produce density map image

USAGE:
    density-mesh.exe image [FLAGS] [OPTIONS] --input <PATH> --output <PATH>

FLAGS:
    -h, --help         Prints help information
    -s, --steepness    Produce steepness image
    -V, --version      Prints version information
        --verbose      Display settings used

OPTIONS:
        --density-source <NAME>    Density source: luma, luma-alpha, red, green, blue, alpha [default: luma-alpha]
    -i, --input <PATH>             Input image file
    -o, --output <PATH>            Output image file
        --scale <INTEGER>          Image scale [default: 1]
density-mesh.exe-mesh
Produce density mesh

USAGE:
    density-mesh.exe mesh [FLAGS] [OPTIONS] --input <PATH> --output <PATH> <--json|--json-pretty|--yaml|--obj|--png>

FLAGS:
    -h, --help                        Prints help information
        --json                        Produce JSON mesh
        --json-pretty                 Produce pretty JSON mesh
        --keep-invisible-triangles    Keep invisible triangles
        --obj                         Produce OBJ mesh
        --png                         Produce PNG mesh visualization
    -V, --version                     Prints version information
        --verbose                     Display settings used
        --yaml                        Produce YAML mesh

OPTIONS:
        --density-source <NAME>            Density source: luma, luma-alpha, red, green, blue, alpha [default: luma-
                                           alpha]
        --extrude-size <NUMBER>            Extrude size
    -i, --input <PATH>                     Input image file
        --max-iterations <INTEGER>         Maximum tries number when finding point to place [default: 32]
    -o, --output <PATH>                    Output mesh file
        --points-separation <NUMBER>       Points separation [default: 10]
        --scale <INTEGER>                  Image scale [default: 1]
        --steepness-threshold <NUMBER>     Steepness threshold [default: 0.01]
        --update-region-margin <NUMBER>    Margin around update region box [default: 0]
        --visibility-threshold <NUMBER>    VIsibility threshold [default: 0.01]
依赖项
~12MB
~72K SLoC