16 个版本 (8 个破坏性更新)
| 0.10.0 | 2024年2月3日 |
|---|---|
| 0.9.3 | 2022年4月30日 |
| 0.9.1 | 2021年7月14日 |
| 0.7.1 | 2021年3月29日 |
| 0.1.1 | 2020年11月28日 |
#829 in 命令行工具
每月下载量 75
140KB
3K SLoC
Gooseberry - 为懒惰的人设计的知识库
Gooseberry 提供
- Hypothesis(一个用于注释网页的工具)的命令行界面
- 让您无需亲自输入知识即可生成知识库维基。

使用 asciinema,svg-term-cli 和 svgembed 构建
这演示了交互式搜索功能。 Enter 添加新标签,Shift-Left 删除标签,Shift-Right 删除注释。(待办事项:在 GIF 中嵌入按键)(待办事项:嵌入按键)
安装
安装要求
二进制文件
请参阅 发布。
- OSX - 通过系统偏好设置允许
gooseberry(在至少是 Catalina 上是必要的) - Linux -
chmod +x gooseberry - 目前,Windows 上无法使用(等待 此问题)
通过 brew(OSX)
brew tap out-of-cheese-error/gooseberry && brew install gooseberry
AUR
现在 gooseberry 也可在 Arch User Repo 这里 找到
贡献
请参阅 CONTRIBUTING.md 了解 Gooseberry 的工作原理以及可以改进的内容。
动机
是的,知识库工具已经过时,到处都是,我们真的没有借口没有一个大杂烩文件夹的 Markdown 文件来填充我们过剩的智慧。但是,经过一整天的编写代码、论文和任务,阅读时间也需要打字时间来记录所有这些知识,这显然是不公平的。如果我们不亲自打字,我们漂亮的知识库就会变得空洞、空虚和悲伤。
欢迎使用Gooseberry——一款在阅读新闻文章、博客文章、论文等时,通过高亮和标注段落来构建知识库的工具。Gooseberry结合了Hypothesis提供的标注便捷性([Hypothesis](https://web.hypothes.is/))、命令行中的批量标记和组织支持,以及可定制的plaintext wiki和HandleBars模板。
典型工作流程
- 找到要阅读的文章、博客文章、论文等。
- 高亮您想以后记住的行和事实。如果您愿意,可以提前添加注释和标签,但重点也可以只放在阅读和高亮上,而不必过多考虑做笔记。
- 通常情况下,当一个人深入研究一个主题时,会打开50个关于子主题的标签页。没关系,继续阅读和高亮,我们会回来处理这些的。
- 最后,当您对知识的渴望得到满足后,打开终端并运行
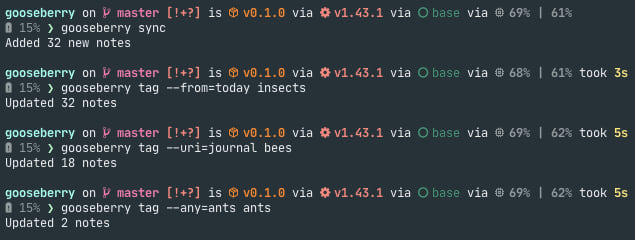
gooseberry sync来下载您所有的最新高亮和标注。gooseberry tag --from "9a.m." 主题来为今天早上阅读的所有内容添加您正在研究的主题标签。这个子命令非常灵活。您可以通过网站来标记某些内容,例如,子主题B的维基百科页面上的所有标注都可以标记为B。或者,打开search来搜索您的标注,并为所有匹配搜索查询的内容添加标签(或删除标签和标注)。标签非常可嵌套,一定要充分利用这一点——例如,今天所有的标注可能都关于主题A,其中五个也是子主题B等。gooseberry make将所有这些新标记的信息添加到您的知识库中。
以下是一个例子。今天我阅读并标注了三篇关于昆虫的文章:这篇Nautilus文章《我们比它们更需要昆虫》,这篇关于蜜蜂和杀虫剂的研究,以及一篇关于“anternet”的Atlantic文章。
我已经同步并标记了这些标注

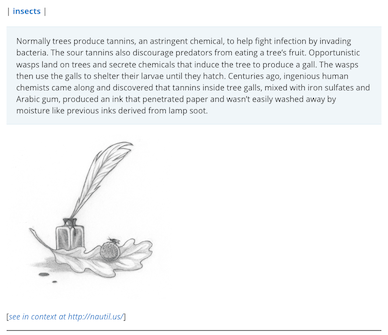
然后运行gooseberry make来制作一个mdBook风格的wiki,我可以在浏览器中打开它

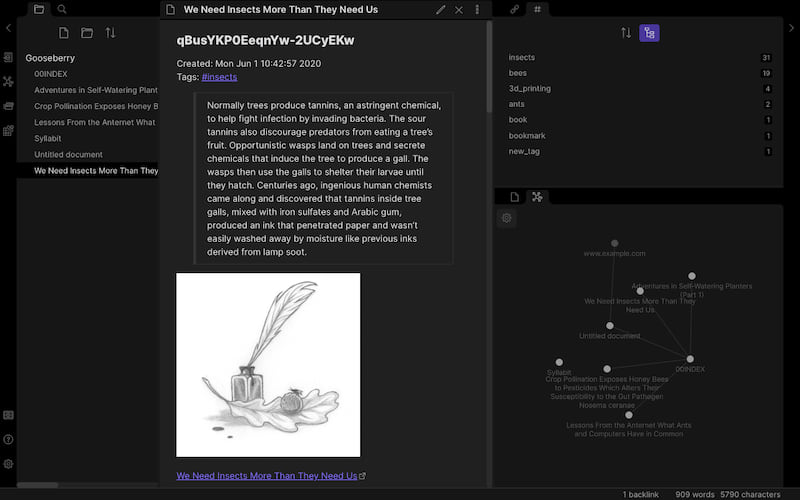
或者一个Obsidian风格的wiki,标注根据文档/网页标题分组到文件夹中

标注文本只是markdown,因此文本格式、LaTeX、图片等等也都适用!

标注模板是可配置的,文件夹和分组结构也是如此。每个标注都可以链接回您获取标注的网站位置,如果您觉得缺少上下文。
一些优点
- 除非您想做笔记,否则在阅读时几乎不需要打字。
- 如果您想做笔记,做笔记时不需要切换窗口。
- 即使不使用wiki功能,您也会得到一个CLI来快速标记您的Hypothesis标注。
- 即使不使用标记功能,您也会得到一个相当酷的wiki,列出您所有的标注。
- 由于它只是plaintext,并且模板可以自定义,您可以将它与任何接受plaintext文件的知识库系统(如Obsidian、mdBook、org-mode、vim-wiki等)集成。
用法
Usage: gooseberry [OPTIONS] <COMMAND>

Commands:
  sync      Sync newly added or updated Hypothesis annotations
  search    Opens a search buffer to filter annotations. Has keyboard shortcuts for deleting annotations, modifying tags, and creating knowledge-base files
  tag       Tag annotations according to topic
  delete    Delete annotations in bulk
  view      View (optionally filtered) annotations
  uri       Get the set of URIs from a list of (optionally filtered) annotations
  make      Create knowledge-base text files using optionally filtered annotations
  index     Create an index file using hierarchy and optionally filtered annotations
  complete  Generate shell completions
  config    Manage configuration
  clear     Clear all gooseberry data
  move      Move (optionally filtered) annotations from a different hypothesis group to Gooseberry's
  help      Print this message or the help of the given subcommand(s)

Options:
  -c, --config <CONFIG>  Location of config file (uses default XDG location or environment variable if not given) [env: GOOSEBERRY_CONFIG=]
  -h, --help             Print help
默认的TOML配置文件位于
- Linux:
/home/<username>/.config - Mac:
/Users/<username>/Library/Preferences
通过创建一个配置文件并通过以下命令修改内容来更改此设置:gooseberry config default > config.toml。然后,您可以使用此配置文件,通过以下命令使用:gooseberry -c path/to/config.toml <subcommand>,或者通过设置环境变量$GOOSEBERRY_CONFIG指向该文件。
您可以通过设置环境变量$HYPOTHESIS_NAME和$HYPOTHESIS_KEY为您自己的用户名和开发者API令牌,或者运行gooseberry config authorize来授权Hypothesis。
Gooseberry从给定的Hypothesis组中获取注释,您可以使用gooseberry config group创建或设置这些组。这将自动同步这些组中的所有现有注释。
使用gooseberry sync同步新添加的注释。
search命令提供了一个交互式搜索界面来查找您的注释(可选地使用以下筛选选项进行预筛选)。每个注释都使用注释模板(通过gooseberry config kb annotation配置并描述如下)进行渲染。该界面支持以下快捷键:箭头键滚动,Tab键切换选择,Ctrl-A选择所有,Esc取消,Enter添加标签,Shift-Left删除标签,Shift-Right删除注释,Shift-Down创建知识库文件,Shift-Up打印URI集合。
您也可以使用tag、delete、view、uri、make和index命令在不使用交互式界面的情况下完成这些任务。
注意:标签和删除将同步到Hypothesis!
筛选
您可以使用以下选项在大多数Gooseberry命令中筛选您想要修改或导出的注释:
      --from <FROM>
          Only annotations created after this date and time

          Can be colloquial, e.g. "last Friday 8pm"

      --before <BEFORE>
          Only annotations created before this date and time

          Can be colloquial, e.g. "last Friday 8pm"

  -i, --include-updated
          Include annotations updated in given time range (instead of just created)

      --uri <URI>
          Only annotations with this pattern in their URL

          Doesn't have to be the full URL, e.g. "wikipedia"

          [default: ]

      --any <ANY>
          Only annotations with this pattern in their `quote`, `tags`, `text`, or `uri`

          [default: ]

      --tags <TAGS>
          Only annotations with ANY of these tags (use --and to match ALL)

      --groups <GROUPS>
          Only annotations from these groups

      --exclude-tags <EXCLUDE_TAGS>
          Only annotations without ANY of these tags

      --quote <QUOTE>
          Only annotations that contain this text inside the text that was annotated

          [default: ]

      --text <TEXT>
          Only annotations that contain this text in their textual body

          [default: ]

  -n, --not
          Annotations NOT matching the given filter criteria

      --and
          (Use with --tags) Annotations matching ALL of the given tags

  -p, --page
          Only page notes

  -a, --annotation
          Only annotations (i.e exclude page notes)
知识库
gooseberry make命令用于生成使用(可选筛选的)注释的知识库文件。默认情况下,它还会生成一个索引文件(由index和link配置选项配置)- 使用--no-index可以禁用。使用gooseberry index仅生成索引文件。
知识库的配置选项如下:
Usage: gooseberry config kb <COMMAND>

Commands:
  all         Change everything related to the knowledge base
  directory   Change knowledge base directory
  annotation  Change annotation handlebars template
  page        Change page handlebars template
  link        Change index link handlebars template
  index       Change index file name
  extension   Change knowledge base file extension
  hierarchy   Change folder & file hierarchy
  sort        Change sort order of annotations within a page
  ignore      Set which tags to ignore
  nest        Set string defining nested tags (e.g "/" => parent/child)
  help        Print this message or the help of the given subcommand(s)
您可以通过运行gooseberry config kb all或更改配置文件中相应的键来一次性设置所有知识库配置选项(在gooseberry config where中找到)。
重要:知识库目录在每次同步时都会被清除,因此如果您与其他笔记一起存储Hypothesis注释,请确保创建一个单独的文件夹。
注释模板
注释模板用于渲染单个注释。模板内可以使用以下键:
{{ id }}- 注释IDcreated- 创建日期。与date_format助手一起使用(有关格式选项,请参阅此处)updated- 最后修改日期。与date_format助手一起使用(有关格式选项,请参阅此处){{ user }}- 以acct:<username>@<authority>格式化的用户账户 ID{{ uri }}- 正在被注释的页面的 URI(这可能是一个网站 URL 或 PDF URN){{ base_uri }}- URI 的基础网站,即只包含协议和域名。{{ title }}- 网页/文章/文档的标题{{ incontext }}- 在上下文中注释的链接(打开 Hypothesis 侧边栏并聚焦于注释)highlight- 文档中选定的/高亮显示的行的列表(由换行符分隔){{ text }}- 注释主体的文本内容tags- 与注释相关联的标签列表。{{ group }}- Hypothesis 群组 ID{{ group_name }}- Hypothesis 群组名称references- 指引用注释的任何注释的注释 ID(例如,是对注释的回复){{ display_name }}- 注释创建者的显示名称。这可能未设置。
有关模板的更多信息,请参阅 Handlebars 语言指南。您还可以利用来自 handlebars_misc_helpers 的助手。
以下显示了使用列表键和格式化日期的不同系统的示例
- mdBook
##### {{date_format "%c" created}} - *{{id}}*

{{#each tags}}| [{{this}}]({{this}}.md) {{#if @last}}|{{/if}}{{/each}}

{{#each highlight}}> {{this}}{{/each}}

{{text}}

[See in context]({{incontext}})
渲染为
##### Sat Jan 16 11:12:49 2021 - *test*

| [tag1](tag1.md) | [tag2](tag2.md) |

> exact text highlighted in website

testing annotation

[See in context](https://incontext_link.com)
这使得每个标签都成为链接到包含具有该标签注释的专用页面的链接 - 您可以通过配置层次结构来设置此功能(hierarchy = ["tag"])。
- Obsidian
### {{id}}

Created: {{date_format "%c" created}} Tags: {{#each tags}}#{{this}}{{#unless @last}}, {{/unless}}{{/each}}

{{#each highlight}}> {{this}}{{/each}}

{{text}}

[See in context]({{incontext}})
渲染为
### test

Created: Sat Jan 16 10:22:20 2021 Tags: #tag1, #tag2

> exact text highlighted in website

testing annotation
这使用 #tags,因为 Obsidian 喜欢这些。
待办事项:添加 org-mode 示例
页面模板
《page》模板用于渲染注释的单页(不是索引页)。以下键可以在模板内部使用
{{ name }}- 文件名{{ relative_path }}- 相对于KB目录的路径{{ absolute_path }}- 文件系统上的完整路径annotations- 根据注释模板渲染的注释列表raw_annotations- 注释列表(如果你需要有关页面注释的信息 - 例如,{{raw_annotations.0.title}})
默认模板是
# {{name}}

{{#each annotations}}{{this}}{{/each}}
将注释分组到文件夹和页面中
《hierarchy》配置定义了知识库的文件夹和文件结构看起来如何,以及哪些注释在哪些页面上。可用的选项有
- 空 - 将
hierarchy = []设置为使所有注释都在索引页上渲染。 - 标签 - 根据标签对注释进行分组
- URI - 根据URI对注释进行分组
- BaseURI - 根据基础URI对注释进行分组
- 标题 - 根据网页/文章/文档的标题对注释进行分组
- ID - 根据注释ID进行分组
- 分组 - 根据分组ID进行分组
- 分组名称 - 根据分组名称进行分组
将多个层次结构组合起来,形成文件夹和子文件夹,最后一个条目定义页面。
例如:
hierarchy = ["Group", "Tag"]将为每个组创建一个单独的文件夹。在每个文件夹内将会有一个页面,页面包含带有该标签的注释。
hierarchy = ["Tag"]给出了上面 mdbook 图中的结构,即没有文件夹,每个标签都有一个页面。
在页面内排序注释
《sort》配置定义了注释在每个页面内如何排序。可用的选项有
- 标签 - 根据标签排序(多个标签被视为 "tag1,tag2,tag3" 进行排序)
- URI
- BaseURI
- 标题
- ID
- 分组
- 分组名称
- 创建时间
- 更新时间
可以按照优先级组合多个排序选项,例如 sort = ["Tag", "Created"] 按标签排序,然后按创建日期排序。
索引链接模板
link 模板控制索引文件中每个链接的渲染方式。可用的键有
{{ name }}- 文件名{{ relative_path }}- 相对于KB目录的路径{{ absolute_path }}- 文件系统上的完整路径
示例
- mdBook
- [{{name}}]({{relative_path}})
- Obsidian
- [[{{name}}]]
创建内部链接,或
- ![[{{name}}]]
转储文件
- Org-mode
- [[{{relative_path}}][{{name}}]]
其他选项
index- 设置索引文件的名称,例如mdbook需要将其设置为 "SUMMARY",在 Obisidan 中可以使用 "00INDEX" 以便在文件资源管理器中首先显示。ignore- 设置在创建知识库时忽略的标签列表。注意:带有忽略标签的注释仍将包含在search和tag命令中nest- 定义用于嵌套标签的模式。例如,如果nested_tag = "/",则 "parent/child" 标签与hierarchy = ["Tag"]结合将创建一个包含 "child" 文件的 "parent" 文件夹。注意:逗号 (",") 和分号 (";") 不应出现在标签中,因为它们是 Gooseberry 的分隔符extension- 设置知识库文件的文件扩展名。例如 "md","org","txt" 等。注意:不要在扩展名中包含点号 (.)
为什么叫 "Gooseberry"?
因为当涉及到名称时,Discworld 从来不会让我失望:Dis-organizer Mark 5, the Gooseberry
依赖关系
~34–50MB
~835K SLoC
