13 个版本 (7 个重大更改)
| 0.8.2 | 2022年2月7日 |
|---|---|
| 0.8.1 | 2021年3月26日 |
| 0.8.0 | 2020年2月26日 |
| 0.7.1 | 2019年11月19日 |
#379 in 图像
在 texture-synthesis-cli 中使用
110KB
2.5K SLoC
🎨 texture-synthesis
![]()
![]()
![]()
![]()
![]()
![]()
Rust 语言的轻量级 API,用于 Multiresolution Stochastic Texture Synthesis [1],这是一种基于示例的非参数图像生成算法。
仓库还包含多个代码示例(附带测试图像)以帮助您入门,您可以在发布标签下找到具有命令行界面的编译二进制文件。
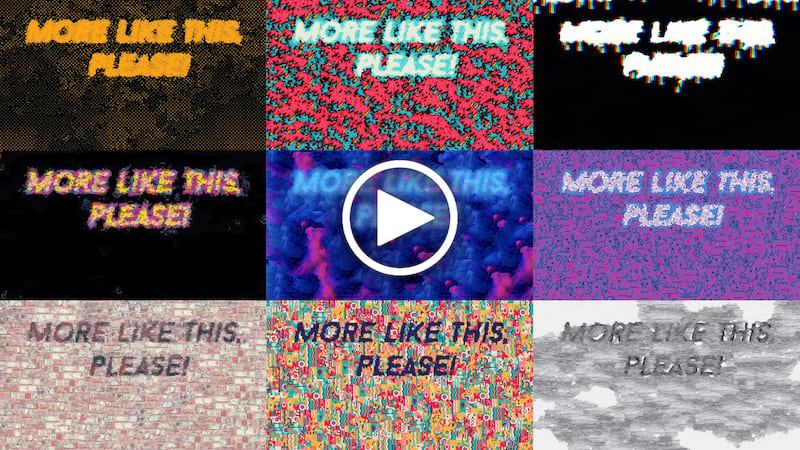
还可以查看我们的演讲 类似这样的内容,请!从单个示例进行纹理合成和混搭,其中更深入地解释了这项技术和背景。
功能和示例
1. 单个示例生成

从单个示例生成类似外观的图像。
API - 01_single_example_synthesis
use texture_synthesis as ts;

fn main() -> Result<(), ts::Error> {
    //create a new session
    let texsynth = ts::Session::builder()
        //load a single example image
        .add_example(&"imgs/1.jpg")
        .build()?;

    //generate an image
    let generated = texsynth.run(None);

    //save the image to the disk
    generated.save("out/01.jpg")
}
CLI
cargorun --release ----out out/01.jpg generate imgs/1.jpg
使用此仓库提供的图像,您应该会得到以下结果

2. 多个示例生成

我们还可以提供多个示例图像,算法将“混搭”它们生成新的图像。
API - 02_multi_example_synthesis
use texture_synthesis as ts;

fn main() -> Result<(), ts::Error> {
    // create a new session
    let texsynth = ts::Session::builder()
        // load multiple example image
        .add_examples(&[
            &"imgs/multiexample/1.jpg",
            &"imgs/multiexample/2.jpg",
            &"imgs/multiexample/3.jpg",
            &"imgs/multiexample/4.jpg",
        ])
        // we can ensure all of them come with same size
        // that is however optional, the generator doesnt care whether all images are same sizes
        // however, if you have guides or other additional maps, those have to be same size(s) as corresponding example(s)
        .resize_input(ts::Dims {
            width: 300,
            height: 300,
        })
        // randomly initialize first 10 pixels
        .random_init(10)
        .seed(211)
        .build()?;

    // generate an image
    let generated = texsynth.run(None);

    // save the image to the disk
    generated.save("out/02.jpg")?;

    //save debug information to see "remixing" borders of different examples in map_id.jpg
    //different colors represent information coming from different maps
    generated.save_debug("out/")
}
CLI
cargorun --release ----rand-init 10 --seed 211 --in-size 300x300 -o out/02.png --debug-out-dir out generate imgs/multiexample/1.jpg imgs/multiexample/2.jpg imgs/multiexample/3.jpg imgs/multiexample/4.jpg
使用此仓库提供的图像,您应该会得到以下结果

3. 引导合成

我们还可以通过提供“从...到...”的转换形式为引导图来引导生成
API - 03_guided_synthesis
use texture_synthesis as ts;

fn main() -> Result<(), ts::Error> {
    let texsynth = ts::Session::builder()
        // NOTE: it is important that example(s) and their corresponding guides have same size(s)
        // you can ensure that by overwriting the input images sizes with .resize_input()
        .add_example(ts::Example::builder(&"imgs/2.jpg").with_guide(&"imgs/masks/2_example.jpg"))
        // load target "heart" shape that we would like the generated image to look like
        // now the generator will take our target guide into account during synthesis
        .load_target_guide(&"imgs/masks/2_target.jpg")
        .build()?;

    let generated = texsynth.run(None);

    // save the image to the disk
    generated.save("out/03.jpg")
}
CLI
cargorun --release ---o out/03.png generate --target-guide imgs/masks/2_target.jpg --guides imgs/masks/2_example.jpg -- imgs/2.jpg
注意:注意使用 -- 来分隔到示例路径 imgs/2.jpg,如果不指定 --,则示例路径将被用作另一个引导路径,且将没有示例。
使用此仓库提供的图像,您应该会得到以下结果

4. 风格迁移

纹理合成API支持自动生成示例引导图,从而产生类似风格迁移的效果。
API - 04_style_transfer
use texture_synthesis as ts;

fn main() -> Result<(), ts::Error> {
    let texsynth = ts::Session::builder()
        // load example which will serve as our style, note you can have more than 1!
        .add_examples(&[&"imgs/multiexample/4.jpg"])
        // load target which will be the content
        // with style transfer, we do not need to provide example guides
        // they will be auto-generated if none were provided
        .load_target_guide(&"imgs/tom.jpg")
        .guide_alpha(0.8)
        .build()?;

    // generate an image that applies 'style' to "tom.jpg"
    let generated = texsynth.run(None);

    // save the result to the disk
    generated.save("out/04.jpg")
}
CLI
cargorun --release ----alpha 0.8 -o out/04.png transfer-style --style imgs/multiexample/4.jpg --guide imgs/tom.jpg
使用此仓库提供的图像,您应该会得到以下结果

5. 填充

我们还可以使用填充来补充缺失的信息。通过更改种子,我们将获得不同的“填充”版本。
API - 05_inpaint
use texture_synthesis as ts;

fn main() -> Result<(), ts::Error> {
    let texsynth = ts::Session::builder()
        // let the generator know which part we would like to fill in
        // if we had more examples, they would be additional information
        // the generator could use to inpaint
        .inpaint_example(
            &"imgs/masks/3_inpaint.jpg",
            // load a "corrupted" example with missing red information we would like to fill in
            ts::Example::builder(&"imgs/3.jpg")
                // we would also like to prevent sampling from "corrupted" red areas
                // otherwise, generator will treat that those as valid areas it can copy from in the example,
                // we could also use SampleMethod::Ignore to ignore the example altogether, but we
                // would then need at least 1 other example image to actually source from
                // example.set_sample_method(ts::SampleMethod::Ignore);
                .set_sample_method(&"imgs/masks/3_inpaint.jpg"),
            // Inpaint requires that inputs and outputs be the same size, so it's a required
            // parameter that overrides both `resize_input` and `output_size`
            ts::Dims::square(400),
        )
        // Ignored
        .resize_input(ts::Dims::square(200))
        // Ignored
        .output_size(ts::Dims::square(100))
        .build()?;

    let generated = texsynth.run(None);

    //save the result to the disk
    generated.save("out/05.jpg")
}
CLI
请注意,使用填充时,--out-size 参数决定了所有输入和输出的尺寸!
cargorun --release ----out-size 400 --inpaint imgs/masks/3_inpaint.jpg -o out/05.png generate imgs/3.jpg
使用此仓库提供的图像,您应该会得到以下结果

6. 填充通道
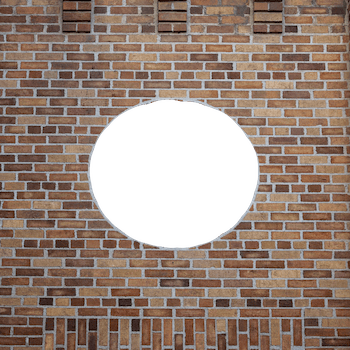
我们不必使用单独的图像作为填充掩码,而是可以获取特定通道的信息。在这个示例中,alpha通道是图像正中央的一个圆圈。
API - 06_inpaint_channel
use texture_synthesis as ts;

fn main() -> Result<(), ts::Error> {
    let texsynth = ts::Session::builder()
        // Let the generator know that it is using
        .inpaint_example_channel(
            ts::ChannelMask::A,
            &"imgs/bricks.png",
            ts::Dims::square(400),
        )
        .build()?;

    let generated = texsynth.run(None);

    //save the result to the disk
    generated.save("out/06.jpg")
}
CLI
cargorun --release ----inpaint-channel a -o out/06.png generate imgs/bricks.jpg
使用此仓库提供的图像,您应该会得到以下结果

7. 平铺纹理

我们可以使生成的图像平铺(这意味着如果你将多个图像并排放置,则不会有缝隙)。通过调用填充模式和平铺一起,我们可以使现有图像平铺。
API - 07_tiling_texture
use texture_synthesis as ts;

fn main() -> Result<(), ts::Error> {
    // Let's start layering some of the "verbs" of texture synthesis
    // if we just run tiling_mode(true) we will generate a completely new image from scratch (try it!)
    // but what if we want to tile an existing image?
    // we can use inpaint!

    let texsynth = ts::Session::builder()
        // load a mask that specifies borders of the image we can modify to make it tiling
        .inpaint_example(
            &"imgs/masks/1_tile.jpg",
            ts::Example::new(&"imgs/1.jpg"),
            ts::Dims::square(400),
        )
        //turn on tiling mode!
        .tiling_mode(true)
        .build()?;

    let generated = texsynth.run(None);

    generated.save("out/07.jpg")
}
CLI
cargorun --release ----inpaint imgs/masks/1_tile.jpg --out-size 400 --tiling -o out/07.bmp generate imgs/1.jpg
使用此仓库提供的图像,您应该会得到以下结果

8. 在新图像上重复纹理合成变换

我们可以将纹理合成执行的坐标变换重新应用于新图像。
API - 08_repeat_transform
use texture_synthesis as ts;

fn main() -> Result<(), ts::Error> {
    // create a new session
    let texsynth = ts::Session::builder()
        //load a single example image
        .add_example(&"imgs/1.jpg")
        .build()?;

    // generate an image
    let generated = texsynth.run(None);

    // now we can apply the same transformation of the generated image
    // onto a new image (which can be used to ensure 1-1 mapping between multiple images)
    // NOTE: it is important to provide same number of input images as the
    // otherwise, there will be coordinates mismatch
    let repeat_transform_img = generated
        .get_coordinate_transform()
        .apply(&["imgs/1_bw.jpg"])?;

    // save the image to the disk
    // 08 and 08_repeated images should match perfectly
    repeat_transform_img.save("out/08_repeated.jpg").unwrap();
    generated.save("out/08.jpg")
}
CLI
- 首先,我们需要创建一个可重用的变换
这里值得注意的是 --save-transform out/multi.xform,它创建了一个可以用来生成新输出的文件。
cargorun --release ----rand-init 10 --seed 211 --in-size 300x300 -o out/02.png generate --save-transform out/multi.xform imgs/multiexample/1.jpg imgs/multiexample/2.jpg imgs/multiexample/3.jpg imgs/multiexample/4.jpg
- 接下来,我们使用
repeat子命令来重复变换,并使用不同的输入
这里重要的是使用 repeat 子命令而不是 generate,以及 --transform out/multi.xform,它告诉应用什么变换到输入。唯一的要求是,你指定的图像数量必须与原始示例数量“完全”匹配。如果输入图像的尺寸与示例图像不同,它们将被自动调整大小。
cargorun --release ---o out/02-repeated.png repeat --transform out/multi.xform imgs/multiexample/1.jpg imgs/multiexample/2.jpg imgs/multiexample/4.jpg imgs/multiexample/3.jpg
还要注意的是,与 generate 一起使用的常规参数不适用于 repeat 子命令,将被忽略。
9. 样本掩码
样本掩码允许您指定在生成过程中如何采样示例图像。
API - 09_sample_masks
use texture_synthesis as ts;

fn main() -> Result<(), ts::Error> {
    let session = ts::Session::builder()
        .add_example(
            ts::Example::builder(&"imgs/4.png").set_sample_method(ts::SampleMethod::Ignore),
        )
        .add_example(ts::Example::builder(&"imgs/5.png").set_sample_method(ts::SampleMethod::All))
        .seed(211)
        .output_size(ts::Dims::square(200))
        .build()?;

    // generate an image
    let generated = session.run(None);

    // save the image to the disk
    generated.save("out/09.png")
}
CLI
cargorun --release ----seed 211 --out-size 200 --sample-masks IGNORE ALL --out 09_sample_masks.png generate imgs/4.png imgs/5.png
使用此仓库提供的图像,您应该会得到以下结果

10. 合并纹理合成'动词'
我们还可以将多个模式合并在一起。例如,多示例引导合成

或将多个生成阶段链接在一起

有关更多用例和示例,请参阅演示文稿:"请更多类似!从单个示例进行纹理合成和混音"
额外的CLI功能
某些功能仅通过CLI公开,并未集成到库中。
翻转和旋转
此子命令对每个示例执行翻转和旋转转换,以生成额外的生成示例输入。此子命令不支持目标或示例指南。
示例: cargo run --release -- -o out/output.png flip-and-rotate imgs/1.jpg
命令行二进制文件
- 为您的操作系统下载二进制文件。
- 或者 从源代码安装。
- 打开终端
- 导航到您下载二进制文件的目录,如果您还没有通过
cargo install安装 - 运行
texture_synthesis --help以获取您可以运行的所有选项和命令列表 - 有关运行二进制文件的示例,请参阅此readme中的示例部分
注意
- 默认情况下,生成输出将使用您的所有逻辑核心
- 在生成时使用多个线程时,输出图像不保证与相同输入的确定性。要实现100%的确定性,您必须使用一个线程数,这可以通过以下方式完成:
- CLI -
texture-synthesis --threads 1 - API -
SessionBuilder::max_thread_count(1)
- CLI -
限制
- 在像素颜色之外的复杂语义方面有困难(除非您引导它)
- 对常规纹理处理不佳(接缝可能变得明显)
- 无法从现有信息中推断出新信息(仅操作现有信息)
- 设计用于单个示例或非常小的数据集(与基于深度学习的方法不同)
其他依赖项
如果您正在为Linux编译,您需要安装 libxkbcommon 开发库。对于ubuntu,这是 libxkbcommon-x11-dev。
链接/参考
[1] [Opara & Stachowiak] "请更多类似!从单个示例进行纹理合成和混音"
[2] [Harrison] 图像纹理工具
[3] [Ashikhmin] 自然纹理合成
参考文献[4] [Efros & Leung] 非参数采样纹理合成
参考文献[5] [Wey & Levoy] 使用树结构向量量化快速纹理合成
参考文献[6] [De Bonet] 纹理图像分析和合成的多分辨率采样过程
本仓库中的所有测试图像均来自 Unsplash
贡献
![]()
我们欢迎社区为本项目贡献。
请阅读我们的贡献指南以获取更多信息。
许可证
许可协议为以下之一
- Apache License, Version 2.0, (LICENSE-APACHE 或 https://apache.ac.cn/licenses/LICENSE-2.0)
- MIT license (LICENSE-MIT 或 https://open-source.org.cn/licenses/MIT)
任选其一。
贡献
除非你明确表示,否则任何提交给作品作为贡献的、根据Apache-2.0许可证定义的内容,都应按上述方式双重许可,不得附加任何额外条款或条件。
依赖关系
~12MB
~60K SLoC