4个版本
| 0.3.4 | 2023年3月21日 |
|---|---|
| 0.3.3 | 2023年2月23日 |
| 0.3.2 | 2023年2月22日 |
| 0.3.1 | 2023年2月22日 |
#1476 in 嵌入式开发
每月22次下载
23KB
313 行
嵌入式设备3642BS驱动程序
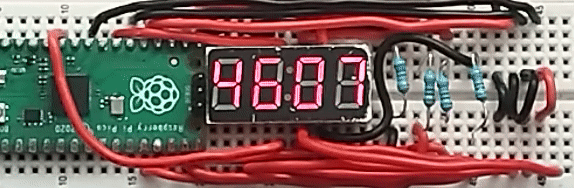
简化了在3642BS上显示内容的过程。
文档
允许您使用一行代码显示十进制和十六进制数字,以及时间和自定义字符。
display.clear().unwrap();
display.number(1234).unwrap();
display.hex(0xF3E2).unwrap();
display.time(10, 30).unwrap();				    //   ===A===
                                                            //  ‖       ‖
// Make your own custom characters:                         //  F       B
let letter_c = SEG_A | SEG_F | SEG_E | SEG_D;               //  ‖       ‖
let letter_o = SEG_G | SEG_E | SEG_C | SEG_D;               //   ===G===
let letter_l = SEG_F | SEG_E | SEG_D;                       //  ‖       ‖
let text_cool = [letter_c, letter_o, letter_o, letter_l];   //  E       C
                                                            //  ‖       ‖
display.custom(text_cool).unwrap();                         //   ===D===
使用方法
在您的 cargo.toml 中包含库
sevseg_3642bs = "0.3.2"
定义将使用的引脚
let mut display = Display::new(
    pins.gpio16.into_push_pull_output(), // Segment A
    pins.gpio17.into_push_pull_output(), // Segment B
    pins.gpio18.into_push_pull_output(), // Segment C
    pins.gpio19.into_push_pull_output(), // Segment D
    pins.gpio20.into_push_pull_output(), // Segment E
    pins.gpio21.into_push_pull_output(), // Segment F
    pins.gpio22.into_push_pull_output(), // Segment G
    pins.gpio26.into_push_pull_output(), // Two dots
    pins.gpio15.into_push_pull_output(), // Digit 1
    pins.gpio14.into_push_pull_output(), // Digit 2
    pins.gpio13.into_push_pull_output(), // Digit 3
    pins.gpio12.into_push_pull_output(), // Digit 4
    delay, 				 // Your HAL's delay object
);
由于显示必须进行复用,因此不能在库所在的相同核心上使用延迟,否则显示将冻结在单个数字上。因此,我建议使用闹钟或定时器。您也可以使用Embassy的异步任务。
使用 Alarm0 的示例(在rpi pico上)
// Other code like defining the pins and importing libraries.
// You'll need to import fugit::ExtU32

let mut timer = bsp::hal::Timer::new(pac.TIMER, &mut pac.RESETS);

// Other code like defining the Display struct

let alarm = timer.alarm_1().unwrap();

loop {
    // Other code like calculating "value"

    let _ = alarm.schedule(100_000.micros());

    while !alarm.finished() {
        display.number(value).unwrap();
    }
}
使用 Timer 的示例(在rpi pico上)
// Other code like defining the pins and importing libraries

let mut timer = bsp::hal::Timer::new(pac.TIMER, &mut pac.RESETS);
let mut count_down = timer.count_down();

// Other code like defining the Display struct

let mut prev_time = timer.get_counter();

loop {
    // Other code like calculating "value"

    while timer.get_counter() < prev_time + 100_000 {
        display.number(value);
    }
    prev_time = timer.get_counter();
}
使用 实时时钟 的示例(在pi pico上)
let mut watchdog = Watchdog::new(pac.WATCHDOG);

let clocks = clocks::init_clocks_and_plls(
    XTAL_FREQ_HZ,
    pac.XOSC,
    pac.CLOCKS,
    pac.PLL_SYS,
    pac.PLL_USB,
    &mut pac.RESETS,
    &mut watchdog,
).ok().unwrap();

let initial_date = DateTime {
    year: 2023,
    month: 1,
    day: 27,
    day_of_week: DayOfWeek::Friday,
    hour: 18,
    minute: 46,
    second: 0,
};

let real_time_clock = RealTimeClock::new(pac.RTC, clocks.rtc_clock, &mut pac.RESETS, initial_date).unwrap();

let mut prev_time = real_time_clock.now().unwrap().second;

loop {
    let mut current_time = real_time_clock.now().unwrap().second;
    while current_time == prev_time {
        display
            .time(
                real_time_clock.now().unwrap().minute,
                current_time,
                current_time,
            )
            .unwrap();
        current_time = real_time_clock.now().unwrap().second;
    }
    prev_time = current_time;
}
依赖关系
~71KB