28 个版本 (稳定)
| 1.0.19 | 2023年4月10日 |
|---|---|
| 1.0.16 | 2023年3月21日 |
| 1.0.14 | 2022年9月16日 |
| 0.2.3 | 2022年7月10日 |
| 0.1.3 | 2022年7月9日 |
#57 in 调试
每月下载 121 次
用于 hmw
99KB
1.5K SLoC
nolog 日志记录器
方便且默认“美观”的日志记录器,用于调试程序。易于使用,本页面提供了完整的文档。无依赖。无不安全(通过 #![deny(unsafe_code)])。
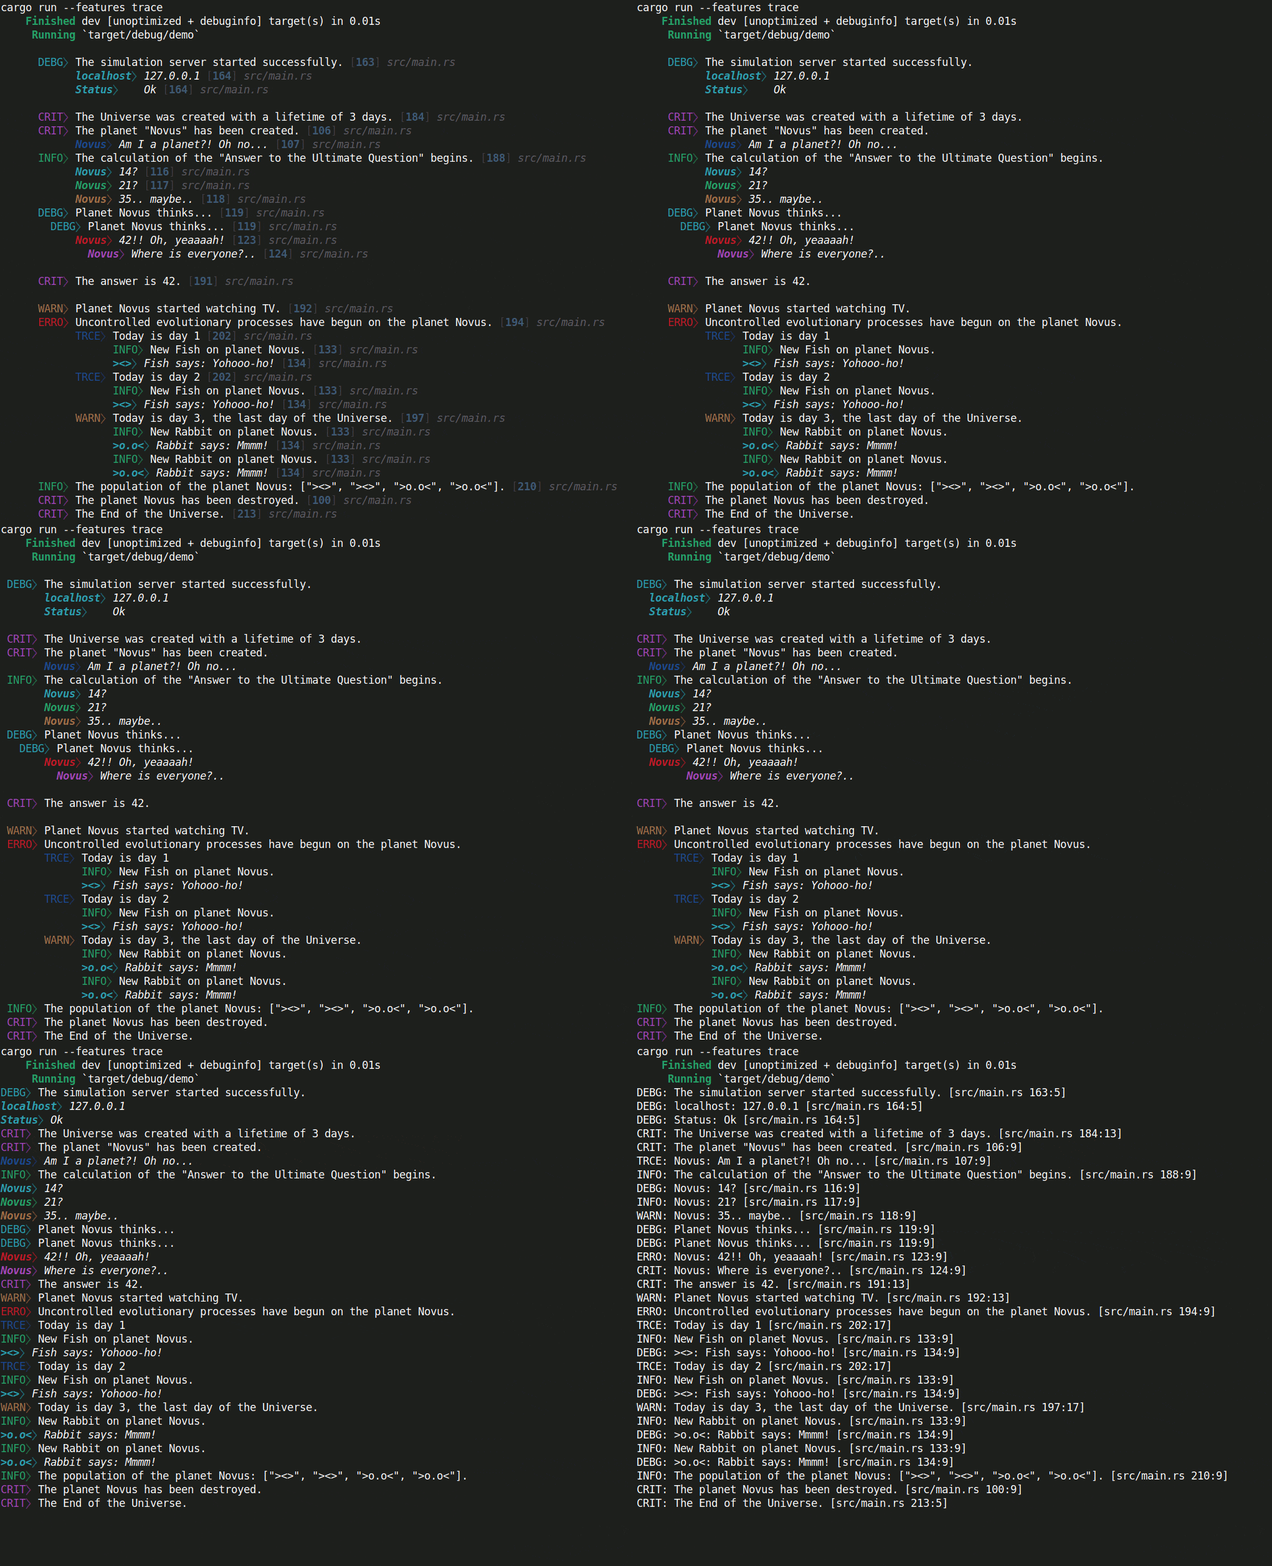
nolog 功能
- 在大多数情况下,
nolog使用一个std::format_args!()(避免堆分配)以及通过 Cargo 特性在编译时进行级别过滤。如果您使用默认设置而没有额外的特性(如logmod、logonly、logcatch、tofile),则大多数情况下nolog只会在编译时宏中工作,不使用函数、方法、if或循环。实际上,它将展开成字符串eprintln!("{}", format_args!("{}{}{}{}"," ", "CRIT⧽", "msg", "[34] src/main.rs"));。没有任何额外内容。 - 通过模块路径(
logmod特性)进行过滤。 - 仅显示选定代码部分的消息(
logonly特性)。 - 智能日志记录:隐藏所有消息,如果触发了
error或crit级别的消息,则显示之前的Х消息(logcatch特性)。 - 可以在消息中添加自定义缩进,以及在消息前后添加空白行。您可以使用变量(例如循环计数器)为选定的消息设置缩进。
- 通过特性轻松调整和禁用所有缩进和新行。
- 自定义:您可以为记录器创建自己的颜色方案。
- 支持命名格式参数:
info!("{line_count} lines.");。 - 支持
key => value语法:info!("{server}" => "{ip}"); - 在发布构建中自动禁用:
cargo run --release。如果您想在发布构建中启用日志记录,则使用release特性:nolog = {version = "*", features = ["release"]}。 - 所有级别默认都是禁用的。开启
debug级别也会同时开启其上级别:info、warn、error、crit。可以使用控制台来启用级别:cargo run --features debug或在Cargo.toml中:nolog = {version = "*", features = ["debug"]}。要启用所有级别:cargo run --features trace。 - 默认情况下,日志写入到
stderr。可以使用tofile功能将日志写入文件。您可以设置缓冲区大小。每次消息后自动刷新将被使用。如果您想要等待缓冲区填满或手动使用logflush!(),则使用no_auto_flush功能。 - 自定义输出重定向。例如,同时写入到
file和stderr。 - 您可以使用喜欢的第三方库添加类似
[2022-07-10 06:49:33.646361181 UTC]的时间戳。有关如何添加时间戳的更多信息,请参阅 这里。 - 支持将多个消息链接成一个(它们必须是同一类型:
usual或key-value)。
info!(
        "{server}" => "{ip}";
        "Status"   => "{server_check_result}";
);
目录
- 使用 nolog
- 使用 nolog 与
--features - tofile。将日志条目写入文件
- 如何添加时间戳
- 样式
- 链接
- Logmod。通过模块路径过滤
- Logonly。仅显示所选代码部分的日志消息
- Logcatch。智能日志记录
- 快速禁用和启用消息
- 缩进和换行
- 颜色
- 级别标题
- 在发布构建中不要禁用记录器
- 位置
- 分隔符
- 自定义颜色方案
- 自定义输出重定向
- 其他自定义选项
- 测试中的日志记录
- 变更日志
使用 nolog
Cargo.toml
[dependencies]
nolog = { version = "1", features = ["trace"] }
main.rs
#[macro_use]
extern crate nolog;

fn main() {
    trace!("line_count: {}", 42);
    debug!("line_count: {}", 42);
    info!("line_count: {}", 42);
    warn!("line_count: {}", 42);
    error!("line_count: {}", 42);
    crit!("line_count: {}", 42);
}
cargo run
结果
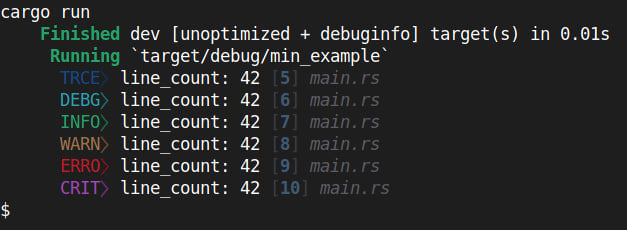
您可以在 cargo.toml 中启用更多输出过滤功能。
- Logonly。仅显示所选代码部分的日志消息。与
trace级别一起使用很有用。 - Logcatch。智能日志记录。隐藏所有消息,当触发
error或crit级别的消息时,显示之前的Х消息。这允许您了解错误之前发生了什么。 - Logmod. 按模块路径过滤。只接收你当前正在工作的模块的消息。
Cargo.toml
[dependencies]
nolog = { version = "1", features = [
  "debug",
  "logonly",
  "logcatch",
  "logmod",
]}
此外,您可以自定义外观设置。
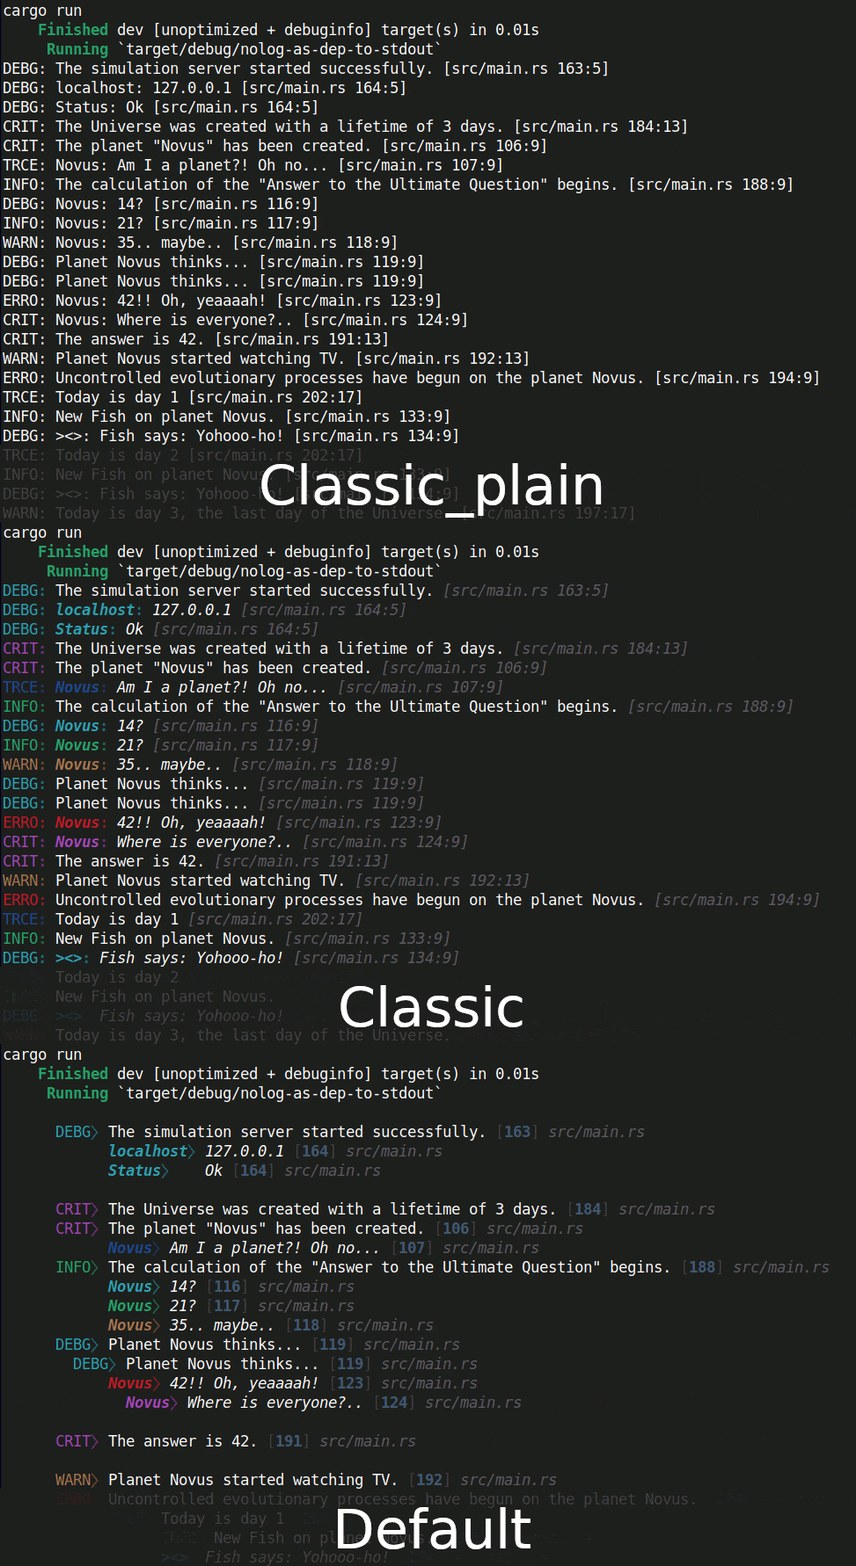
外观设置 classic
Cargo.toml
[dependencies]
nolog = { version = "1", features = [
  "debug",
  "show_lvl_header_kv",
  "indent_ignore_all",
  "newline_ignore",
  "location_style_classic",
  "sep_colon",
]}
外观设置 classic_plain
Cargo.toml
[dependencies]
nolog = { version = "1", features = [
  "debug",
  "plain",
  "show_lvl_header_kv",
  "indent_ignore_all",
  "newline_ignore",
  "location_style_classic",
  "sep_colon",
]}
缩进。
您可以使用以下方式指定缩进
crit!(->[X,Y,Z] "msg");
X- 缩进。Y- 在消息之前添加Y个空行。Z- 在消息之后添加Z个空行。
所有这些参数都是可选的。
crit!("msg");

//       X
crit!(->[1] "msg");

//       X Y
crit!(->[6,1] "msg");

//       X Y Z
crit!(->[1,2,3] "msg");
如果您想添加空行并保留默认缩进
//       X Y
crit!(->[_,1] "msg");

//       X Y Z
crit!(->[_,_,2] "msg");
链中的每条消息都适用相同规则。
debug!(
    ->[2]   "msg 1";
    ->[_,1] "msg 2";
            "msg 3";
);
键值对具有设置缩进的附加能力,不仅可以设置键,还可以设置值。
debug!(->[_,1] "The simulation server started successfully.");
debug!(
    "{server}" =>       "{ip}";
    "Status"   => ->[3] "{server_check_result}";
);
crit!(->[_,1] "The Universe was created with a lifetime of {} days.", universe.len());
如果您想得到整齐对齐的输出,这将非常有用。

更多关于缩进的信息。
使用 nolog 与 --features
您需要将此文件的全部内容完全复制到您的 cargo.toml 中。然后您可以写 cargo run --features trace,logonly 而不是 cargo run --features nolog/trace,nolog/logonly 在GitHub上查看示例。
Cargo.toml
[dependencies]
nolog = { version = "1", features = [] }

[features]
nolog_setup = []

# example `classic`
#nolog_setup = ["nolog/show_lvl_header_kv", "nolog/indent_ignore_all", "nolog/newline_ignore", "nolog/location_style_classic", "nolog/sep_colon"]

# example `classic_plain`
#nolog_setup = ["nolog/plain", "nolog/show_lvl_header_kv", "nolog/indent_ignore_all", "nolog/newline_ignore", "nolog/location_style_classic", "nolog/sep_colon"]

trace = ["nolog/trace", "nolog_setup"]
debug = ["nolog/debug", "nolog_setup"]
info  = ["nolog/info",  "nolog_setup"]
warn  = ["nolog/warn",  "nolog_setup"]
error = ["nolog/error", "nolog_setup"]
crit  = ["nolog/crit",  "nolog_setup"]

logonly  = ["nolog/logonly"]
logcatch = ["nolog/logcatch"]
logmod   = ["nolog/logmod"]
注释的行 nolog_setup = ["nolog/show_lvl_h...] 是 外观 设置(缩进、配色方案、样式等)。取消注释其中之一,看看会发生什么(别忘了删除 nolog_setup = [])。
外观设置通过条件编译选择,因此它们没有成本。
main.rs
#[macro_use]
extern crate nolog;

fn main() {
    trace!("line_count: {}", 42);
    debug!("line_count: {}", 42);
    info!("line_count: {}", 42);
    warn!("line_count: {}", 42);
    error!("line_count: {}", 42);
    crit!("line_count: {}", 42);
}
nolog 的语法与大多数基于 log crate 的记录器相同。 nolog 通过添加新功能扩展了 log crate 语法。然而,nolog 并不是基于 log crate,它只是具有相同的宏名称。这也导致 nolog 没有依赖项。
因此,切换到 nolog 将需要代码的最小更改。
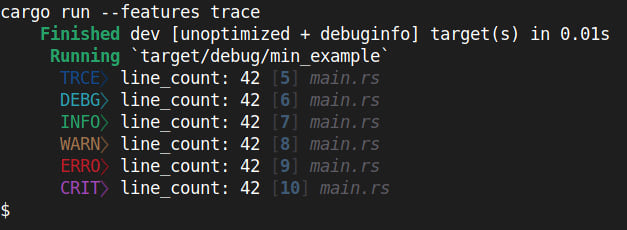
好了。现在我们可以使用以下命令
cargo run --features trace
或者,例如
# The output will be empty because there are no logonly
# blocks, etc. in the code.
# This is just to demonstrate the use of several features.

cargo run --features trace,logonly,logcatch,logmod
与之前相同,但更嘈杂
# The output will be empty because there are no logonly
# blocks, etc. in the code.
# This is just to demonstrate the use of several features.

cargo run --features nolog/trace,nolog/logonly,nolog/logcatch,nolog/logmod
结果
tofile。将日志条目写入文件
Cargo.toml
#...
[dependencies]
nolog = { version = "1", features = ["tofile"] }
#...
main.rs
use std::fs::OpenOptions;
use std::io::{self, Read};
use std::path::PathBuf;

#[macro_use]
extern crate nolog;

fn main() -> io::Result<()> {
    let path = PathBuf::from("log.txt");
    let file = OpenOptions::new()
        .read(true)
        .write(true)
        .create(true)
        .truncate(true)
        //^^^^^^^ truncate the file to 0 length if it already exists.
        //.append(true)
        .open(&path)?;

    // Initialization
    // Don't use macros like `debug!("msg");` before initialization.
    logfile!(file);

    trace!("Hello from file!");

    let mut file = OpenOptions::new()
        .read(true)
        .open(&path)?;

    let mut contents = String::new();
    file.read_to_string(&mut contents)?;
    println!("\n      -- In {path:?} --");
    println!("{contents}");

    Ok(())
}
可选地,您还可以设置缓冲区大小。
    // Buffer `std::io::BufWriter` with capacity: 8000 bytes.
    logfile!(8000, file);
默认情况下,会在每条消息后自动刷新。如果您想等待缓冲区填满或手动使用 logflush!() 来刷新日志,请使用 no_auto_flush 功能。
Cargo.toml
#...
[dependencies]
nolog = { version = "1", features = ["tofile", "no_auto_flush"] }
#...
然后使用 logflush!() 手动刷新日志。
main.rs
...
    // Initialization
    // Don't use macros like `debug!("msg");` before initialization.
    logfile!(8000, file);

    trace!("Hello from file!");
    logflush!();
...
如何添加时间戳
您可以使用第三方库添加时间戳,例如:[2022-07-10 06:49:33.646361181 UTC]。
在此示例中,我们将使用 chrono 库。
Cargo.toml
#...
[dependencies]
nolog = { version = "1", features = [] }
chrono = "0.4"

[features]
custom_leading    = ["nolog/custom_leading"]
custom_trailing   = ["nolog/custom_trailing"]
custom_before_msg = ["nolog/custom_before_msg"]
custom_after_msg  = ["nolog/custom_after_msg"]

nolog_setup = ["custom_leading"]
#...
这里有4个选项:
- "custom_leading" -
<TIMESTAMP>CRIT⧽ msg [5] src/main.rs - "custom_trailing" -
CRIT⧽ msg [5] src/main.rs<TIMESTAMP> - "custom_before_msg" -
CRIT⧽ <TIMESTAMP>msg [5] src/main.rs - "custom_after_msg" -
CRIT⧽ msg<TIMESTAMP> [5] src/main.rs
日志条目结构
常规:<indents><custom_leading><lvlheader><sep><custom_before_msg><msg><custom_after_msg><location><custom_trailing>
键值对:<indents><custom_leading><lvlheader><sep_kv><custom_before_msg><key><sep_key><value_indent><value><custom_after_msg><location><custom_trailing>
以下是一个示例
main.rs
#[macro_use]
extern crate nolog;

#[macro_use]
pub mod logger_setup {
    #[macro_export]
    #[cfg(feature = "custom_leading")] macro_rules!
    //               ^^^^^^^^^^^^^^
    custom_leading {
        // usual
        ( $level:tt, $indent:expr, $($msg:expr),* ) => {
            format_args!("[{}] ", chrono::Utc::now())

        };
        // key-value
        ( $level:tt, $indent:expr, $($key:expr),* => $($value:expr),* ) => {
            format_args!("[{}] ", chrono::Local::now())
        };
    }
}

mod other {
    pub fn from_other_mod() -> () {
        crit!(->[0] "Other" => "Hello from other mod! This is key-value msg.");
    }
}

fn main() {
    crit!("Hello from main! This is usual msg.");
    other::from_other_mod();
}
输出
[2022-09-07 09:22:09.150921578 UTC] CRIT⧽ Hello from main! This is usual msg. [34] src/main.rs
[2022-09-07 12:22:09.150973037 +03:00] Other⧽ Hello from other mod! This is key-value msg. [29] src/main.rs
使用 classic 风格
[2022-09-07 09:29:45.859185734 UTC] CRIT: Hello from main! This is usual msg. [src/main.rs 34:5]
[2022-09-07 12:29:45.859225186 +03:00] CRIT: Other: Hello from other mod! This is key-value msg. [src/main.rs 29:9]
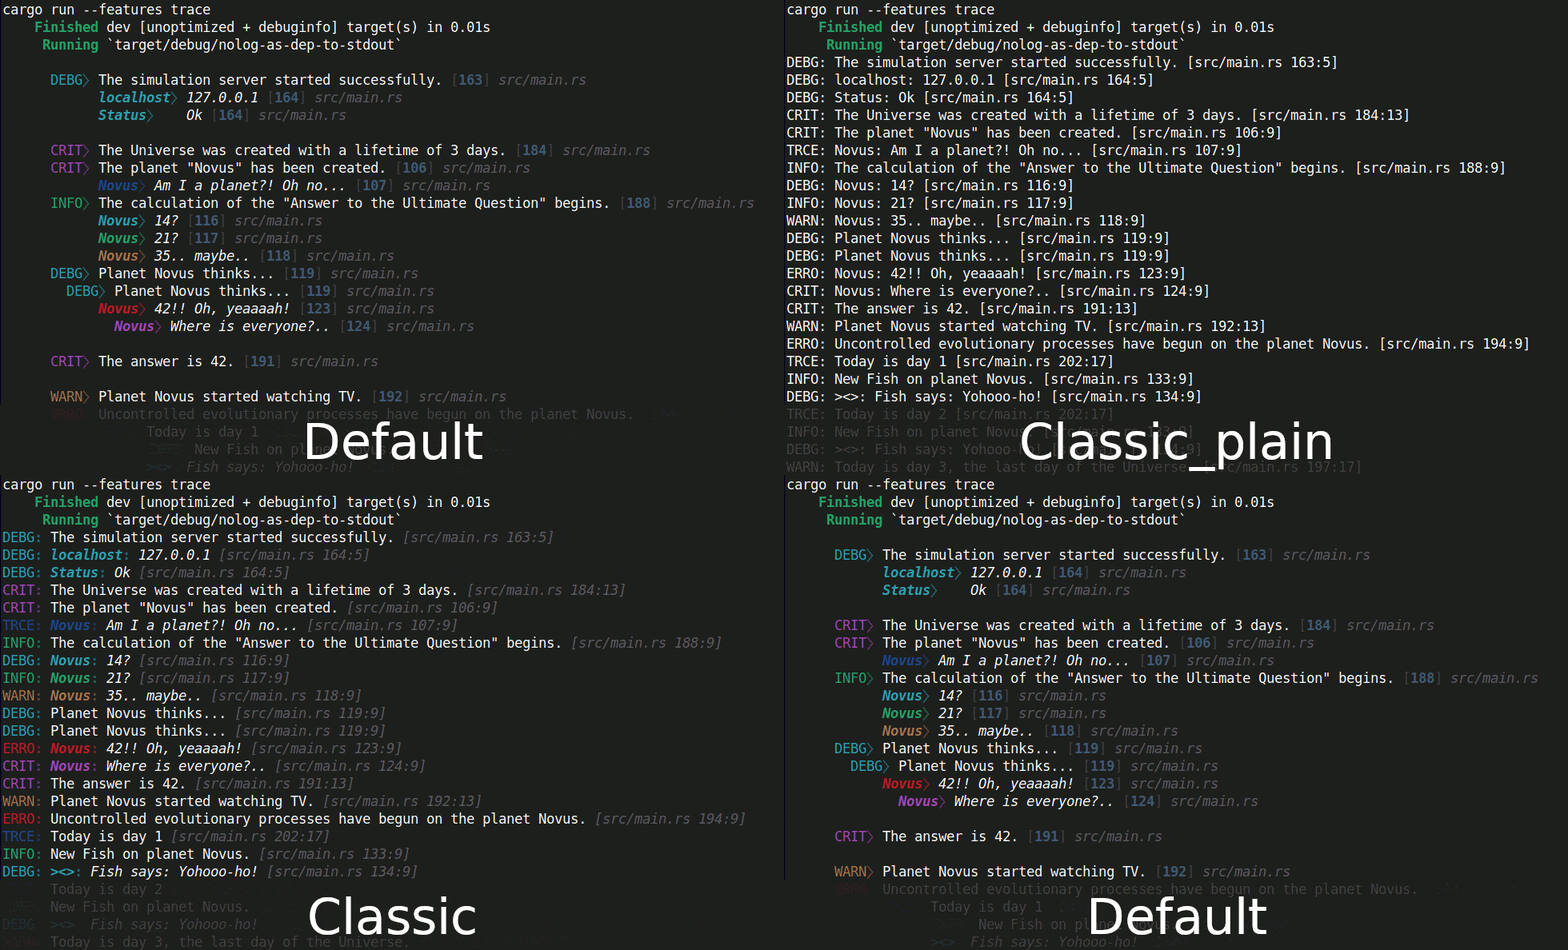
样式
默认
nolog_setup = []
classic
nolog_setup = ["nolog/show_lvl_header_kv", "nolog/indent_ignore_all", "nolog/newline_ignore", "nolog/location_style_classic", "nolog/sep_colon"]
classic_plain
nolog_setup = ["nolog/plain", "nolog/show_lvl_header_kv", "nolog/indent_ignore_all", "nolog/newline_ignore", "nolog/location_style_classic", "nolog/sep_colon"]
链接
链式消息应全部为同一类型: usual 或 key-value
ususal
debug!(
    "Planet {name} thinks...";
    "Planet {name} thinks...";
);
key-value
debug!(
    "{server}" => "{ip}";
    "Status"   => "{server_check_result}";
);
Logmod。通过模块路径过滤
尽可能早地在代码中添加它
logmod!(
    [  ] main,
    [!=] crate::other2,
);
[]- 包含模块及其所有子模块。[=]- 相同(包含模块及其所有子模块)。[!]- 排除模块及其所有子模块。[==]- 仅包含此模块,不包括子模块。[!=]- 仅排除此模块,不包括子模块。
然后
cargorun --featurestrace,logmod
Logonly。仅显示所选代码部分的日志消息
这对于调试很有用,可以从一小段代码中获取消息。
logonly!(
    let universe = [0;3];
    crit!("The Universe was created with a lifetime of {} days.", universe.len());
    error!("Uncontrolled evolutionary processes have begun on the planet {planet_name}.");
);
然后
cargorun --featurestrace,logonly
您可以使用任何括号
logonly!(), logonly!{}, logonly![]。
您可以使用多个 logonly!() 块。所有消息都会显示出来。
在发布版本中,当日志关闭时,这不会破坏您的代码。因此,您可以在代码中保留这些块。
当禁用时,该宏的定义将被替换为以下内容
logonly { ( $($a:tt)* ) => { $($a)* }; }
它只是简单地记录接收到的代码。
Logcatch。智能日志记录
隐藏所有消息,如果触发了错误或 crit 级别的消息,则显示前一个 Х 消息。
默认情况下 X=10。您可以在代码的任何地方更改此值。
// This will take effect for the code below.
logcatch!(2); // now X=2
要启用此功能,请使用
cargorun --featurestrace,logcatch
使用 newline!() 或 ->[_,1,1](下面将详细介绍)创建的每行新内容都视为一条单独的消息。
快速禁用和启用消息
您可以在不将其从代码中删除的情况下禁用单个消息。类似于 debug!([_]; "msg") 的宏将展开为空元组 ()。
// on
info!([#]; "New {name} on planet {planet_name}.");

// off
info!([_]; "{repr}" => "{name} says: {speech}");
您可以使用任何您喜欢的选项
开启: [#],[x],[v],[+],[on],[true],[your_var]
关闭: [ ],[_],[-],[off],[false],[your_var]
your_var 应为 bool 类型。
要更改状态,只需更改一个字符
[_] --> [#].
这同样适用于链式消息,但会禁用整个链。您不能关闭链中的单个消息。
crit!([_];
    "The answer is {answer}.";
    "Planet {planet_name} started watching TV.";
);
您可以关闭 logonly 块的操作。这不会影响代码,效果就像宏 logonly 不在这个位置一样。
logonly!{[_];
    crit!("The answer is {answer}.");
    let x = 42;
}
这样,您可以在代码中留下 logonly!(),如果将来需要,只需启用它。
变量和表达式
如有必要,您可以使用变量和表达式来控制消息。
let my_log_enabled = true;
crit!([my_log_enabled]; "The planet {} has been destroyed.", self.name);
let status = "ok";
crit!([(status == "ok")]; "The planet {} has been destroyed.", self.name);
//     ^              ^
//     Add parentheses
fn is_message_show_fn () -> bool { false }
...
crit!([(is_message_show_fn())]; "The planet {} has been destroyed.", self.name);
//     ^                    ^
//     Add parentheses
缩进和换行
新行
newline!(2); - 它将简单地写入指定数量的新行到日志中。
缩进
缩进有几种类型
基本缩进
基本缩进将添加到每一行。
- 默认值:所有:
6个缩进。一个缩进等于一个空格。
您可以使用 cargo 功能更改 base indent
indent_base_zeroindent_base_oneindent_base_twoindent_base_threeindent_base_fourindent_base_fiveindent_base_sevenindent_base_eightindent_base_nineindent_base_ten
例如在 Cargo.toml
nolog_setup = ["nolog/indent_base_zero"]

trace = ["nolog/trace", "nolog_setup"]
选定消息的缩进
usual的默认值:0key-value的默认值:6
如果没有提供用户值,则使用默认缩进。
您可以使用以下方式指定缩进
crit!(->[X,Y,Z] "msg");
X- 缩进。Y- 在消息前添加Y个空行(与newline!(Y)相同的效果)。Z- 在消息后添加Z个空行。
所有这些参数都是可选的。
crit!("msg");
crit!(->[1] "msg");
crit!(->[6,1] "msg");
crit!(->[1,2,3] "msg");
crit!([#]; ->[1,2,3] "msg");
如果您想添加空行并保留默认缩进
crit!(->[_,1] "msg");
crit!(->[_,_,2] "msg");
链中的每条消息都适用相同规则。
debug!(
    ->[2]   "Planet {name} thinks...";
    ->[_,1] "Planet {name} thinks...";
            "Planet {name} thinks...";
);
key => value 默认缩进为 6,但您可以通过将其设置为零来重置它。
error!(->[0] "{name}" => "{}!! Oh, yeaaaah!", 2*3*7);
或者您可以通过 Cargo.toml 为所有消息执行此操作。
indent_kv_default_zeroindent_kv_default_oneindent_kv_default_twoindent_kv_default_threeindent_kv_default_fourindent_kv_default_fiveindent_kv_default_sevenindent_kv_default_eightindent_kv_default_nineindent_kv_default_ten
例如在 Cargo.toml
nolog_setup = ["nolog/indent_kv_default_zero"]

trace = ["nolog/trace", "nolog_setup"]
键值对具有设置缩进的附加能力,不仅可以设置键,还可以设置值。
debug!(
    "{server}" =>       "{ip}";
    "Status"   => ->[3] "{server_check_result}";
);
如果您想得到整齐对齐的输出,这将非常有用。

缩进变量
您可以使用变量来设置缩进和添加空行。
for i in 0..2 {
    warn!(->[i,i,i] "msg");
}
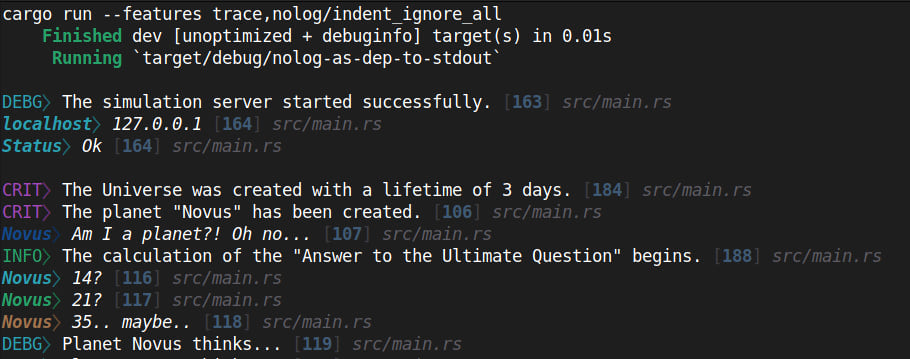
忽略所有缩进
忽略所有类型的缩进。
nolog_setup = ["nolog/indent_ignore_all"]
忽略所有新行
nolog_setup = ["nolog/newline_ignore"]
颜色
nolog 默认着色,使用此功能进行纯输出
nolog_setup = ["nolog/plain"]
级别标题
nolog_setup = ["nolog/show_lvl_header_kv"]
显示键值的关键级别名称
CRIT: Key: value [src/main.rs 90:5]`
^^^^
默认禁用
Key: value [src/main.rs 90:5]
在发布构建中不要禁用记录器
nolog = { version = "1", features = ["release"] }
位置
不显示位置(如 [src/main.rs 155:9])
nolog_setup = ["nolog/location_hide"]
样式如下:[src/main.rs 155:9]
nolog_setup = ["nolog/location_style_classic"]

分隔符
默认 = "⧽ "
- ": "
nolog_setup = ["nolog/sep_colon"]
- " "
nolog_setup = ["nolog/sep_space"]
- ""
nolog_setup = ["nolog/sep_hide"]
自定义颜色方案
您可以为日志器创建自己的颜色方案。
Cargo.toml
#...
[dependencies]
nolog = { version = "1", features = [] }

[features]
custom_colors = ["nolog/custom_colors"]
nolog_setup = ["custom_colors"]
#...
以下是一个示例
main.rs
#[macro_use]
extern crate nolog;

#[macro_use]
pub mod logger_setup {
    #[macro_export]
    #[cfg(feature = "custom_colors")] macro_rules!
    //               ^^^^^^^^^^^^^
    color {
        ( [trace] ) => { "\x1B[34m"                    };
        ( [debug] ) => { "\x1B[36m"                    };
        ( [info]  ) => { "\x1B[32m"                    };
        ( [warn]  ) => { "\x1B[33m"                    };
        ( [error] ) => { "\x1B[31m"                    };
        ( [crit]  ) => { "\x1B[35m"                    };
        ( [sep]   ) => { "\x1B[1m\x1B[2m"              }; // +bold +dim
        ( [msg]   ) => { ""                            }; // default term font color
        ( [from]  ) => { "\x1B[90m\x1B[3m"             }; // `[src/main.rs 101:5]` in `location_style_classic`
        ( [sep2]  ) => { "\x1B[90m\x1B[2m"             }; // sep2 in default style
        ( [sep3]  ) => { "\x1B[90m\x1B[2m"             }; // sep3 in default style
        ( [line]  ) => { "\x1B[38;5;67m\x1B[1m\x1B[2m" }; // line number in default style
        ( [key]   ) => { "\x1B[3m\x1B[1m"              }; // +italic +bold
        ( [value] ) => { "\x1B[3m"                     }; // +italic
        ( [rm]    ) => { "\x1B[0m"                     }; // remove previous colors
    }
}

mod other {
    pub fn from_other_mod() -> () {
        crit!(->[0] "Other" => "Hello from other mod! This is key-value msg.");
    }
}

fn main(){
    crit!("Hello from main! This is usual msg.");
    other::from_other_mod();
}
自定义输出重定向
可以重定向输出。例如,我们将同时重定向输出到 stderr 和文件。限制是到 stderr 的输出将与文件相同,它将不会被着色。
Cargo.toml
#...
[dependencies]
nolog = { version = "1", features = [] }

[features]
nolog_setup = [
    "custom_writelog_inner",
    "nolog/tofile"
]
custom_writelog_inner = ["nolog/custom_writelog_inner"]
#...
以下是一个示例
main.rs
use std::fs::OpenOptions;
use std::io::{self, Read};
use std::path::PathBuf;

#[macro_use]
extern crate nolog;

// use `cargo run --features trace`

#[macro_use]
pub mod logger_setup {
    #[macro_export]
    #[cfg(feature = "custom_writelog_inner")] macro_rules!
    writelog_inner { ( $msg:expr ) => {
            eprintln!("{}", $msg); // write to stderr
            tofile_writelog_inner_helper!($msg); // write to a file
        }
    }
}

mod other {
    pub fn from_other_mod() -> () {
        crit!(->[0] "Other" => "Hello from other mod! This is key-value msg.");
    }
}

fn main() -> io::Result<()> {
    let path = PathBuf::from("log.txt");
    let file = OpenOptions::new()
        .read(true)
        .write(true)
        .create(true)
        .truncate(true)
        //^^^^^^^ truncate the file to 0 length if it already exists.
        //.append(true)
        .open(&path)?;

    // Initialization
    // Don't use macros like `debug!("msg");` before initialization.
    logfile!(file);

    eprintln!("\n-- From eprintln: --");
    crit!("Hello from main! This is usual msg.");
    other::from_other_mod();

    let mut file = OpenOptions::new()
        .read(true)
        .open(&path)?;

    let mut contents = String::new();
    file.read_to_string(&mut contents)?;
    println!("\n-- In {path:?} --");
    println!("{contents}");

    Ok(())
}
输出
-- From eprintln: --
CRIT: Hello from main! This is usual msg. [main.rs 54:5]
CRIT: Other: Hello from other mod! This is key-value msg. [main.rs 34:9]

-- In "log.txt" --
CRIT: Hello from main! This is usual msg. [main.rs 54:5]
CRIT: Other: Hello from other mod! This is key-value msg. [main.rs 34:9]
其他自定义选项
nolog 有其他未在此描述的自定义选项,因为这些选项可能不会被广泛用户需求。它们的使用方式类似于上述描述。您可以在 Cargo.toml 中查看完整的最新列表。
测试中的日志记录
测试中的日志功能与主程序相同,只是 Rust 测试程序会隐藏成功测试的标准输出。
使用以下代码查看成功测试的输出。
cargo test --features trace -- --nocapture
无论怎样,都会显示失败的测试输出。
cargo test --features trace
变更日志
- 1.0.15 - 1.0.19 – Readme 等中的小更改。
- 1.0.12 - 1.0.14 – Readme 等中的小更改。一些优化修复。
- 1.0.10 - 1.0.11 – 微小更改,增加了一个带有输出重定向的示例。
- 1.0.1 - 1.0.9 – Readme等中的小更改。
- 1.0.0 – 发布。完全重写。
- 0.1.1-0.2.3 – 早期版本。
无运行时依赖
功能
- all
- crit
- custom_after_msg
- custom_before_msg
- custom_colors
- custom_leading
- custom_location_style
- custom_lvl_headers
- custom_msg_render
- custom_sep
- custom_trailing
- custom_writelog
- custom_writelog_inner
- debug
- error
- glob
- indent_base_eight
- indent_base_five
- indent_base_four
- indent_base_nine
- indent_base_one
- indent_base_seven
- indent_base_ten
- indent_base_three
- indent_base_two
- indent_base_zero
- indent_ignore_all
- indent_kv_default_eight
- indent_kv_default_five
- indent_kv_default_four
- indent_kv_default_nine
- indent_kv_default_one
- indent_kv_default_seven
- indent_kv_default_ten
- indent_kv_default_three
- indent_kv_default_two
- indent_kv_default_zero
- info
- location_hide
- location_style_classic
- log_enabled
- logcatch
- logmod
- logonly
- newline_ignore
- no_auto_flush
- plain
- release
- sep_colon
- sep_hide
- sep_space
- show_lvl_header_kv
- tofile
- trace
- warn