3 个稳定版本
| 1.0.2 | 2023 年 3 月 16 日 |
|---|---|
| 0.1.2 |
|
| 0.1.1 |
|
| 0.1.0 |
|
#352 在 图像
每月 45 次下载
29KB
236 行
目录
描述
一个可以将图像转换为可以在 Space Engineers LCD 面板上显示的字符串的 crate。
本项目使用 语义化版本控制 (尝试使用)。
前言
您可以跳过这部分。
我想提及 Whip 的图像转换器,作者是 Whiplash141,它为启发和将颜色转换为 Space Engineers LCD 面板字符的方法提供了帮助。我不知道他是如何做到这一点的。我做了以下 5 个原因:
- 我想学习 Rust。
- 他的程序较慢。
- 他的程序(据我所知)有点过于复杂。
- 他的程序仅在 Windows 上运行。
- 这是一个可重用的 crate 版本,而他只有可执行文件。
我无意贬低,但这是事实。除了第 3 点是主观的之外。但是,我确实赞赏他为图像缩放时为游戏中每个面板变体制作特殊情况的举动。我在纵横比上采取了简单的方法。
示例结果
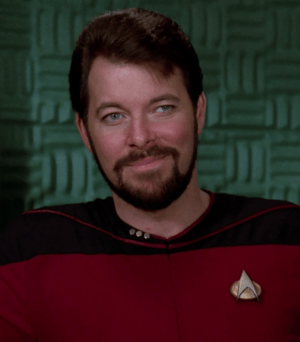
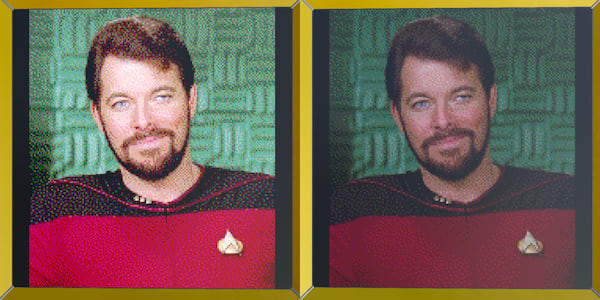
原始图像(演员乔纳森·弗莱克扮演的虚构角色“威廉·托马斯·瑞克”的照片,来自《星际迷航:下一代》系列)
Space Engineers 中看到的未抖动版本

Space Engineers 中看到的抖动版本
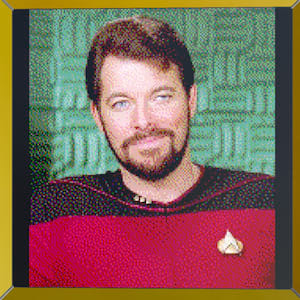
在这些截图中,未抖动版本看起来比抖动版本更暗,但这只是因为游戏内的光照。我在游戏日夜循环的不同面板上在不同时间拍了这些截图。您可以看到周围黄色方块在未抖动截图中也更暗。
使用方法
- 使用
DynamicImage通过 image 包获取图像。 - 使用
resized函数调整图像大小。宽高比很重要!它决定了游戏中图像的尺寸。
例如,对于宽 LCD 面板,你需要一个2:1的宽高比。也就是说,宽度宽高比为 2,高度宽高比为 1。如果你想保留原始图像的宽高比(不要拉伸),请将preserve_aspect_ratio参数设置为true。 - 调用
image_to_se_string函数,并将调整大小的图像作为参数传递。将dither参数设置为true是强烈推荐的,因为否则图像看起来会很糟糕。 - 现在你有了字符串,需要配置你的面板。将字体大小设置为最低可能值(0.1)并将字体设置为
Monospace。
进一步配置
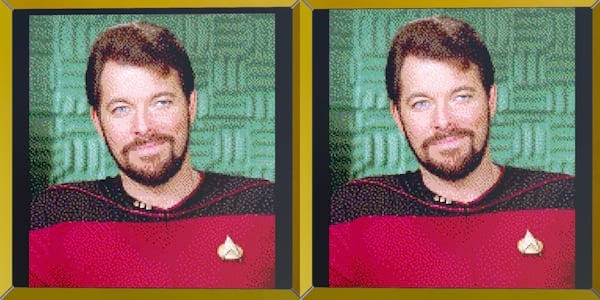
移除默认填充
默认情况下,Space Engineers 为所有面板提供 2% 的文本填充。这意味着面板上的文本将向下/向上移动(取决于旋转)并向右/向左移动(取决于对齐方式)。对于文本,这可能很棒,但对于图像,你可能希望去掉这个,因为这样会导致一些边缘像素被移动到屏幕外。
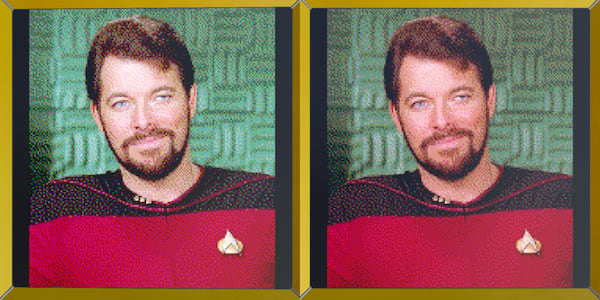
比较(顶部面板有默认填充,底部面板没有)
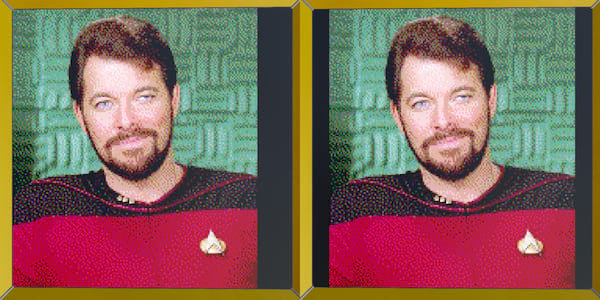
更改文本对齐
想象一下,你有一个肖像(高度超过宽度)想要显示,但你不想拉伸以适应面板。在这种情况下,如果你要在正方形面板上显示它,右侧会有一个大黑缝(因为默认是左对齐,你的图像比面板薄)。你可以改变对齐方式以使图像居中,因此面板的两侧都有等效的间隙。
比较(顶部面板左对齐,底部面板不对齐)
更改色调
通常,当你想要不同颜色的文本时,你只需更改面板的颜色。这与图像一样有效,即使图像“文本”已经有颜色。更改颜色会影响图像的色调。
我们的图像在游戏中看起来有点太亮。使用颜色滑块,我们可以降低每个 RGB 分量的值。在这种情况下,我将它们从默认的 255 降低到 100(实际上降低了亮度),并且我认为它看起来与原始图像更接近。
比较(顶部面板没有进行任何颜色修改,底部面板的 RGB 所有组件颜色设置为 100)
你可以显然更改每个单独的 RGB 分量。例如,增加红色分量通常可以使图像(尤其是人物或风景图像)看起来更“生动”。让我们结合前面的方法。这次,红色分量设置为 220,但绿色和蓝色设置为 180。我们将所有这些值都降低了,但使红色突出。
比较(顶部面板没有进行任何颜色修改,底部面板的红色分量为 220,但绿色和蓝色分量为 180)
最终比较
按照上述简单步骤,你可以让你的面板看起来更接近原始图像。看看这个比较(顶部图像是原始图像,底部左是默认面板配置,底部右是调整后的面板)
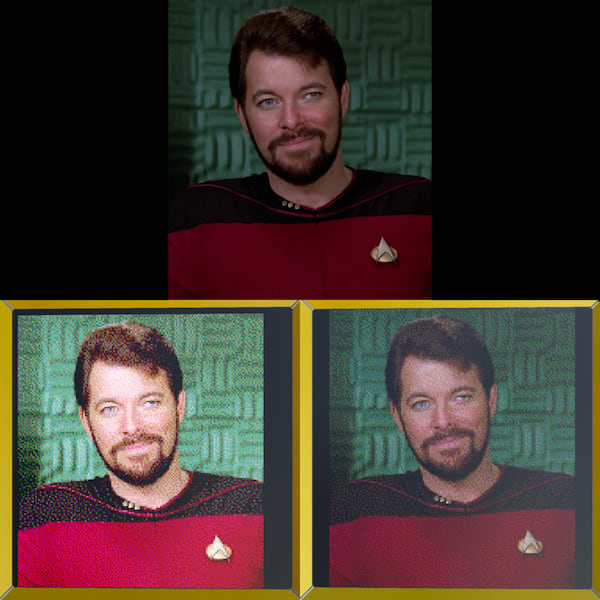
注意面板左侧和顶部的间隙消失了,颜色与原始图像更接近。
代码示例
这是一个简单的二进制程序示例,它所做的不仅仅是询问用户所有必要的转换图像到太空工程师LCD面板的信息。您可以对其进行改进,例如将输出字符串复制到用户的剪贴板,而不是创建新文件来存储字符串,或者优化代码。我只是个Rust初学者。
# Cargo.toml

[package]
# Package info

[dependencies]
# The versions below might not be up to date, but they will work for the program below.
image = "0.24.0"
image_to_space_engineers_lcd = "0.1.3"
// main.rs

use std::fs::{File};
use std::io;
use std::io::{Write};

/// Utility function.
fn read_line() -> String {
  let mut buffer = String::new();

  match io::stdin().read_line(&mut buffer) {
    Ok(_) => {},
    Err(e) => panic!("Failed to read line. Error: {:#?}", e),
  }

  return buffer;
}

fn main() {
  println!("Enter the image path:");
  let path = read_line();
  let trimmed_path = path.trim(); // Just in case extra spaces get lost in there.
  let source = image::open(trimmed_path).unwrap();

  println!("Enter the panel ratio (width:height, for example, a Wide LCD Panel would be 2:1):");
  let aspect_ratios_raw = read_line();
  let aspect_ratios: Vec<&str> = aspect_ratios_raw.trim().split(':').collect();
  let width_aspect_ratio: u32 = aspect_ratios[0].parse().unwrap();
  let height_aspect_ratio: u32 = aspect_ratios[1].parse().unwrap();

  // Let's assume that we want to dither and don't want to stretch the image.
  let resized = image_to_space_engineers_lcd::resized(&source, width_aspect_ratio, height_aspect_ratio, true);
  let output_string = image_to_space_engineers_lcd::image_to_se_string(&resized, true, true);
  let output_path = trimmed_path.to_owned() + "_space_engineers_text.txt";
  let mut file = File::create(&output_path).unwrap();

  file.write_all(output_string.as_ref()).unwrap();
  file.flush().unwrap();

  println!("The output file can be found at {}. Open it and select everything and copy it (CTRL + A, CTRL + C). Press enter to exit...", output_path);
  read_line();
工作原理
太空工程师面板只能显示文本或有限的内置纹理,但如果将字体设置为Monospace,特殊字符将以特定颜色渲染。您可以在to_se_char函数的源代码中找到将颜色转换为特殊字符的方法。
这就是我们能够渲染图像而不是文本的原因,但太空工程师也有有限的调色板和面板大小。我们需要首先调整图像大小,具体到宽度为178 * width_aspect_ratio和高度为178 * height_aspect_ratio。
至于调色板,这意味着如果您只是简单地取图像中的每个像素并将其转换为特殊字符而不进行其他处理,最终结果将受到色彩带状效应的影响,而且影响相当严重。您可以在示例结果中亲自看到,只需比较难看的未抖动图像和抖动图像。
这就是为什么我们还需要对图像应用抖动。在这种情况下,我选择了Floyd-Steinberg抖动方法,因为它在保持简单的同时产生出色的结果。所以,过程是这样的
- 获取图像
- 调整图像大小
- 对图像进行抖动
- 创建字符串
- 获取图像中的像素并将其推送到字符串中的太空工程师兼容版本
- 返回字符串
除非您选择image_to_se_string函数,该函数不进行图像抖动,导致示例结果中提到的上述难看的图像。是的,它更快,但差别微乎其微。我仅将其公开是因为可能存在一些非常特殊的情况,您可能不希望对图像进行抖动。
依赖项
~13MB
~60K SLoC