2 个版本
| 0.8.1 | 2022年3月23日 |
|---|---|
| 0.8.0 | 2021年5月26日 |
#251 在 身份验证
135KB
3K SLoC
authoscope 
authoscope 是一个可脚本的网络身份验证破解工具。尽管常见的服务暴力破解空间已经 非常 饱和 了,但在测试 Web 应用程序的凭据时,您可能仍然需要编写自己的 Python 脚本。
authoscope 的范围是专门破解自定义服务。这是通过编写加载到 Lua 运行时的脚本实现的。这些脚本代表单个服务,并提供一个返回 true 或 false 的 verify(user, password) 函数。并发、进度指示和报告由 authoscope 运行时自动提供。
安装
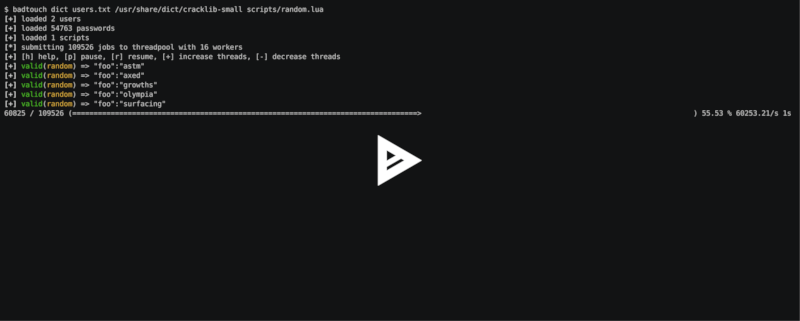
![]()
如果您使用的是基于 Arch Linux 的系统,请使用
pacman -S authoscope
如果您使用的是 Mac OSX,请使用
brew install authoscope
从源码构建,请确保已安装 rust 和 libssl-dev,然后运行
cargo install
使用以下命令验证您的设置是否完整
authoscope --help
Debian
- 安装必要的构建工具
sudo apt-get update && sudo apt-get dist-upgrade
sudo apt-get install build-essential libssl-dev pkg-config
- 安装 rust
curl -sf -L https://static.rust-lang.org/rustup.sh | sh
source $HOME/.cargo/env
- 安装 authoscope
cd /path/to/authoscope
cargo install
脚本编写
一个简单的脚本可能看起来像这样
descr = "example.com"

function verify(user, password)
    session = http_mksession()

    -- get csrf token
    req = http_request(session, 'GET', 'https://example.com/login', {})
    resp = http_send(req)
    if last_err() then return end

    -- parse token from html
    html = resp['text']
    csrf = html_select(html, 'input[name="csrf"]')
    token = csrf["attrs"]["value"]

    -- send login
    req = http_request(session, 'POST', 'https://example.com/login', {
        form={
            user=user,
            password=password,
            csrf=token
        }
    })
    resp = http_send(req)
    if last_err() then return end

    -- search response for successful login
    html = resp['text']
    return html:find('Login successful') != nil
end
请参阅参考和 示例 了解所有可用函数。请注意,您可以使用 print(x) 和 authoscope oneshot 来调试您的脚本。
参考
- base64_decode
- base64_encode
- clear_err
- execve
- hex
- hmac_md5
- hmac_sha1
- hmac_sha2_256
- hmac_sha2_512
- hmac_sha3_256
- hmac_sha3_512
- html_select
- html_select_list
- http_basic_auth
- http_mksession
- http_request
- http_send
- json_decode
- json_encode
- last_err
- ldap_bind
- ldap_escape
- ldap_search_bind
- MD5
- mysql_connect
- mysql_query
- 打印
- rand
- randombytes
- SHA1
- sha2_256
- sha2_512
- sha3_256
- sha3_512
- sleep
- sock_connect
- sock_send
- sock_recv
- sock_sendline
- sock_recvline
- sock_recvall
- sock_recvline_contains
- sock_recvline_regex
- sock_recvn
- sock_recvuntil
- sock_sendafter
- sock_newline
- 示例
- 配置
- 包装 Python 脚本
base64_decode
解码 base64 字符串。
base64_decode("ww==")
base64_encode
使用 base64 对二进制数组进行编码。
base64_encode("\x00\xff")
clear_err
清除所有已记录的错误以防止重新排队。
if last_err() then
    clear_err()
    return false
else
    return true
end
execve
执行外部程序。返回退出代码。
execve("myprog", {"arg1", "arg2", "--arg", "3"})
hex
对字节数组进行十六进制编码。
hex("\x6F\x68\x61\x69\x0A\x00")
hmac_md5
使用 MD5 计算hmac。返回一个二进制数组。
hmac_md5("secret", "my authenticated message")
hmac_sha1
使用 SHA1 计算hmac。返回一个二进制数组。
hmac_sha1("secret", "my authenticated message")
hmac_sha2_256
使用 sha2_256 计算hmac。返回一个二进制数组。
hmac_sha2_256("secret", "my authenticated message")
hmac_sha2_512
使用 sha2_512 计算hmac。返回一个二进制数组。
hmac_sha2_512("secret", "my authenticated message")
hmac_sha3_256
使用 sha3_256 计算hmac。返回一个二进制数组。
hmac_sha3_256("secret", "my authenticated message")
hmac_sha3_512
使用 sha3_512 计算hmac。返回一个二进制数组。
hmac_sha3_512("secret", "my authenticated message")
html_select
解析 HTML 文档并返回与 CSS 选择器匹配的第一个元素。返回值是一个表格,其中 text 是内部文本,attrs 是元素属性的表格。
csrf = html_select(html, 'input[name="csrf"]')
token = csrf["attrs"]["value"]
html_select_list
与 html_select 相同,但返回所有匹配项而不是第一个。
html_select_list(html, 'input[name="csrf"]')
http_basic_auth
发送带有基本身份验证的 GET 请求。如果没有设置 WWW-Authenticate 标头且状态码不是 401,则返回 true。
http_basic_auth("https://httpbin.org/basic-auth/foo/buzz", user, password)
http_mksession
创建会话对象。这与 python-requests 中的 requests.Session 相似,并跟踪 cookie。
session = http_mksession()
http_request
准备 HTTP 请求。第一个参数是会话引用,并将该会话的 cookie 复制到请求中。发送请求后,将响应中的 cookie 复制回会话。
下一个参数是 method、url 和其他选项。请注意,即使没有设置选项,您仍然需要指定一个空的表 {}。以下选项可用
query- 应设置在 URL 上的查询参数映射headers- 应设置的头映射basic_auth- 使用{"用户, "密码"}配置基本身份验证头user_agent- 使用字符串覆盖默认用户代理json- 应进行 JSON 编码的请求正文form- 应进行表单编码的请求正文body- 作为字符串的原始请求正文
req = http_request(session, 'POST', 'https://httpbin.org/post', {
    json={
        user=user,
        password=password,
    }
})
resp = http_send(req)
if last_err() then return end
if resp["status"] ~= 200 then return "invalid status code" end
http_send
使用 http_request 发送构建的请求。返回一个包含以下键的表格
status- HTTP 状态码headers- 头表text- 响应正文作为字符串
req = http_request(session, 'POST', 'https://httpbin.org/post', {
    json={
        user=user,
        password=password,
    }
})
resp = http_send(req)
if last_err() then return end
if resp["status"] ~= 200 then return "invalid status code" end
json_decode
从 JSON 字符串解码 lua 值。
json_decode("{\"data\":{\"password\":\"fizz\",\"user\":\"bar\"},\"list\":[1,3,3,7]}")
json_encode
将 Lua 值编码为 JSON 字符串。注意,空表将被编码为空对象 {},而不是空列表 []。
x = json_encode({
    hello="world",
    almost_one=0.9999,
    list={1,3,3,7},
    data={
        user=user,
        password=password,
        empty=nil
    }
})
last_err
如果没有记录错误,则返回 nil,否则返回一个字符串。
if last_err() then return end
ldap_bind
连接到 LDAP 服务器并尝试使用给定的用户进行身份验证。
ldap_bind("ldaps://ldap.example.com/",
    "cn=\"" .. ldap_escape(user) .. "\",ou=users,dc=example,dc=com", password)
ldap_escape
在相对区分名中转义属性值。
ldap_escape(user)
ldap_search_bind
连接到 LDAP 服务器,登录到搜索用户,搜索目标用户,然后尝试使用搜索返回的第一个 DN 进行身份验证。
ldap_search_bind("ldaps://ldap.example.com/",
    -- the user we use to find the correct DN
    "cn=search_user,ou=users,dc=example,dc=com", "searchpw",
    -- base DN we search in
    "dc=example,dc=com",
    -- the user we test
    user, password)
MD5
使用 md5 对字节数组进行哈希并返回结果作为字节数组。
hex(md5("\x00\xff"))
mysql_connect
连接到 MySQL 数据库并尝试使用提供的凭据进行身份验证。如果成功,则返回 MySQL 连接。
sock = mysql_connect("127.0.0.1", 3306, user, password)
mysql_query
在 MySQL 连接上运行查询。第三个参数用于预处理语句。
rows = mysql_query(sock, 'SELECT VERSION(), :foo as foo', {
    foo='magic'
})
打印
打印变量的值。请注意,这将绕过常规写入器并可能影响进度条。仅用于调试。
print({
    data={
        user=user,
        password=password
    }
})
rand
返回一个具有最小和最大约束的随机 u32。返回值可以大于或等于最小边界,并且始终小于最大边界。此函数尚未经过密码学安全性审查。
rand(0, 256)
randombytes
生成指定数量的随机字节数。
randombytes(16)
SHA1
使用 sha1 对字节数组进行哈希并返回结果作为字节数组。
hex(sha1("\x00\xff"))
sha2_256
使用 sha2_256 对字节数组进行哈希并返回结果作为字节数组。
hex(sha2_256("\x00\xff"))
sha2_512
使用 sha2_512 对字节数组进行哈希并返回结果作为字节数组。
hex(sha2_512("\x00\xff"))
sha3_256
使用 sha3_256 对字节数组进行哈希并返回结果作为字节数组。
hex(sha3_256("\x00\xff"))
sha3_512
使用 sha3_512 对字节数组进行哈希并返回结果作为字节数组。
hex(sha3_512("\x00\xff"))
sleep
暂停线程指定的秒数。这主要用于调试并发。
sleep(3)
sock_connect
创建 TCP 连接。
sock = sock_connect("127.0.0.1", 1337)
sock_send
向套接字发送数据。
sock_send(sock, "hello world")
sock_recv
从套接字接收最多 4096 字节。
x = sock_recv(sock)
sock_sendline
向套接字发送一个字符串。字符串后自动附加换行符。
sock_sendline(sock, line)
sock_recvline
从套接字接收一行。该行包括换行符。
x = sock_recvline(sock)
sock_recvall
从套接字接收所有数据,直到 EOF。
x = sock_recvall(sock)
sock_recvline_contains
从服务器接收行,直到一行包含针,然后返回此行。
x = sock_recvline_contains(sock, needle)
sock_recvline_regex
从服务器接收行,直到一行与正则表达式匹配,然后返回此行。
x = sock_recvline_regex(sock, "^250 ")
sock_recvn
从套接字接收恰好 n 字节。
x = sock_recvn(sock, 4)
sock_recvuntil
在找到针之前接收数据,然后返回包括针在内的所有数据。
x = sock_recvuntil(sock, needle)
sock_sendafter
在找到针之前接收数据,然后将数据写入套接字。
sock_sendafter(sock, needle, data)
sock_newline
覆盖默认的 \n 换行符。
sock_newline(sock, "\r\n")
配置
您可以将配置文件放置在 ~/.config/authoscope.toml 以设置一些默认值。
全局用户代理
[runtime]
user_agent = "w3m/0.5.3+git20180125"
RLIMIT_NOFILE
[runtime]
# requires CAP_SYS_RESOURCE
# sudo setcap 'CAP_SYS_RESOURCE=+ep' /usr/bin/authoscope
rlimit_nofile = 64000
包装 Python 脚本
authoscope 运行时仍然非常基础,因此您可能偶尔需要使用常规的 Python 脚本。您的包装器可能如下所示
descr = "example.com"

function verify(user, password)
    ret = execve("./docs/test.py", {user, password})
    if last_err() then return end

    if ret == 2 then
        return "script signaled an exception"
    end

    return ret == 0
end
您的 Python 脚本可能如下所示
import sys

try:
    if sys.argv[1] == "foo" and sys.argv[2] == "bar":
        # correct credentials
        sys.exit(0)
    else:
        # incorrect credentials
        sys.exit(1)
except:
    # signal an exception
    # this requeues the attempt instead of discarding it
    sys.exit(2)
许可证
GPLv3+
依赖项
~27–44MB
~764K SLoC