5 个版本
| 1.0.0-beta.3 | 2024年1月15日 |
|---|---|
| 1.0.0-beta.2 | 2024年1月14日 |
| 1.0.0-beta.1 | 2023年5月27日 |
| 1.0.0-alpha | 2023年5月14日 |
#29 in 科学
53 每月下载量
用于 qhyccd-alpaca
265KB
5K SLoC
ascom-alpaca-rs
这是天文学设备标准 ASCOM Alpaca API 的 Rust 实现。
它实现了主要的 Alpaca API 客户端和服务器,以及自动发现机制和 ImageBytes 编码对相机图像的透明支持。
使用方法
编译功能
此 crate 定义了两套编译功能,通过仅选择所需的特性,有助于控制二进制大小和编译速度。
第一套功能沿客户端-服务器轴
client:启用对 Alpaca 兼容设备的客户端访问。server:允许将您的设备公开为 Alpaca 服务器。
第二套功能基于设备类型,并启用相应的特质
all-devices:启用以下所有功能。除非您正在构建通用天文学应用程序,否则不建议使用。camera:通过Camera特质启用对摄像头的支持。covercalibrator:启用 [...] 的CoverCalibrator特质。dome:启用Dome。filterwheel:启用FilterWheel。focuser:启用Focuser。observingconditions:启用ObservingConditions。rotator:启用Rotator。switch:启用Switch。telescope:启用Telescope。
一旦确定所需的功能,就可以将此crate添加到您的Cargo.toml中。例如,如果我在实现一个Alpaca相机驱动程序,我会在我的Cargo.toml中添加以下内容
[dependencies]
ascom-alpaca = { version = "0.1", features = ["client", "camera"] }
设备方法
所有设备类型 trait 方法都是异步的,并对应于 ASCOM Alpaca API。它们都返回 ASCOMResult<...>。
Device 超trait 包含 Alpaca API 中适用于所有设备的 "ASCOM 方法",以及一些用于设备注册的定制元数据方法
fn static_name(&self) -> &str:返回静态设备名称。fn unique_id(&self) -> &str:返回全局唯一的设备ID。
实现设备服务器
由于异步 trait 在稳定 Rust 中尚未原生支持,因此使用 async-trait crate 实现这些 trait。除此之外,您应像通常那样实现具有所有 Alpaca 方法的 trait
use ascom_alpaca::ASCOMResult;
use ascom_alpaca::api::{Device, Camera};
use async_trait::async_trait;

#[derive(Debug)]
struct MyCamera {
    // ...
}

#[async_trait]
impl Device for MyCamera {
    fn static_name(&self) -> &str {
        "My Camera"
    }

    fn unique_id(&self) -> &str {
        "insert GUID here"
    }

    // ...
}

#[async_trait]
impl Camera for MyCamera {
    async fn bayer_offset_x(&self) -> ASCOMResult<i32> {
        Ok(0)
    }

    async fn bayer_offset_y(&self) -> ASCOMResult<i32> {
        Ok(0)
    }

    // ...
}
跳过的任何方法都将默认为以下值
can_*功能检测方法 - 为false。Device::name- 为Device::static_name()的结果。Device::interface_version- 为3(此 crate 实现的最新 ASCOM 接口版本)。Device::supported_actions- 为空列表。- 所有其他方法 - 为
Err(ASCOMError::NOT_IMPLEMENTED)。这是您的责任,查阅文档并实现必需的方法。
实现 trait 后,您可以创建服务器,注册您的设备,并开始监听
use ascom_alpaca::Server;
use ascom_alpaca::api::CargoServerInfo;
use std::convert::Infallible;

// ...implement MyCamera...

#[tokio::main]
async fn main() -> eyre::Result<Infallible> {
    let mut server = Server {
        // helper macro to populate server information from your own Cargo.toml
        info: CargoServerInfo!(),
        ..Default::default()
    };

    // By default, the server will listen on dual-stack (IPv4 + IPv6) unspecified address with a randomly assigned port.
    // You can change that by modifying the `listen_addr` field:
    server.listen_addr.set_port(8000);

    // Create and register your device(s).
    server.devices.register(MyCamera { /* ... */ });

    // Start the infinite server loop.
    server.start().await
}
这将启动主 Alpaca 服务器以及自动发现响应器。
示例
-
examples/camera-server.rs:一个跨平台示例,将您的连接的摄像头作为 AlpacaCamera公开。> env RUST_LOG=debug { cargo run --example camera-server --release } Finished release [optimized] target(s) in 0.60s Running `target\release\examples\camera-server.exe` 2023-05-27T15:21:43.336191Z DEBUG camera_server: Registering webcam webcam=Webcam { unique_id: "150ddacb-7ad9-4754-b289-ae56210693e8::0", name: "Integrated Camera", description: "MediaFoundation Camera", max_format: CameraFormat { resolution: Resolution { width_x: 1280, height_y: 720 }, format: MJPEG, frame_rate: 30 }, subframe: RwLock { data: Subframe { bin: Size { x: 1, y: 1 }, offset: Point { x: 0, y: 0 }, size: Size { x: 1280, y: 720 } } }, last_exposure_start_time: RwLock { data: None }, last_exposure_duration: RwLock { data: None }, valid_bins: [1, 2, 4] } 2023-05-27T15:21:43.339433Z DEBUG ascom_alpaca::server: Binding Alpaca server addr=[::]:8000 2023-05-27T15:21:43.342897Z INFO ascom_alpaca::server: Bound Alpaca server bound_addr=[::]:8000 2023-05-27T15:21:43.369040Z WARN join_multicast_groups{listen_addr=::}: ascom_alpaca::server::discovery: err=An unknown, invalid, or unsupported option or level was specified in a getsockopt or setsockopt call. (os error 10042) 2023-05-27T15:21:43.370932Z DEBUG join_multicast_groups{listen_addr=::}: ascom_alpaca::server::discovery: return=() 2023-05-27T15:21:43.371861Z DEBUG ascom_alpaca::server: Bound Alpaca discovery server通过将摄像头切换到其他支持的分辨率(与原始分辨率成比例)来实现合并。
长时间曝光是通过累积单个帧直到总持续时间来模拟的。这种方法不能提供精确请求的曝光,但在其他方面工作得足够好。
-
star-adventurer-alpaca:这是jsorrell/star-adventurer-alpaca的一个分支,它实现了通过串行端口为Star Adventurer支架的Alpaca API。原始项目功能相当丰富,并手动实现了Alpaca API,因此它是一个将代码移植到这个库的好测试案例。
从客户端访问设备
如果您知道要访问的设备服务器的地址,您可以直接通过Client结构体访问它。
use ascom_alpaca::Client;

let client = Client::new("https://:8000")?;

// `get_server_info` returns high-level metadata of the server.
println!("Server info: {:#?}", client.get_server_info().await?);

// `get_devices` returns an iterator over all the devices registered on the server.
// Each is represented as a `TypedDevice` tagged enum encompassing all the device types as corresponding trait objects.
// You can either match on them to select the devices you're interested in, or, say, just print all of them:
println!("Devices: {:#?}", client.get_devices().await?.collect::<Vec<_>>());
如果您想在本地网络中发现设备服务器,可以通过discovery::DiscoveryClient结构体来这样做。
use ascom_alpaca::discovery::DiscoveryClient;
use ascom_alpaca::Client;
use futures::prelude::*;

// This holds configuration for the discovery client.
// You can customize prior to binding if you want.
let discovery_client = DiscoveryClient::new();
// This results in a discovery client bound to a local socket.
// It's intentionally split out into a separate API step to encourage reuse,
// for example so that user could click "Refresh devices" button in the UI
// and the application wouldn't have to re-bind the socket every time.
let mut bound_client = discovery_client.bind().await?;
// Now you can discover devices on the local networks.
bound_client.discover_addrs()
    // create a `Client` for each discovered address
    .map(|addr| Ok(Client::new_from_addr(addr)))
    .try_for_each(|client| async move {
        /* ...do something with devices via each client... */
        Ok::<_, eyre::Error>(())
    })
    .await?;
或者,如果您只想列出所有可用的设备,而不关心每个服务器的信息或错误
bound_client.discover_devices()
    .for_each(|device| async move {
        /* ...do something with each device... */
    })
    .await;
请注意,发现是一个基于UDP的协议,因此不能保证可靠性。
此外,如果设备服务器在多个网络接口上可用,则可能会多次发现相同的设备。虽然无法可靠地删除重复的服务器,但可以通过将它们存储在类似HashSet的东西或用于在服务器上注册任意设备的同一Devices结构体中来删除重复的设备。
use ascom_alpaca::api::{Camera, Devices};
use ascom_alpaca::discovery::DiscoveryClient;
use ascom_alpaca::Client;
use futures::prelude::*;

let devices =
    DiscoveryClient::new()
    .bind()
    .await?
    .discover_devices()
    .collect::<Devices>()
    .await;

// Now you can iterate over all the discovered devices via `iter_all`:
for (typed_device, index_within_category) in devices.iter_all() {
    println!("Discovered device: {typed_device:#?} (index: {index_within_category})");
}

// ...or over devices in a specific category via `iter<dyn Trait>`:
for camera in devices.iter::<dyn Camera>() {
    println!("Discovered camera: {camera:#?}");
}
示例
-
examples/discover.rs:一个简单的发现示例,列出所有找到的服务器和设备。 -
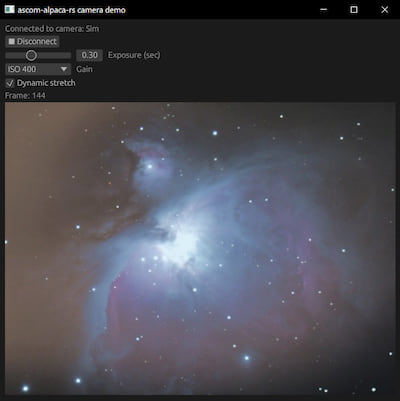
examples/camera-client.rs:一个跨平台的GUI示例,显示了从发现的Alpaca相机来的实时预览流。支持彩色、单色和Bayer传感器,并具有自动颜色转换的预览。
日志和跟踪
此crate使用tracing框架来记录跨度的事件,与Alpaca的ClientID、ClientTransactionID和ServerTransactionID字段集成。
您可以通过使用任何订阅crates来在您的应用程序中启用日志记录。
例如,tracing_subscriber::fmt将根据RUST_LOG环境变量将所有事件记录到stderr。
tracing_subscriber::fmt::init();
测试
由于这是一个用于与网络设备通信的库,因此应在较高层面上针对真实设备进行测试。
特别是,如果您正在实现Alpaca设备,请确保针对您的设备服务器运行ConformU - ASCOM的官方合规性检查器。
许可证
许可权属于以下任一
- Apache License,版本2.0 (LICENSE-APACHE-2.0)
- MIT许可证 (LICENSE-MIT)
依赖项
~7–40MB
~619K SLoC
