16个不稳定版本 (7个破坏性更新)
| 新增 0.8.0 | 2024年8月5日 |
|---|---|
| 0.7.0 | 2023年12月20日 |
| 0.6.0 | 2023年4月11日 |
| 0.5.0 | 2022年9月30日 |
| 0.1.0 | 2020年3月23日 |
#1531 在 过程宏 中
每月下载量256,773
用于 35 个crate(通过 tabled)
45KB
1K SLoC
 tabled
一个易于使用的库,用于漂亮地打印Rust结构体和枚举的表格。
您可以使用这个库做很多事情。
如果它没有做您认为应该做的事情,或者不清楚如何做,请提交一个问题。
这个README包含了很多信息,但可能并不完整,
您可以在 示例 文件夹中找到更多示例。

目录
用法
要将结构体或枚举的列表打印为表格,有两种方法。
- 使用构建器模式逐步构建表格。
- 为您的类型实现
Tabled特质(或使用derive宏注解您的类型)并使用此类型的迭代器。
当数据模式未知时,构建器模式很有用,而在事先知道数据结构的情况下,类型化结构体很有用。
请注意,您的表格有大量可用的mods,以及如derive宏和proc宏之类的辅助工具。
下面以derive方法开始,演示了两种方法。
use tabled::{Tabled, Table};

#[derive(Tabled)]
struct Language {
    name: &'static str,
    designed_by: &'static str,
    invented_year: usize,
}

let languages = vec![
    Language{
        name: "C",
        designed_by: "Dennis Ritchie",
        invented_year: 1972
    },
    Language{
        name: "Go",
        designed_by: "Rob Pike",
        invented_year: 2009
    },
    Language{
        name: "Rust",
        designed_by: "Graydon Hoare",
        invented_year: 2010
    },
];

let table = Table::new(languages).to_string();

let expected = "+------+----------------+---------------+\n\
                | name | designed_by    | invented_year |\n\
                +------+----------------+---------------+\n\
                | C    | Dennis Ritchie | 1972          |\n\
                +------+----------------+---------------+\n\
                | Go   | Rob Pike       | 2009          |\n\
                +------+----------------+---------------+\n\
                | Rust | Graydon Hoare  | 2010          |\n\
                +------+----------------+---------------+";

assert_eq!(table, expected);
下一个示例说明了构建器模式。
use tabled::{builder::Builder, settings::Style};

let lyrics = r#"
    And the cat's in the cradle and the silver spoon
    Little boy blue and the man on the moon
    When you comin' home dad?
    I don't know when, but we'll get together then son
    You know we'll have a good time then
"#;

let mut builder = Builder::default();
for line in lyrics.lines() {
    let line = line.trim();
    if line.is_empty() {
        continue;
    }

    let words: Vec<_> = line.split_terminator(' ').collect();
    builder.push_record(words);
}

let columns = (0..builder.count_columns()).map(|i| i.to_string());
builder.insert_record(0, columns);

let mut table = builder.build();
table.with(Style::ascii_rounded());

let expected = concat!(
    ".------------------------------------------------------------------------------------.\n",
    "| 0      | 1     | 2      | 3     | 4    | 5      | 6    | 7        | 8      | 9     |\n",
    "| And    | the   | cat's  | in    | the  | cradle | and  | the      | silver | spoon |\n",
    "| Little | boy   | blue   | and   | the  | man    | on   | the      | moon   |       |\n",
    "| When   | you   | comin' | home  | dad? |        |      |          |        |       |\n",
    "| I      | don't | know   | when, | but  | we'll  | get  | together | then   | son   |\n",
    "| You    | know  | we'll  | have  | a    | good   | time | then     |        |       |\n",
    "'------------------------------------------------------------------------------------'",
);

assert_eq!(table, expected);
设置
本节列出了您可以应用于表格的设置。大多数设置都由Table::with和Table::modify利用。
样式
Style的唯一目的是配置表格外观。在const/static上下文中,Style的主要用途是。如果您想在运行时查看样式,则可能更适合使用Theme。
任何Style都可以自定义。同样,可以从头开始创建自定义Style。
可以这样使用样式。
use tabled::{Table, Style};

let mut table = Table::new(&data);
table.with(Style::psql());
样式
有大量的预配置样式。下面是它们的渲染列表。
如果您认为应该添加一些有价值的样式,请提出问题。
ascii
+------+----------------+---------------+
| name | designed_by    | invented_year |
+------+----------------+---------------+
| C    | Dennis Ritchie | 1972          |
+------+----------------+---------------+
| Rust | Graydon Hoare  | 2010          |
+------+----------------+---------------+
| Go   | Rob Pike       | 2009          |
+------+----------------+---------------+
现代
┌──────┬────────────────┬───────────────┐
│ name │ designed_by    │ invented_year │
├──────┼────────────────┼───────────────┤
│ C    │ Dennis Ritchie │ 1972          │
├──────┼────────────────┼───────────────┤
│ Rust │ Graydon Hoare  │ 2010          │
├──────┼────────────────┼───────────────┤
│ Go   │ Rob Pike       │ 2009          │
└──────┴────────────────┴───────────────┘
锐利
┌──────┬────────────────┬───────────────┐
│ name │ designed_by    │ invented_year │
├──────┼────────────────┼───────────────┤
│ C    │ Dennis Ritchie │ 1972          │
│ Rust │ Graydon Hoare  │ 2010          │
│ Go   │ Rob Pike       │ 2009          │
└──────┴────────────────┴───────────────┘
圆角
╭──────┬────────────────┬───────────────╮
│ name │ designed_by    │ invented_year │
├──────┼────────────────┼───────────────┤
│ C    │ Dennis Ritchie │ 1972          │
│ Rust │ Graydon Hoare  │ 2010          │
│ Go   │ Rob Pike       │ 2009          │
╰──────┴────────────────┴───────────────╯
扩展
╔══════╦════════════════╦═══════════════╗
║ name ║ designed_by    ║ invented_year ║
╠══════╬════════════════╬═══════════════╣
║ C    ║ Dennis Ritchie ║ 1972          ║
╠══════╬════════════════╬═══════════════╣
║ Rust ║ Graydon Hoare  ║ 2010          ║
╠══════╬════════════════╬═══════════════╣
║ Go   ║ Rob Pike       ║ 2009          ║
╚══════╩════════════════╩═══════════════╝
psql
 name | designed_by    | invented_year
------+----------------+---------------
 C    | Dennis Ritchie | 1972
 Rust | Graydon Hoare  | 2010
 Go   | Rob Pike       | 2009
markdown
| name | designed_by    | invented_year |
|------|----------------|---------------|
| C    | Dennis Ritchie | 1972          |
| Rust | Graydon Hoare  | 2010          |
| Go   | Rob Pike       | 2009          |
re_structured_text
====== ================ ===============
 name   designed_by     invented_year
====== ================ ===============
 C      Dennis Ritchie   1972
 Rust   Graydon Hoare    2010
 Go     Rob Pike         2009
====== ================ ===============
点
.........................................
: name : designed_by    : invented_year :
:......:................:...............:
: C    : Dennis Ritchie : 1972          :
: Rust : Graydon Hoare  : 2010          :
: Go   : Rob Pike       : 2009          :
:......:................:...............:
ascii_rounded
.---------------------------------------.
| name | designed_by    | invented_year |
| C    | Dennis Ritchie | 1972          |
| Rust | Graydon Hoare  | 2010          |
| Go   | Rob Pike       | 2009          |
'---------------------------------------'
空白
 name   designed_by      invented_year
 C      Dennis Ritchie   1972
 Rust   Graydon Hoare    2010
 Go     Rob Pike         2009
空
name designed_by    invented_year
C    Dennis Ritchie 1972
Rust Graydon Hoare  2010
Go   Rob Pike       2009
样式自定义
您可以修改现有样式以适应您的需求。请注意,所有修改都是在编译时完成的。
有关更多自定义选项,请参阅文档。
如果您无法在编译时做出决定,请使用Theme。
以下是一个自定义示例,其中我们删除了所有垂直和水平线,但添加了单线。
use tabled::settings::{Style, HorizontalLine, VerticalLine};

let style = Style::modern()
    .horizontals([(1, HorizontalLine::inherit(Style::modern()).horizontal('═'))])
    .verticals([(1, VerticalLine::inherit(Style::modern()))])
    .remove_horizontal()
    .remove_vertical();
此样式将如下所示
┌──────┬───────────────────────────────┐
│ name │ designed_by     invented_year │
├══════┼═══════════════════════════════┤
│ C    │ Dennis Ritchie  1972          │
│ Go   │ Rob Pike        2009          │
│ Rust │ Graydon Hoare   2010          │
└──────┴───────────────────────────────┘
如前所述,在const上下文中进行自定义并不总是最佳选择,您可以使用Theme对象来完成此操作。
Theme本身非常强大,您可以在文档中查看它。
use tabled::grid::config::{Border, HorizontalLine};
use tabled::settings::Theme;

let mut style = Theme::default();
style.insert_horizontal_line(1, HorizontalLine::full('-', '-', '+', '+'));
style.set_border_frame(Border::filled('+'));
此样式将如下所示
+++++++++++++++++++++++++++++++++++++++
+ name  designed_by     invented_year +
+-------------------------------------+
+ C     Dennis Ritchie  1972          +
+ Go    Rob Pike        2009          +
+ Rust  Graydon Hoare   2010          +
+++++++++++++++++++++++++++++++++++++++
单元格边框
有时tabled::Style设置不足以更改特定单元格的边框。
为此,您可以使用Border。
use tabled::{settings::{object::Rows, Border, Style}, Table};

let data = [["123", "456"], ["789", "000"]];

let table = Table::new(data)
    .with(Style::ascii())
    .modify(Rows::first(), Border::new().set_top('x'))
    .to_string();

assert_eq!(
    table,
    "+xxxxx+xxxxx+\n\
     | 0   | 1   |\n\
     +-----+-----+\n\
     | 123 | 456 |\n\
     +-----+-----+\n\
     | 789 | 000 |\n\
     +-----+-----+"
);
边框上的文本
您可以将字符串设置为水平边框线。
use tabled::{settings::style::LineText, Table};
use tabled::settings::object::Rows;

let mut table = Table::new(["Hello World"]);
table.with(LineText::new("+-.table", Rows::first()));

assert_eq!(
    table.to_string(),
    "+-.table------+\n\
     | &str        |\n\
     +-------------+\n\
     | Hello World |\n\
     +-------------+"
);
有时设置字符串可能不方便。但是,需要设置自定义字符。
您可以使用LineChar来实现这一点。
use tabled::{
    settings::{
        object::Columns,
        style::{LineChar, Offset},
        Modify, Style,
    },
    Table,
};

let table = Table::new([["Hello", "World", "!"]])
    .with(Style::markdown())
    .with(
        Modify::new(Columns::new(..))
            .with(LineChar::horizontal(':', Offset::Begin(0)))
            .with(LineChar::horizontal(':', Offset::End(0))),
    )
    .to_string();

assert_eq!(
    table,
    "| 0     | 1     | 2 |\n\
     |:-----:|:-----:|:-:|\n\
     | Hello | World | ! |"
);
彩色边框
您可以使用 Color 来设置所有边框的颜色。
use tabled::settings::{style::BorderColor, Color};

table.with(BorderColor::new().set_top(Color::FG_GREEN));
您也可以通过使用 BorderColored 来设置单个单元格的颜色边框。
use tabled::settings::{object::Columns, style::BorderColor, Color};

table.modify(Columns::single(2), BorderColor::new().set_top(Color::FG_GREEN));
主题
考虑有几个原子设置比一个但功能齐全的设置更好。
但是,tabled::settings::themes::* 有一点偏离这个想法。它包含一个设置列表,这些设置会对表格进行较大的更改。
第一个是 Theme 本身。您可以使用它更改布局、设置样式、着色、配置边框,甚至反转表格。
use tabled::settings::{
    object::{Columns, Object},
    Alignment, Style, Theme,
};

let mut style = Theme::from_style(Style::ascii_rounded());
style.remove_border_horizontal();
style.remove_border_vertical();
style.align_columns(Alignment::left());
style.set_footer(true);

table.with(style);
table.modify(Columns::new(1..).not(Columns::last()), Alignment::center());
table.modify(Columns::last(), Alignment::right());
运行第一个示例时,您将看到以下输出。
.---------------------------------------------------------------------------.
| name                  C             Go          Rust                 name |
| designed_by     Dennis Ritchie   Rob Pike   Graydon Hoare     designed_by |
| invented_year        1972          2009         2010        invented_year |
'---------------------------------------------------------------------------'
彩色内容
您可以通过模式或特定单元格来着色内容。
use std::iter::FromIterator;

use tabled::{
    builder::Builder,
    settings::{object::Rows, style::Style, themes::Colorization, Color},
};

let data = vec![
    vec!["Word", "Translation", "Lang"],
    vec!["World", "le monde", "FR"],
    vec!["World", "Welt", "DE"],
];

let color_col1 = Color::BG_GREEN | Color::FG_BLACK;
let color_col2 = Color::BG_MAGENTA | Color::FG_BLACK;
let color_col3 = Color::BG_YELLOW | Color::FG_BLACK;
let color_head = Color::BG_WHITE | Color::FG_BLACK;
let color_head_text = Color::BG_BLUE | Color::FG_BLACK;

let mut table = Builder::from_iter(data).build();
table
    .with(Style::empty())
    .with(Colorization::columns([color_col1, color_col2, color_col3]))
    .with(Colorization::exact([color_head], Rows::first()))
    .modify(Rows::first(), color_head_text);

println!("{table}");

列名
您可以将标题移至边框右侧。
use tabled::{
    builder::Builder,
    settings::{style::Style, themes::ColumnNames},
};

let data = vec![
    vec![String::from("header 0"), String::from("header 1")],
    vec![String::from("Hello"), String::from("World")],
    vec![String::from("Bonjour"), String::from("le monde")],
    vec![String::from("Hallo"), String::from("Welt")],
];

let mut table = Builder::from(data).build();
table.with(Style::modern()).with(ColumnNames::default());

println!("{table}");
┌header 0─┬header 1──┐
│ Hello   │ World    │
├─────────┼──────────┤
│ Bonjour │ le monde │
├─────────┼──────────┤
│ Hallo   │ Welt     │
└─────────┴──────────┘
对齐
您可以为任何 Object(例如 Columns、Rows)设置水平和垂直对齐。
use tabled::{
    settings::{object::Segment, Alignment, Settings},
    Table,
};

let data = [("Text", "Multiline\ntext"), ("text", "text")];
let mut table = Table::new(data);
table.modify(
    Segment::all(),
    Settings::new(Alignment::right(), Alignment::bottom()),
);

println!("{table}");
输出如下所示。
+------+-----------+
| &str |      &str |
+------+-----------+
|      | Multiline |
| Text | text      |
+------+-----------+
| text |      text |
+------+-----------+
格式
Format 函数提供了一个修改单元格的接口。
use tabled::{
    settings::{format::Format, object::Rows},
    Table,
};

let data = vec![[0; 10]; 9];
let mut table = Table::new(data);
table.modify(
    Rows::new(..),
    Format::positioned(|_, (row, col)| ((row + 1) * (col + 1)).to_string()),
);

println!("{table}");
您必须得到的结果将是。
+----+----+----+----+----+----+----+----+----+-----+
| 1  | 2  | 3  | 4  | 5  | 6  | 7  | 8  | 9  | 10  |
+----+----+----+----+----+----+----+----+----+-----+
| 2  | 4  | 6  | 8  | 10 | 12 | 14 | 16 | 18 | 20  |
+----+----+----+----+----+----+----+----+----+-----+
| 3  | 6  | 9  | 12 | 15 | 18 | 21 | 24 | 27 | 30  |
+----+----+----+----+----+----+----+----+----+-----+
| 4  | 8  | 12 | 16 | 20 | 24 | 28 | 32 | 36 | 40  |
+----+----+----+----+----+----+----+----+----+-----+
| 5  | 10 | 15 | 20 | 25 | 30 | 35 | 40 | 45 | 50  |
+----+----+----+----+----+----+----+----+----+-----+
| 6  | 12 | 18 | 24 | 30 | 36 | 42 | 48 | 54 | 60  |
+----+----+----+----+----+----+----+----+----+-----+
| 7  | 14 | 21 | 28 | 35 | 42 | 49 | 56 | 63 | 70  |
+----+----+----+----+----+----+----+----+----+-----+
| 8  | 16 | 24 | 32 | 40 | 48 | 56 | 64 | 72 | 80  |
+----+----+----+----+----+----+----+----+----+-----+
| 9  | 18 | 27 | 36 | 45 | 54 | 63 | 72 | 81 | 90  |
+----+----+----+----+----+----+----+----+----+-----+
| 10 | 20 | 30 | 40 | 50 | 60 | 70 | 80 | 90 | 100 |
+----+----+----+----+----+----+----+----+----+-----+
填充
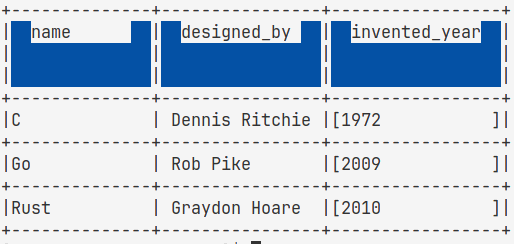
Padding 结构提供了一个为单元格左、右、上和下填充的接口。您可以设置缩进大小和填充颜色。
use tabled::settings::{
    object::{Columns, Object, Rows},
    Color, Padding,
};

// Set a padding size for first column
table.modify(Columns::first().not((0, 0)), Padding::new(0, 10, 0, 0));

// Set a padding for a last column (except first row)
table.modify(Columns::last().not(Rows::first()), Padding::new(1, 1, 0, 0).fill('[', ']', ' ', ' '));

// Set a padding for a first row
table.modify(
    Rows::first(),
    Padding::new(2, 2, 0, 2).fill(' ', ' ', ' ', ' ').colorize(
        Color::BG_BLUE,
        Color::BG_BLUE,
        Color::BG_BLUE,
        Color::BG_BLUE,
    ),
);
将最后一个更改应用于第一个示例将产生以下结果。
边距
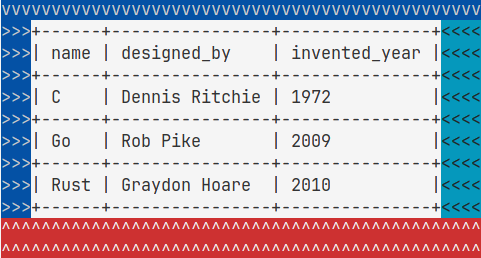
Margin 设置围绕表格的额外空间(顶部、底部、左侧、右侧)。至于 Padding,您可以设置额外空间的缩进、大小和颜色。
use tabled::settings::Margin;

table.with(Margin::new(3, 4, 1, 2).fill('>', '<', 'v', '^'));
如果您针对第一个示例运行它,您将得到。
vvvvvvvvvvvvvvvvvvvvvvvvvvvvvvvvvvvvvvvvvvvvvvvv
>>>+------+----------------+---------------+<<<<
>>>| name | designed_by    | invented_year |<<<<
>>>+------+----------------+---------------+<<<<
>>>| C    | Dennis Ritchie | 1972          |<<<<
>>>+------+----------------+---------------+<<<<
>>>| Go   | Rob Pike       | 2009          |<<<<
>>>+------+----------------+---------------+<<<<
>>>| Rust | Graydon Hoare  | 2010          |<<<<
>>>+------+----------------+---------------+<<<<
^^^^^^^^^^^^^^^^^^^^^^^^^^^^^^^^^^^^^^^^^^^^^^^^
^^^^^^^^^^^^^^^^^^^^^^^^^^^^^^^^^^^^^^^^^^^^^^^^
边距颜色
您可以为字符设置颜色。
use tabled::settings::{Margin, Color};

table.with(Margin::new(3, 4, 1, 2).fill('>', '<', 'v', '^').colorize(
    Color::BG_BRIGHT_BLUE,
    Color::BG_BRIGHT_CYAN,
    Color::BG_BLUE,
    Color::BG_RED,
));
阴影
Shadow 可用于设置类似边距的“阴影”。
use tabled::{settings::{Style, Shadow}, Table};

let data = vec![["A", "B", "C"]];
let table = Table::new(data)
    .with(Style::modern())
    .with(Shadow::new(1))
    .to_string();

println!("{}", table);
输出可能如下所示。
┌───┬───┬───┐
│ 0 │ 1 │ 2 │▒
├───┼───┼───┤▒
│ A │ B │ C │▒
└───┴───┴───┘▒
 ▒▒▒▒▒▒▒▒▒▒▒▒▒
宽度
使用以下结构,您可以配置表格和单个单元格的宽度。
请注意,Width 仅控制内容,因此它不能使事物小于一定最小值。请注意,它在不考虑 Padding 时调整宽度。
函数保留 ansi 颜色序列(当 ansi 功能开启时)。
以下是一个设置精确表格宽度的示例。
use tabled::{
    settings::{
        peaker::{PriorityMax, PriorityMin},
        Settings, Width,
    },
    Table,
};

fn gen_table(string_size: usize, width: usize) -> String {
    let data = vec![(string_size.to_string(), "x".repeat(string_size))];

    let mut table = Table::new(data);
    table.with(Settings::new(
        Width::wrap(width).priority::<PriorityMax>(),
        Width::increase(width).priority::<PriorityMin>(),
    ));

    table.to_string()
}

let table = gen_table(50, 40);
println!("{table}");

let table = gen_table(20, 40);
println!("{table}");
结果必须如下所示。
+--------+-----------------------------+
| String | String                      |
+--------+-----------------------------+
| 50     | xxxxxxxxxxxxxxxxxxxxxxxxxxx |
|        | xxxxxxxxxxxxxxxxxxxxxxx     |
+--------+-----------------------------+
+---------------+----------------------+
| String        | String               |
+---------------+----------------------+
| 20            | xxxxxxxxxxxxxxxxxxxx |
+---------------+----------------------+
截断
Truncate 通过截断内容来设置单元格的最大宽度。
use tabled::settings::{Width, object::Rows};

// Truncating content to 10 chars in case it's bigger than that
// in a first row.
table.modify(Rows::first(), Width::truncate(10));

// Truncating content to 7 chars and puts a suffix '...' after it
// in all rows except a first.
table.modify(Rows::new(1..), Width::truncate(10).suffix("..."));
Truncate 可以用于设置整个表格的最大宽度。
use tabled::settings::Width;

// Tries to set table width to 22, in case it's bigger than that.
table.with(Width::truncate(22));
它可以与 MinWidth 结合使用来设置精确的表格大小。
换行
Wrap 通过将内容包装到新行来设置单元格的最大宽度。
use tabled::settings::{Width, object::Rows};

// Wrap content to 10 chars in case it's bigger than that
// in a first row.
table.modify(Rows::first().with(Width::wrap(10)));

// Use a strategy where we try not to keep words split (where possible).
table.modify(Rows::new(1..).with(Width::wrap(10).keep_words()));
Wrap 可以用于设置整个表格的最大宽度。
use tabled::settings::Width;

// Tries to set table width to 22, in case it's bigger than that.
table.with(Width::wrap(22));
它可以与 MinWidth 结合使用来设置精确的表格大小。
增加宽度
MinWidth 设置对象的最小宽度。
use tabled::settings::{Width, object::Rows};

// increase the space used by cells in all rows except the header to be at least 10
table.modify(Rows::new(1..), Width::increase(10));
MinWidth 还可以用于设置整个表格的最小宽度。
use tabled::settings::Width;

// increase width of a table in case it was lower than 10.
table.with(Width::increase(10));
它可以与 Truncate 和 Wrap 结合使用来设置精确的表格大小。
对齐
您可以使用 Justify 为所有列设置固定宽度。
use tabled::settings::Width;

table.with(Width::justify(10));
优先级
您可以通过设置优先级来调整 Truncate、Wrap、MinWidth 逻辑的优先级。
use tabled::settings::{Width, peaker::PriorityMax};

table.with(Width::truncate(10).priority::<PriorityMax>());
百分比
默认情况下,您使用 usize 整数来设置宽度设置,但您也可以使用 tabled::width::Percent。
use tabled::settings::{Width, measurement::Percent};

table.with(Width::wrap(Percent(75)));
高度
您可以使用 Height 修饰符增加表格或特定单元格的高度。
请注意,Height 只控制内容,因此它不能使事物小于某个最小值。
以下是设置精确表格高度和宽度的示例。
use std::iter::FromIterator;
use tabled::{
    settings::{Height, Settings, Width},
    Table,
};

fn gen_data(width: usize, height: usize) -> Vec<Vec<String>> {
    let dims = format!("{}x{}", width, height);
    let string = vec!["x".repeat(width); height].join("\n");

    vec![
        vec![String::from("N"), String::from("string")],
        vec![dims, string],
    ]
}

fn gen_table(data: Vec<Vec<String>>, width: usize, height: usize) -> String {
    let mut table = Table::from_iter(data);

    table.with(
        Settings::empty()
            .with(Width::truncate(width))
            .with(Width::increase(width))
            .with(Height::increase(height))
            .with(Height::limit(height)),
    );

    table.to_string()
}

println!("{}", gen_table(gen_data(40, 10), 30, 8));
println!("{}", gen_table(gen_data(40, 4), 80, 12));
+-------+--------------------+
| N     | string             |
|       |                    |
|       |                    |
+-------+--------------------+
| 40x10 | xxxxxxxxxxxxxxxxxx |
|       |                    |
+-------+--------------------+
+-----------------------------------+------------------------------------------+
| N                                 | string                                   |
|                                   |                                          |
|                                   |                                          |
+-----------------------------------+------------------------------------------+
| 40x4                              | xxxxxxxxxxxxxxxxxxxxxxxxxxxxxxxxxxxxxxxx |
|                                   | xxxxxxxxxxxxxxxxxxxxxxxxxxxxxxxxxxxxxxxx |
|                                   | xxxxxxxxxxxxxxxxxxxxxxxxxxxxxxxxxxxxxxxx |
|                                   | xxxxxxxxxxxxxxxxxxxxxxxxxxxxxxxxxxxxxxxx |
|                                   |                                          |
|                                   |                                          |
+-----------------------------------+------------------------------------------+
高度增加
可以通过 Height::increase 来增加整个表格中单元格的高度。
use tabled::settings::{Height, object::Rows};

// increase height of a table in case it was lower than 10.
table.with(Height::increase(10));

// increase height of cells in the last row on a table in case if some of them has it lower than 10.
table.modify(Rows::last(), Height::increase(10));
高度限制
可以通过 Height::limit 来截断整个表格中单元格的高度。
use tabled::settings::{Height, object::Rows};

// decrease height of a table to 10 in case it was bigger than that.
table.with(Height::limit(10));

// decrease height of cells in the last row on a table to 10 in case if some of them has it bigger than that.
table.modify(Rows::last(), Height::limit(10));
旋转
您可以使用 tabled::Rotate 来旋转表格。
想象您已经有一个表格,输出可能看起来像这样。
┌────┬──────────────┬───────────────────────────┐
│ id │ distribution │ link                      │
├────┼──────────────┼───────────────────────────┤
│ 0  │ Fedora       │ https://getfedora.org/    │
├────┼──────────────┼───────────────────────────┤
│ 2  │ OpenSUSE     │ https://opensuse.net.cn/ │
├────┼──────────────┼───────────────────────────┤
│ 3  │ Endeavouros  │ https://endeavouros.com/  │
└────┴──────────────┴───────────────────────────┘
现在我们将添加以下修饰符,输出将旋转:
use tabled::settings::Rotate;

table.with(Rotate::Left);
┌──────────────┬────────────────────────┬───────────────────────────┬──────────────────────────┐
│ link         │ https://getfedora.org/ │ https://opensuse.net.cn/ │ https://endeavouros.com/ │
├──────────────┼────────────────────────┼───────────────────────────┼──────────────────────────┤
│ distribution │ Fedora                 │ OpenSUSE                  │ Endeavouros              │
├──────────────┼────────────────────────┼───────────────────────────┼──────────────────────────┤
│ id           │ 0                      │ 2                         │ 3                        │
└──────────────┴────────────────────────┴───────────────────────────┴──────────────────────────┘
禁用
您可以使用 Disable 来删除表格中的某些行或列。
use tabled::settings::{
    object::{Columns, Rows},
    Disable,
};

table
    .with(Disable::row(Rows::first()))
    .with(Disable::column(Columns::single(2)));
如果将上面的示例应用于文件中的第一个示例,它将看起来像这样。
+------+----------------+
| C    | Dennis Ritchie |
+------+----------------+
| Go   | Rob Pike       |
+------+----------------+
| Rust | Graydon Hoare  |
+------+----------------+
提取
您可以使用 Extract 从表格中提取数据段,以便更密切地关注它。
use tabled::settings::Extract;

table.with(Extract::segment(1..3, 1..));
+-------+-------------+-----------+
|  i32  |    &str     |   bool    |
+-------+-------------+-----------+         +-------------+-----------+
| : 0 : | : Grodno :  | : true :  |         | : Grodno :  | : true :  |
+-------+-------------+-----------+    =    +-------------+-----------+
| : 1 : |  : Minsk :  | : true :  |         |  : Minsk :  | : true :  |
+-------+-------------+-----------+         +-------------+-----------+
| : 2 : | : Hamburg : | : false : |
+-------+-------------+-----------+
| : 3 : |  : Brest :  | : true :  |
+-------+-------------+-----------+
标题、页脚和面板
您可以为表格添加 Header 和 Footer 来显示一些信息。
use tabled::settings::Panel;

let count_elements = table.count_rows();

table
    .with(Panel::vertical(0, "A vertical panel").width(1))
    .with(Panel::header("Tabled Name"))
    .with(Panel::footer(format!("{} elements", count_elements)));
当应用于该文件的主体示例时,将产生以下输出。
+---+------+----------------+---------------+
| Tabled Name                               |
+---+------+----------------+---------------+
| A | name | designed_by    | invented_year |
|   |      |                |               |
| v |      |                |               |
| e |      |                |               |
+ r +------+----------------+---------------+
| t | C    | Dennis Ritchie | 1972          |
| i |      |                |               |
| c |      |                |               |
+ a +------+----------------+---------------+
| l | Go   | Rob Pike       | 2009          |
|   |      |                |               |
| p |      |                |               |
+ a +------+----------------+---------------+
| n | Rust | Graydon Hoare  | 2010          |
| e |      |                |               |
| l |      |                |               |
+---+------+----------------+---------------+
| 4 elements                                |
+---+------+----------------+---------------+
合并
通过使用 Merge 结合重复项,可以创建 "Panel"。
use tabled::{settings::merge::Merge, Table};

let data = [['A', 'B', 'B'], ['A', 'W', 'E'], ['Z', 'Z', 'Z']];

let mut table = Table::new(data);
table.with(Merge::horizontal()).with(Merge::vertical());

println!("{}", table);
+---+---+---+
| 0 | 1 | 2 |
+---+---+---+
| A | B     |
+   +---+---+
|   | W | E |
+---+---+---+
| Z         |
+---+---+---+
连接
您可以使用 Concat 连接两个表格。它将垂直或水平地将两个表格粘合在一起。
以下示例显示了该文件主要表格的水平粘合结果。
use tabled::settings::Concat;

table.with(Concat::horizontal(table.clone()));
结果。
+------+----------------+---------------+------+----------------+---------------+
| name | designed_by    | invented_year | name | designed_by    | invented_year |
+------+----------------+---------------+------+----------------+---------------+
| C    | Dennis Ritchie | 1972          | C    | Dennis Ritchie | 1972          |
+------+----------------+---------------+------+----------------+---------------+
| Go   | Rob Pike       | 2009          | Go   | Rob Pike       | 2009          |
+------+----------------+---------------+------+----------------+---------------+
| Rust | Graydon Hoare  | 2010          | Rust | Graydon Hoare  | 2010          |
+------+----------------+---------------+------+----------------+---------------+
以下示例显示了该文件主要表格的垂直粘合结果。
use tabled::settings::Concat;

table.with(Concat::vertical(table.clone()));
结果。
+------+----------------+---------------+
| name | designed_by    | invented_year |
+------+----------------+---------------+
| C    | Dennis Ritchie | 1972          |
+------+----------------+---------------+
| Go   | Rob Pike       | 2009          |
+------+----------------+---------------+
| Rust | Graydon Hoare  | 2010          |
+------+----------------+---------------+
| name | designed_by    | invented_year |
+------+----------------+---------------+
| C    | Dennis Ritchie | 1972          |
+------+----------------+---------------+
| Go   | Rob Pike       | 2009          |
+------+----------------+---------------+
| Rust | Graydon Hoare  | 2010          |
+------+----------------+---------------+
高亮显示
Highlight 可以用来更改目标区域的边框。这里是一个示例。
use tabled::{
    settings::{
        object::{Columns, Object, Rows},
        Border, Highlight, Style,
    },
    Table,
};

let data = vec![["A", "B", "C"], ["D", "E", "F"]];

let mut table = Table::new(data);
table.with(Style::modern());
table.with(Highlight::border(
    Rows::first().and(Columns::single(2).and((1, 1))),
    Border::filled('*'),
));

println!("{}", table);
生成的表格如下。
*************
* 0 │ 1 │ 2 *
*****───┼───*
│ A * B │ C *
├───*****───*
│ D │ E * F *
└───┴───*****
跨
可以将水平(列)跨度和垂直(行)跨度设置到单元格中。对于某些外观,这可能在表格边框上造成视觉伪影(见 #399)。这可以通过使用 tabled::settings::style::BorderSpanCorrection 来修复。
水平跨
use tabled::{
    settings::{Alignment, Span},
    Table,
};

let data = vec![["A", "B", "C"], ["D", "E", "F"]];

let mut table = Table::new(data);
table
    .modify((0, 0), Span::column(3))
    .modify((1, 0), Span::column(2))
    .with(Alignment::center());

println!("{}", table);
+---+---+---+
|     0     |
+---+---+---+
|   A   | C |
+---+---+---+
| D | E | F |
+---+---+---+
垂直跨
use tabled::{
    settings::{Alignment, Span},
    Table,
};

let data = vec![["A", "B", "C"], ["D", "E", "F"]];

let mut table = Table::new(data);
table
    .modify((0, 1), Span::row(3))
    .with(Alignment::center())
    .with(Alignment::center_vertical());

println!("{}", table);
+---+---+---+
| 0 |   | 2 |
+---+   +---+
| A | 1 | C |
+---+   +---+
| D |   | F |
+---+---+---+
分割
您可以使用 Split 在一行或一列上拆分表格,将超出该点的单元格重新分配到新的形状中,所提供的点作为新,上边界。
将此添加到第一个示例中,将得到下一个表格。
use tabled::settings::{Style, split::Split};

table.with(Style::modern());
table.with(Split::column(2).concat());
运行示例的结果如下。
┌───────────────┬────────────────┐
│ name          │ designed_by    │
├───────────────┼────────────────┤
│ C             │ Dennis Ritchie │
├───────────────┼────────────────┤
│ Go            │ Rob Pike       │
├───────────────┼────────────────┤
│ Rust          │ Graydon Hoare  │
├───────────────┼────────────────┤
│ invented_year │                │
├───────────────┼────────────────┤
│ 1972          │                │
├───────────────┼────────────────┤
│ 2009          │                │
├───────────────┼────────────────┤
│ 2010          │                │
└───────────────┴────────────────┘
复制
可以复制一组单元格到另一组。
use tabled::{Table, settings::{Dup, object::Rows}};

let mut table = Table::new(data);

// copy lastfirst line to the last line (last line gets erased).
table.with(Dup::new(Rows::last(), Rows::first()));
派生
为了能够使用 Tabled 宏,每个字段都必须实现 std::fmt::Display,否则它将不起作用。
以下示例将导致错误。
use tabled::Tabled;
#[derive(Tabled)]
struct SomeType {
    field1: SomeOtherType,
}

struct SomeOtherType;
当 derive 功能打开时,Tabled 宏可用。默认情况下它是打开的。
大多数默认类型也实现了相应的特性。
重写列名
您可以使用 #[tabled(rename = """)] 属性来覆盖列名。
use tabled::Tabled;

#[derive(Tabled)]
struct Person {
    #[tabled(rename = "Name")]
    first_name: &'static str,
    #[tabled(rename = "Surname")]
    last_name: &'static str,
}
格式标题
除了 #[tabled(rename = """)],您还可以使用 #[tabled(rename_all = "UPPERCASE")] 改变列名的格式。
use tabled::Tabled;

#[derive(Tabled)]
#[tabled(rename_all = "CamelCase")]
struct Person {
    id: u8,
    number: &'static str,
    name: &'static str,
    #[tabled(rename_all = "snake_case")]
    middle_name: &'static str,
}
隐藏列
您可以标记字段为隐藏,这样它们将被忽略并且不会出现在工作表中。
可以通过 Disable 设置实现类似的效果。
use tabled::Tabled;

#[derive(Tabled)]
struct Person {
   id: u8,
   #[tabled(skip)]
   number: &'static str,
   name: &'static str,
}
设置列顺序
您可以改变它们在表格中的显示顺序。
use tabled::Tabled;

#[derive(Tabled)]
struct Person {
   id: u8,
   #[tabled(order = 0)]
   number: &'static str,
   #[tabled(order = 1)]
   name: &'static str,
}
格式化字段
如前所述,使用 #[derive(Tabled)] 只能在所有字段实现 Display 特性时使用。然而,这通常并不适用,例如当字段使用 Option 类型时。有两种常见的方法可以解决这个问题
- 手动为类型实现
Tabled特性。 - 将
Option包装成类似DisplayedOption<T>(Option<T>)的东西,并为它实现一个 Display 特性。
或者,您可以使用 #[tabled(display_with = ""func")] 属性为字段指定显示函数。
use tabled::Tabled;

#[derive(Tabled)]
pub struct MyRecord {
    pub id: i64,
    #[tabled(display_with = "display_option")]
    pub valid: Option<bool>
}

fn display_option(o: &Option<bool>) -> String {
    match o {
        Some(s) => format!("is valid thing = {}", s),
        None => format!("is not valid"),
    }
}
您可以像这样向函数发送参数(也可以使用 &self),使用 #[tabled(display_with(""some_function", ""arg1", 2, self))]
use tabled::Tabled;

#[derive(Tabled)]
pub struct MyRecord {
    pub id: i64,
    #[tabled(display_with("Self::display_valid", self, 1))]
    pub valid: Option<bool>
}

impl MyRecord {
    fn display_valid(&self, arg: usize) -> String {
        match self.valid {
            Some(s) => format!("is valid thing = {} {}", s, arg),
            None => format!("is not valid {}", arg),
        }
    }
}
为了减少样板代码,也可以通过在 format 属性中使用 #[derive(Tabled)] 内部实现此功能。
use tabled::Tabled;

#[derive(Tabled)]
pub struct Motorcycle {
    weight: usize,
    #[tabled(format = "{} cc")]
    cc: usize,
}
在上面的示例中,cc 字段将使用指定的格式字符串 "{} cc" 进行格式化,其中 {} 将被 cc 的值替换。
与 display_with 属性类似,您可以为更复杂的格式化场景传递参数。
use tabled::Tabled;

#[derive(Tabled)]
pub struct Motorcycle {
    weight: usize,
    #[tabled(format = "{}/{} cc/kg", self.cc, self.weight)]
    cc: usize,
}
在这种情况下,cc 字段将使用格式字符串 "{}/{} cc/kg" 进行格式化,{} 将分别替换为 cc 和 weight 的值。
内联
如果内部数据实现了 Tabled 特性,则可以使用 #[tabled(inline)] 来内联。您还可以通过 #[tabled(inline("prefix>>"))] 为所有内联元素设置前缀。
use tabled::Tabled;

#[derive(Tabled)]
struct Person {
    id: u8,
    name: &'static str,
    #[tabled(inline)]
    ed: Education,
}

#[derive(Tabled)]
struct Education {
    uni: &'static str,
    graduated: bool,
}
它也适用于枚举类型。
use tabled::Tabled;

#[derive(Tabled)]
enum Vehicle {
    #[tabled(inline("Auto::"))]
    Auto {
        model: &'static str,
        engine: &'static str,
    },
    #[tabled(inline)]
    Bikecycle(
        &'static str,
        #[tabled(inline)] Bike,
    ),
}

#[derive(Tabled)]
struct Bike {
    brand: &'static str,
    price: f32,
}
表格类型
tabled 有几种表格表示形式。有些在视图上有所不同,有些在实现细节上有所不同。
在某些情况下,您可能更愿意使用其中一种而不是另一种。但有时某些可以用作可互换的。
以下是一个简短的现有列表。您可以在文档中找到有关每个的描述性信息。
表格
库的主要表格。它的实现需要所有数据都存储在堆上。
迭代表格
它与主 Table 类似,唯一的区别是它不需要整个缓冲区。它只需要一次一行缓冲区。
当您无法将所有数据放入内存时可能很有用。
紧凑表格
与 IterTable 类似,但它可能不需要任何缓冲区。它还具有嗅探逻辑的能力,我们通过一小部分数据来估计数据维度。
在非常受限的环境中可能很有用。它是唯一支持 no-std 的表格。
池化表格
与 Table 不同,它不必要要求列对齐。它提供完全不同的表格布局能力。
示例
use tabled::{
    settings::{Alignment, Style},
    tables::PoolTable,
};

let characters = [
    "Naruto Uzumaki",
    "Kakashi Hatake",
    "Minato Namikaze",
    "Jiraiya",
    "Orochimaru",
    "Itachi Uchiha",
];

let data = characters.chunks(2);

let table = PoolTable::new(data)
    .with(Style::dots())
    .with(Alignment::center())
    .to_string();

println!("{table}");
输出将如下所示。
...................................
: Naruto Uzumaki : Kakashi Hatake :
:................:................:
:  Minato Namikaze   :  Jiraiya   :
:....................:............:
:  Orochimaru   :  Itachi Uchiha  :
:...............:.................:
扩展表格
如果您的数据结构有很多字段,您可以使用 ExtendedTable。
这里有一个例子。
use tabled::{tables::ExtendedTable, Tabled};

#[derive(Tabled)]
struct Distribution {
    name: &'static str,
    is_active: bool,
    is_cool: bool,
}

let data = [
    Distribution {
        name: "Manjaro",
        is_cool: true,
        is_active: true,
    },
    Distribution {
        name: "Debian",
        is_cool: true,
        is_active: true,
    },
    Distribution {
        name: "Debian",
        is_cool: true,
        is_active: true,
    },
];

let table = ExtendedTable::new(&data);

println!("{}", table);
您将看到以下内容。
-[ RECORD 0 ]------
name      | Manjaro
is_active | true
is_cool   | true
-[ RECORD 1 ]------
name      | Debian
is_active | true
is_cool   | true
-[ RECORD 2 ]------
name      | Debian
is_active | true
is_cool   | true
技巧与窍门
std::fmt::*选项
您使用 formatting(std::fmt::*) 选项应用某些设置。
use tabled::Table;

let numbers = [1, 2, 3];
let table = Table::new(numbers);

println!("{:#^10}", table);
结果将如下所示。
#+-----+##
#| i32 |##
#+-----+##
#|  1  |##
#+-----+##
#|  2  |##
#+-----+##
#|  3  |##
#+-----+##
ANSI
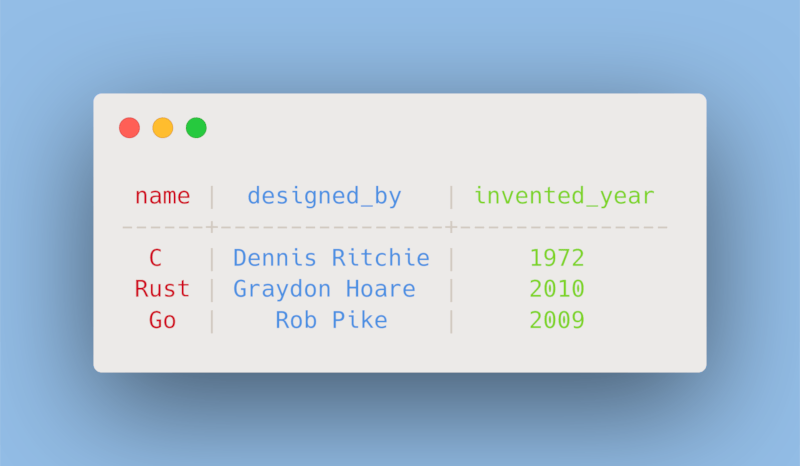
该库不会强制你使用任何颜色库,但为了正确处理带颜色输入(带有ANSI序列)并避免由于嵌入ANSI序列而导致字符串宽度计算错误,你应该在 Cargo.toml 中添加 ansi 功能。
tabled = { version = "*", features = ["ansi"] }
然后你可以使用彩色字符串作为值,表格将正确渲染。
调整我们最喜欢的示例将产生以下结果
use tabled::{format::Format, object::Columns, Style, Table};
use owo_colors::OwoColorize;

let mut table = Table::new(&data);
table
    .with(Style::psql())
    .modify(Columns::single(0), Format::new(|s| s.red().to_string()))
    .modify(Columns::single(1), Format::new(|s| s.blue().to_string()))
    .modify(Columns::new(2..), Format::new(|s| s.green().to_string()));
元组组合
您还可以通过元组组合实现 Tabled 的对象,您将获得它们的组合列。
use tabled::{
    settings::{Alignment, Style},
    Table, Tabled,
};

#[derive(Tabled)]
struct Developer(#[tabled(rename = "name")] &'static str);

#[derive(Tabled)]
enum Domain {
    Security,
    Embedded,
    Frontend,
    Unknown,
}

let data = vec![
    (Developer("Terri Kshlerin"), Domain::Embedded),
    (Developer("Catalina Dicki"), Domain::Security),
    (Developer("Jennie Schmeler"), Domain::Frontend),
    (Developer("Maxim Zhiburt"), Domain::Unknown),
];

let table = Table::new(data)
    .with(Style::psql())
    .with(Alignment::center())
    .to_string();

assert_eq!(
    table,
    concat!(
        "      name       | Security | Embedded | Frontend | Unknown \n",
        "-----------------+----------+---------+----------+---------\n",
        " Terri Kshlerin  |          |    +    |          |         \n",
        " Catalina Dicki  |    +     |         |          |         \n",
        " Jennie Schmeler |          |         |    +     |         \n",
        "  Maxim Zhiburt  |          |         |          |    +    ",
    )
);
对象
您可以使用 and 和 not 方法对一个对象的子组单元格应用设置。
use tabled::settings::object::{Object, Segment, Cell, Rows, Columns};
Segment::all().not(Rows::first()); // select all cells except header.
Columns::first().and(Columns::last()); // select cells from first and last columns.
Rows::first().and(Columns::single(0)).not(Cell(0, 0)); // select the header and first column except the (0, 0) cell.
您还可以通过其名称使用 ByColumnName 来定位列。
use tabled::{location::ByColumnName, Alignment, Modify};

table.with(Modify::new(ByColumnName::new("name")).with(Alignment::center()));
构建器
Builder 是一个您应该注意的强大工具。
例如,您可以使用 Builder::index 将特定列设置为索引,它将保持在左侧。
use tabled::{builder::Builder, settings::Style};

let mut builder = Builder::default();
builder.push_record(["Index", "Language", "Status"]);
builder.push_record(["1", "English", "In progress"]);
builder.push_record(["2", "Deutsch", "Not ready"]);

let builder = builder.index().column(1).name(None);

let mut table = builder.build();
table.with(Style::rounded());

println!("{}", table);
╭─────────┬───────┬─────────────╮
│         │ Index │ Status      │
├─────────┼───────┼─────────────┤
│ English │ 1     │ In progress │
│ Deutsch │ 2     │ Not ready   │
╰─────────┴───────┴─────────────╯
例如,您可以使用 transpose() 方法更改布局。
// A dynamic table example
// ...

let mut builder = builder.index().transpose();
.-------------------------------------------------.
|   | 0      | 1      | 2      | 3        | 4     |
| 0 | And    | Little | When   | I        | You   |
| 1 | the    | boy    | you    | don't    | know  |
| 2 | cat's  | blue   | comin' | know     | we'll |
| 3 | in     | and    | home   | when,    | have  |
| 4 | the    | the    | dad?   | but      | a     |
| 5 | cradle | man    |        | we'll    | good  |
| 6 | and    | on     |        | get      | time  |
| 7 | the    | the    |        | together | then  |
| 8 | silver | moon   |        | then     |       |
| 9 | spoon  |        |        | son      |       |
'-------------------------------------------------'
宏定义
动态 Table 显示的实用工具。
列和行
col! 创建一个由给定单元格组成的单列表格。row! 创建一个由给定单元格组成的单行表格。
通过组合 col! 和 row! 来创建灵活的表格可视化。
use tabled::{col, row, settings::Style};

let mut table = row![
    col!["table 0", "0", "1", "2"],
    col!["table 1", "world"],
    col!["table 2"],
];
table.with(Style::modern_rounded());

println!("{table}");
运行它时您将看到的输出。
╭─────────────┬─────────────┬─────────────╮
│ +---------+ │ +---------+ │ +---------+ │
│ | table 0 | │ | table 1 | │ | table 2 | │
│ +---------+ │ +---------+ │ +---------+ │
│ | 0       | │ | world   | │             │
│ +---------+ │ +---------+ │             │
│ | 1       | │             │             │
│ +---------+ │             │             │
│ | 2       | │             │             │
│ +---------+ │             │             │
╰─────────────┴─────────────┴─────────────╯
静态表格
您可以在编译时通过 static_table 构造表格。您需要包含不同的crate来使用它。
static_table = "*"
let table = static_table::static_table!(
    [
        ["x", "y", "op", "result"],
        ["1", '2', '*', '2'],
        ["2", '2', '*', '4']
    ],
    THEME = "ROUNDED",
);

assert_eq!(
    table,
    "╭───┬───┬────┬────────╮\n\
     │ x │ y │ op │ result │\n\
     ├───┼───┼────┼────────┤\n\
     │ 1 │ 2 │ *  │ 2      │\n\
     │ 2 │ 2 │ *  │ 4      │\n\
     ╰───┴───┴────┴────────╯",
);
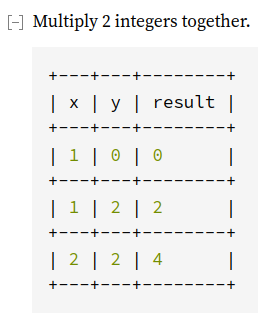
请注意,您甚至可以在文档中使用它。
/// Multiply 2 integers together.
///
#[doc = static_table::static_table!([
    ["x", "y", "result"],
    ["1", '0', '0'],
    ["1", '2', '2'],
    ["2", '2', '4']
])]
pub fn mul(left: usize, right: usize) -> usize {
    left + right
}
它看起来如下。
功能
该库有一系列功能。
std- 默认使用。如果不使用,则认为是no_std,功能有限。derive- 默认使用。添加对Tabledderive 宏的支持。ansi- 支持 ANSI 序列。macros- 支持row!、col!宏。
格式
您可以使用实用程序库将某些格式转换为 Table。
json格式
您可以使用 json_to_table 库将任意 json 转换为 Table。请参阅 示例。
ron格式
您可以使用 ron_to_table 库将任意 ron 转换为 Table。请参阅 示例。
csv格式
您可以使用 csv_to_table 库将任意 csv 转换为 Table。请参阅 示例。
toml格式
您可以使用 toml_to_table 库将任意 toml 转换为 Table。请参阅 示例。
html格式
您可以使用 table_to_html 库将 Table 转换为 HTML 表格。请参阅 示例。
注意事项
字符集
自版本 0.11 以来,我们不再对会破坏终端输出的符号(例如 \t 和 \r)进行特殊处理。因此,如果您的内容可能包含这些符号,您应该自行处理,或者调用 tabled::settings::formatting::Charset::clean 和 tabled::settings::formatting::Tabsize。
ANSI转义码
默认情况下,tabled 不处理 ANSI 转义代码。默认情况下,通过 ANSI 代码实现的事物(如超链接、闪烁等)可能无法正确工作。
要启用此支持,请将 ansi 功能添加到您的 Cargo.toml 文件中。
tabled = { version = "*", features = ["ansi"] }
表情符号
此库默认支持表情符号(但有时需要 ansi 功能)。请注意,某些终端和编辑器可能无法按预期渲染它们。
让我们将表情符号添加到 用法 部分的一个示例中。
let languages = vec![
    Language {
        name: "C 💕",
        designed_by: "Dennis Ritchie",
        invented_year: 1972,
    },
    Language {
        name: "Rust 👍",
        designed_by: "Graydon Hoare",
        invented_year: 2010,
    },
    Language {
        name: "Go 🧋",
        designed_by: "Rob Pike",
        invented_year: 2009,
    },
];
生成的表格将如下所示。如您所见,GitHub 稍微玩弄了一下返回表格,但 GNOME 终端 和 Alacritty 终端可以正确处理。
+---------+----------------+---------------+
| name    | designed_by    | invented_year |
+---------+----------------+---------------+
| C 💕    | Dennis Ritchie | 1972          |
+---------+----------------+---------------+
| Rust 👍 | Graydon Hoare  | 2010          |
+---------+----------------+---------------+
| Go 🧋   | Rob Pike       | 2009          |
+---------+----------------+---------------+
终端大小
这是一个常见的例子,其中需要对表格进行对齐以适应终端的宽度和高度。您可以使用 Width 和 Height 来实现这一点。您可以使用 Priority 来查看列/行截断/加宽的策略。
此示例使用 terminal_size crate 来确定大小,但也可以使用其他任何方法。
use tabled::{
    builder::Builder,
    settings::{peaker::PriorityMax, Height, Settings, Width},
    Table,
};
use terminal_size::{terminal_size, Height as TerminalHeight, Width as TerminalWidth};

fn get_terminal_size() -> (usize, usize) {
    let (TerminalWidth(width), TerminalHeight(height)) =
        terminal_size().expect("failed to obtain a terminal size");

    (width as usize, height as usize)
}

let (width, height) = get_terminal_size();

let data = [
    ["0.2.1", "2021-06-23", "true", "#[header(inline)] attribute"],
    ["0.2.0", "2021-06-19", "false", "API changes"],
    ["0.1.4", "2021-06-07", "false", "display_with attribute"],
];

let table_settings = Settings::default()
    .with(Width::wrap(width).priority::<PriorityMax>())
    .with(Width::increase(width))
    .with(Height::limit(height))
    .with(Height::increase(height));

let mut table = Table::from_iter(data);
table.with(table_settings);

println!("{table}");
语义化版本控制
当您需要发布破坏性更改时——任何破坏性更改——您都应该在主版本中进行。就这样。没有借口。
我们仍然这样做。我们经常在次要版本升级时进行破坏性更改。因此,您可能不应该依赖于次要版本(如 0.7)。最好依赖于固定版本,例如 =0.8.0。
最低支持的Rust版本
破坏 MSRV 被视为破坏性更改;但请参阅 semver-note。
比较
如今,有几个库用于美化表格。有些人可能会想知道 tabled 与其他库相比是更好还是更差?
我希望 tabled 能够很好地完成其工作,但最终您可能需要自己做出决定。如果您对增强功能有任何想法或对 tabled 有任何疑问,请提交问题。
下面您将找到一系列执行类似功能或执行 tabled 不做的事情的 crate。
您可以在 这里 找到性能比较基准。
描述来自作者的引用。
-
cli-table旨在保持编译时间和 crate 的大小低,并支持所有平台。它具有可选的csv支持。 -
comfy-table专注于提供最小化但稳健的库,用于构建基于文本的表格,重点在于安全性和动态长度内容排列。 -
term-table-rs的主要重点是提供一套优秀的工具用于渲染 CLI 表格,同时允许用户为颜色等事物提供自己的工具。它具有在表格的每一行中具有不同列数的功能。
如果您认为其他 crate 值得提及,请打开一个 issue。
依赖项
~1.5MB
~36K SLoC