8 个版本
| 0.1.9 | 2024 年 4 月 30 日 |
|---|---|
| 0.1.8 | 2024 年 4 月 25 日 |
#32 in #bitcoin
421 每月下载量
72KB
1.5K SLoC
sentrum
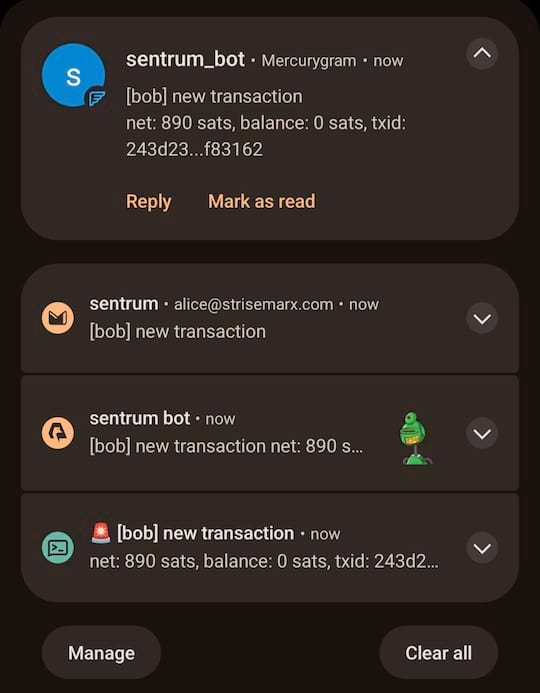
守护进程,监控比特币区块链中涉及您钱包的交易,并通过多种不同的渠道向您发送通知(ntfy 推送通知、电子邮件、Telegram、nostr、任意命令等)。
单个交易的多个通知示例截图

安装
以下任选其一
- 从 发布页面 下载二进制文件
- 安装
cargo,使用cargo install sentrum从源代码编译(二进制文件将安装在~/.cargo/bin) - 如果您使用 archlinux,可以从 AUR 安装它:sentrum、sentrum-bin 或 sentrum-git
配置
配置文件路径
它将在以下目录中查找位于 sentrum.toml 的配置文件(按此优先级)
- 当前工作目录
$XDG_CONFIG_HOME/sentrum~/.config/sentrum/etc/sentrum(如果作为 systemd 服务运行,则更合适)
或者,您可以将配置文件路径作为参数传递到调用中,这将覆盖上述任何一项。
首先,将示例配置复制到您想要的位置。 例如。
cp sentrum.sample.toml sentrum.toml
或
sudo cp sentrum.sample.toml /etc/sentrum/sentrum.toml
要配置的内容
您可以使用 sentrum.sample.toml 文件作为示例。大多数选项都有很好的默认值,所以除非您想更改它们,否则不需要更改。 以下示例中,注释选项展示了它们的默认值,除非明确说明否则。
必需
wallets:您要监控的钱包actions:找到相关交易后您要采取的操作
可选
electrum:默认情况下,使用公共 Electrum 服务器。您可以配置它连接到您自己的message:这允许您配置通知消息的主题和正文模板,并选择您想要包含的交易中的相关数据
钱包
对于您想要跟踪的每个钱包,请添加以下配置
[[wallets]]
# Identifier for naming purposes (required)
name = "alice"
# Wallet xpub (required)
xpub = "xpub6CkXHzuU1NyHUFNiQZLq2bgt6QPqjZbwpJ1MDgDeo4bWZ8ZP7HZr7v9WTLCQFhxVhqiJNcw5wSKE77rkAK1SzcuHjt36ZUibBHezGzGL9h9"
# Script kind ("legacy","nested_segwit","segwit","taproot") (optional)
#kind = "segwit"
它假设一个BIP84(原生segwit,bc1风格的钱包)。如果您的钱包有不同的脚本类型,请添加字段kind = "legacy"(或nested_segwit,或taproot)。
多签和其他
通过提供descriptor = "<desc>"和change_descriptor = "<desc>"钱包描述符,而不是xpub =和kind = ,来支持更复杂的钱包类型。您不需要提供change_descriptor,它是可选的,很多时候主要描述符已经包含它。示例
[[wallets]]
name = "charlie"
descriptor = "wsh(sortedmulti(2,[bbc5fee8/48h/1h/0h/2h]tpubDEuo3nCajorgHFrA5unQB3dSR3Mh7EPfedyU36GC2wVLwB32PsDuiPcsw5RobqNRfQyjas3cxeEraxs6HYJvQPcNX5neut2jRvZijyxLiqT/<0;1>/*,[3f007faa/48h/1h/0h/2h]tpubDEgyzFTDNEUcy674okNRZFuV1Q3P3RNdhd5FwncHBZ9DpZNHR3FGm5c4n8co1Efg3Xv6cUCPuPraJ85j8CV2QXqhLdXn38uyNoSX3rVMpbC/<0;1>/*,[c478c82d/48h/1h/0h/2h]tpubDFKmAnxyJKb7LLQ2UDU4ytFZ1Lx5R7C9op23Ew7zxDwCHDMUhqWfmgMi7d6YNSfKnsW3wp9QEU4TuNJxcPCcAi4ddCYsVL9ken6tWGPD9jz/<0;1>/*))#3l992dql"
您可以使用Sparrow钱包检索几乎所有钱包的钱包描述符,方法是在钱包中打开,转到设置 >> 脚本策略 >> 描述符编辑。将弹出一个窗口,您可以在其中复制钱包描述符字符串,并将其粘贴为descriptor =的sentrum.toml值。
并非所有脚本都受支持。sentrum依赖于bdk,它只支持这些脚本。
操作
对于每个新的相关交易,您可以执行多个操作。对于您想要执行的每个操作,您需要添加配置
[[actions]]
# Action type (required)
type =  "<INSERT ACTION KIND>"
<.... INSERT ACTION SPECIFIC CONFIGURATION HERE...>
以下我们将解释每种操作类型的配置。您可以有多个相同类型的操作(例如,您可能需要从不同的账户发送多个电子邮件,原因可能是某种原因)。
ntfy
这是在智能手机上获取推送通知的最简单直接的方法。
- 根据https://ntfy.sh中的相关链接安装android/iOS应用程序
- 打开应用程序,授予它所需的权限
然后您只需要添加相关的配置
[[actions]]
type =  "ntfy"
#
# EVERYTHING BELOW IS OPTIONAL
#
# Credentials (optional, relevant for self-hosted instances or paid reserved topics)
# You can also use an access token by setting the username to an empty string ""
#credentials.username = "<YOUR USERNAME HERE>"
#credentials.password = "<YOUR PASSWORD HERE>"
# ntfy server (optional)
#url = "https://ntfy.sh"
# notification channel name (optional, defaults to random string for security)
#topic = "<RANDOM TOPIC NAME>"
# Proxy used to connect (optional, defaults to None)
#proxy = "socks5://127.0.0.1:9050"
# Priority ("max", "high", "default", "low", "min") (optional)
#priority = "default"
如果您未设置topic = ,sentrum将为您随机自动生成一个(因为主题名称有点像公共默认ntfy.sh服务器的密码)。当您稍后运行sentrum时,它将打印出它正在使用的主题名称。
打开ntfy应用程序,点击+按钮,创建一个“主题”并将其设置为与sentrum日志相同的值。
nostr
通过nostr NIP04加密DM(泄露元数据但广泛支持)或NIP59 GiftWrap密封发件人DM(更私密但许多客户端不支持)获得通知。添加
[[actions]]
type = "nostr"
# Which npub to send the DM (required)
recipient = "<YOUR npub, hex pubkey, nprofile or nip05>"
# If NIP59 giftwrap DMs should be used instead of NIP04 (optional)
#sealed_dm = false
# Which relays to use to send DMs
#relays = ["wss://nostr.bitcoiner.social", "wss://nostr.oxtr.dev", "wss://nostr.orangepill.dev", "wss://relay.damus.io"]
您需要添加以下配置并基本上配置与您的电子邮件提供商的SMTP服务器的认证连接。我无法帮助您处理每个提供商的奇怪规则(也许您需要允许第三方应用访问gmail,谁知道呢)。
[[actions]]
type =  "email"
# SMTP server (required)
server = "<insert smtp server url (e.g. smtp.gmail.com)"
# SMTP connection type ("tls", "starttls" or "plain") (optional)
#connection = "tls"
# SMTP port (optional, defaults to 587 for TLS, 465 for STARTTLS and 25 for plain connections
#port = 1025
# SMTP credentials (required in most cases)
credentials.authentication_identity = "<insert login email>"
credentials.secret = "<insert password>"
# Accept self signed certificates (needed if you are using protonmail-bridge) (optional)
#self_signed_cert = false
# Configure sender (required)
from = "sentrum <youremailhere@host.tld>"
# Configure recipient (optional, defaults to the same as the "from" sender)
#to = "sentrum <youremailhere@host.tld>"
telegram
- 使用@Botfather创建一个新的机器人以获取格式为
123456789:blablabla的令牌。 - 可选地使用@Botfather配置机器人(名称、个人资料图片等)
- 与您的机器人打开聊天
- 添加相关的配置
[[actions]]
type =  "telegram"
# Auth token of the bot created with @Botfather (required)
bot_token = "<insert bot token>"
# 10-digit user id of the DM recipient, go to your profile to get it (required)
user_id = 1234567890
command
运行外部命令,您可以使用事务详情作为参数。您可以在消息配置中检查可以使用哪些参数(如{wallet}或{tx_net}),因为它们是相同的。
[[actions]]
type = "command"
cmd = "notify-send"
args = ["[{wallet}] new tx: {tx_net} sats"]
终端打印
仅在终端中打印通知文本。您可以将它管道化到其他东西。
[[actions]]
type =  "terminal_print"
桌面通知
在Sentrum运行的同一台计算机上,以原生桌面通知的形式显示交易消息。
[[actions]]
type =  "desktop_notification"
消息
您可以配置消息模板,它适用于几乎每种操作类型。此配置完全可选,因为省略时将使用默认模板。
以下是默认模板
[message]
subject = "[{wallet}] new transaction"
body = "net: {tx_net} sats, balance: {total_balance} sats, txid: {txid_short}"
# Can be "plain", "markdown" or "html"
format = "plain"
# Configure blockexplorer urls. This is used to create the {tx_url} parameter
block_explorers.mainnet = "https://mempool.space/tx/{txid}"
block_explorers.testnet = "https://mempool.space/testnet/tx/{txid}"
block_explorers.signet = "https://mempool.space/signet/tx/{txid}"
在主题和正文模板中,您可以使用以下参数
{tx_net}:拥有的输出和拥有的输入之间的差额{wallet}:配置的钱包名称{total_balance}:钱包的总余额{txid}:事务的txid{txid_short}:截断的txid,更易于阅读{received}:拥有的输出的总和{sent}:拥有的输入的总和{fee}:交易费{current_height}:当前区块高度{tx_height}:交易确认的区块高度{confs}:交易确认次数(未确认时为0){conf_timestamp}:第一次确认的时间戳,格式为%Y-%m-%d %H:%M:%S{tx_url}:交易指向区块浏览器的URL
Electrum服务器
默认情况下,将使用公共electrum服务器。如果您想要隐私(您应该这样),我强烈建议您配置自己的electrum服务器。
默认设置如下
[electrum]
# Defaults:
# - mainnet: ssl://fulcrum.sethforprivacy.com:50002
# - testnet: ssl://electrum.blockstream.info:60002
# - signet: ssl://mempool.space:60602
# Use "tcp://" if you are connecting without SSL (e.g. "tcp://:50001"
# or "tcp://fwafiuesngirdghrdhgiurdhgirdgirdhgrd.onion:50001"
url = "ssl://fulcrum.sethforprivacy.com:50002"
# blockchain network ("bitcoin", "testnet", "signet", "regtest")
network = "bitcoin"
# Optional socks5 proxy (defaults to None)
#socks5 = 127.0.0.1:9050
# If using ssl with a trusted certificate, set this to true
certificate_validation = false
用法
只需运行不带参数的 sentrum(使用默认配置搜索路径)或 sentrum <path/to/config/file>。
您可以通过传递 --test 标志向所有配置的操作发送单个测试通知。
默认情况下,只有新交易可以触发操作。如果您传递 --notify-past-txs,它将在初始钱包同步时发送过去交易的通告。如果您有很长的交易历史,这将使您的通知渠道每次交易都被垃圾邮件。
systemd 服务
理想的使用场景是作为长期运行的守护进程,因此将其配置为 systemd 服务是有意义的。
如果您从 AUR 安装了 sentrum,您只需编辑 /etc/sentrum/sentrum.conf 并执行以下命令:
如果您是手动安装 sentrum(例如,从发布页面或 cargo install),您应该(从克隆的存储库或从解压缩的发布存档内部)
- 将 systemd 文件复制到适当的位置
sudo cp contrib/systemd/sentrum.service /etc/systemd/system
sudo cp contrib/systemd/sentrum.sysusers /etc/sysusers.d/sentrum.conf
sudo cp contrib/systemd/sentrum.tmpfiles /etc/tmpfiles.d/sentrum.conf
- 重新加载 systemd 守护进程,sysusers 和 tmpfiles
sudo systemclt daemon-reload
sudo systemd-sysusers
sudo systemd-tmpfiles --create
- 将
sentrum.toml(或sentrum.sample.toml)配置文件放在/etc/sentrum中,并确保sentrum用户拥有它
sudo cp sentrum.toml /etc/sentrum
sudo chown sentrum:sentrum /etc/sentrum/sentrum.toml
- 启用并启动服务
sudo systemclt enable --now sentrum.service
-
使用
systemctl status sentrum检查一切是否正常 -
使用
journalctl -fu sentrum检查日志
Docker
要使用 Docker 运行 sentrum,您可以选择自己构建镜像或使用预构建的镜像。
构建镜像
要从源构建镜像,运行以下命令
git clone https://github.com/sommerfelddev/sentrum.git
cd sentrum
docker build -t sentrum:local .
要使用预构建的镜像,只需从 GHCR 拉取
docker pull docker pull ghcr.io/sommerfelddev/sentrum:latest
请注意,有两种类型的标签
latest:master 分支上最新提交的标签 x.x.x:例如 0.1.1 与相应 sentrum 版本的标签
运行镜像
要运行镜像,只需运行以下命令,传入您之前创建和配置的 sentrum.toml 文件
docker run --rm -it --volume ./sentrum.toml:/sentrum.toml ghcr.io/sommerfelddev/sentrum:latest
如果您使用 Docker Compose,可以按以下方式配置服务
services:
  sentrum:
    container_name: sentrum
    image: ghcr.io/sommerfelddev/sentrum:latest
    restart: unless-stopped
    volumes:
      - ./sentrum.toml:/sentrum.toml
未来工作
- 更多操作类型
- Matrix DM
- SimpleX 聊天 DM
- IRC
- XMPP
- 使用链接设备(难度较大)的 WhatsApp/Signal
- HTTP 请求
- 更多钱包类型
- 单个地址(由 https://github.com/bitcoindevkit/bdk/issues/759 堵塞)
- 将钱包集合作为一个单一实体
- 在第一笔交易确认后和 N 个确认后发送通知
- 根据交易金额过滤通知(例如,对于小于 1M sats 的交易不执行操作)
- Debian 软件包(使用
cargo-deb) - 允许按钱包操作
- 支持其他区块链后端(bitcoind-rpc、explora、块过滤器、dojo)
- 可能创建一个小的 Web UI,帮助编写配置
- 激励节点发行版打包 sentrum
依赖项
~28–66MB
~1M SLoC