1 个稳定版本
| 1.3.0 | 2020年8月2日 |
|---|
#28 in #dapp
73KB
1.5K SLoC

Astar 网络是基于 Substrate 框架的互操作区块链,同时也是 Polkadot 生态系统内 dApp 的中心。通过 Astar 网络和 Shiden 网络,人们可以将代币质押到智能合约中,以奖励为网络提供价值的项目。
关于为该项目做出贡献,请参阅我们的贡献指南。
从源代码构建
本节假定开发者在 macOS 或 Debian 变种操作系统上运行。对于 Windows,虽然存在运行的方法,但我们建议使用 WSL 或虚拟机以提高稳定性。
从您的终端执行以下命令以设置开发环境并构建节点运行时。
# install Substrate development environment via the automatic script
$ curl https://getsubstrate.io -sSf | bash -s -- --fast

# clone the Git repository
$ git clone --recurse-submodules https://github.com/AstarNetwork/Astar.git

# change current working directory
$ cd Astar

# compile the node
# note: you may encounter some errors if `wasm32-unknown-unknown` is not installed, or if the toolchain channel is outdated
$ cargo build --release

# show list of available commands
$ ./target/release/astar-collator --help
使用 Nix 构建
# install Nix package manager:
$ curl https://nixos.org/nix/install | sh

# run from root of the project folder (`Astar/` folder)
$ nix-shell -I nixpkgs=channel:nixos-21.05 third-party/nix/shell.nix --run "cargo build --release"
运行 Collator 节点
要设置 Collator 节点,您必须拥有一个完全同步的节点以及正确的参数,可以使用以下命令完成。
# start the Shiden collator node with
$ ./target/release/astar-collator \
  --base-path <path to save blocks> \
  --name <node display name> \
  --port 30333 \
  --rpc-port 9944 \
  --telemetry-url 'wss://telemetry.polkadot.io/submit/ 0' \
  --rpc-cors all \
  --collator
现在,您可以通过发送以下 RPC 有效载荷来获取节点的会话密钥。
# send `rotate_keys` request
$ curl -H 'Content-Type: application/json' --data '{ "jsonrpc":"2.0", "method":"author_rotateKeys", "id":1 }' localhost:9933

# should return a long string of hex, which is your session key
{"jsonrpc":"2.0","result":"<session key in hex>","id":1}
完成此步骤后,您应该拥有一个在线的验证节点以及您的节点会话密钥。有关密钥管理和验证者奖励,请参阅我们的验证者指南在线。
运行 RPC 测试
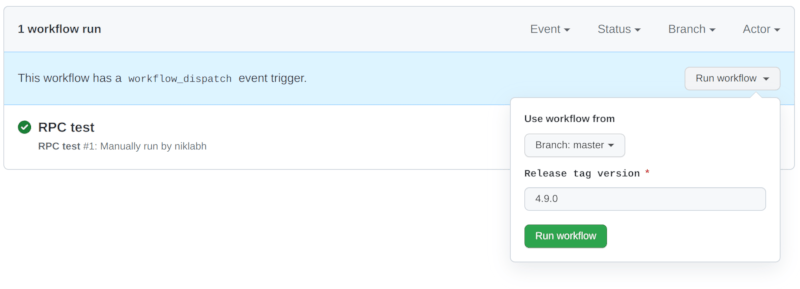
RPC 测试套件可以用于任何版本。要运行测试,请访问https://github.com/AstarNetwork/Astar/actions/workflows/rpcTest.yml。单击“运行工作流程”,在下拉菜单中输入您要运行测试套件的版本标签。然后单击绿色的“运行工作流程”按钮以启动测试套件。

工作区依赖处理
所有依赖项都应该列在工作区根目录下的 Cargo.toml 文件中。这允许我们轻松地通过修改单个位置中版本来更改整个仓库中使用的 crate 版本。
当前,如果需要 non_std,必须在根目录的 Cargo.toml 文件中设置 default-features = false(与此 问题 相关)。否则,将不会产生任何效果,导致编译失败。此外,package 导入不会从根目录正确传播到子 crate,因此应避免定义这些。
在根目录的 Cargo.toml 中定义 features 与具体 crate 的 Cargo.toml 中定义的 features 是累加的。
添加依赖项
- 检查依赖项是否已在根目录的
Cargo.toml中定义- 如果 是,则无需操作,只需注意已启用的 features
- 如果 否,则添加它(如果依赖项在 no_std 上下文中使用,请确保使用
default-features = false)
- 将
new_dependecy = { workspace = true }添加到所需的 crate - 如果依赖项已定义为
default-features = false,但您需要在 std 上下文中使用它,请向所需的 crate 添加features = ["std"]。
进一步阅读
依赖项
~9.5MB
~181K SLoC