29 个版本 (12 个破坏性版本)
| 0.12.0 | 2023年4月23日 |
|---|---|
| 0.11.0 | 2023年1月1日 |
| 0.10.3 | 2022年12月29日 |
| 0.10.1 | 2022年11月6日 |
| 0.5.1 | 2022年3月28日 |
#469 in GUI
87 每月下载量
91KB
814 行
Rust GTK App 框架
这个库旨在为使用 Rust 编写的自适应 GTK4 和 libadwaita 应用程序提供一个框架。
编写 flatpak 应用程序需要几个文件 (.desktop 文件、appdata.xml、flatpak 清单)。gtk-rust-app 及其 CLI gra 允许根据扩展的 Cargo.toml 生成这些文件。
入门 TLDR
cargo install cargo-generate
cargo generate --git https://gitlab.com/floers/gtk-rust-app-template
cd <your app>
sudo make install-gsettings
cargo run
入门
使用 gtk-rust-app 创建应用程序需要
- 在 Cargo.toml 中添加更多元数据
- 在 main.rs 中编写一些样板代码
- 定义应用程序页面
- 可选:定义一个 build.rs 脚本
- 安装 cargo-gra 子命令
- 本地安装应用程序设置
Cargo.toml
在您的 Cargo.toml 中定义应用程序元数据和 gtk-rust-app 的依赖关系。 查看清单参考 获取更多信息。
# Cargo.toml

[package]
...

[app]
# Metadata of your app

[settings]
# global settings

[actions]
# global GTK actions

[dependencies]

# as usual

gtk-rust-app = { git = "https://gitlab.com/floers/gtk-rust-app.git", features = [ "ui" ] }

# If you want to automatically update generated files you can add this build dependency
[build-dependencies]
cargo-gra = "0.3"
应用程序样板代码
创建 main.rs 文件
// src/main.rs

#[macro_use]
extern crate gtk_rust_app;
#[macro_use]
extern crate log;

use gettextrs::gettext;
use gtk::prelude::*;
use gtk_rust_app::widgets::LeafletLayout;

use crate::home::Home;

// This module will contain our home page
mod card;
mod home;

fn main() {
    env_logger::init();

    info!("{}", gettext("Check po/ dir for translations."));

    // call app builder with metadata from your Cargo.toml and the gresource file compiled by the `gtk_rust_app::build` script (see below).
    gtk_rust_app::builder::builder(
        include_bytes!("../Cargo.toml"),
        include_bytes!("../target/gra-gen/compiled.gresource"),
    )
    // include your style sheets here
    .styles(include_str!("styles.css"))
    .build(
        |application, _project_descriptor, settings| {
            // setup custom types
            card::Card::static_type();

            // The pages will be placed in this predefined adaptive layout.
            let leaflet_layout = LeafletLayout::builder(settings)
                .add_page(Home::new())
                .build();

            // LeafletLayout contains a toast overlay
            leaflet_layout.show_message("Hello world");

            // and we use the leaflet layout as root content in the apps window.
            let window = gtk_rust_app::window(
                application,
                gettext("Example"),
                settings,
                leaflet_layout.upcast_ref(),
            );
            window.show();
        },
        |app, _project_descriptor, _settings| {
            if let Some(action) = app.lookup_action("quit") {
                let simple_action: gdk4::gio::SimpleAction = action.downcast().unwrap();
                simple_action.connect_activate(glib::clone!(@weak app => move |_, _| {
                    app.quit();
                }));
            }
        },
    );
}
定义应用程序页面
主页
//src/home.rs

use gdk4::subclass::prelude::ObjectSubclassIsExt;
use gtk::prelude::*;
use gettextrs::gettext;
use crate::card::Card;

// Define a page of your app as a new widget
#[widget(gtk::Box)]
#[template(file = "home.ui")]
struct Home {
    #[template_child]
    pub card: TemplateChild<Card>,
}

impl Home {
    pub fn constructed(&self) {
        self.imp().card.connect_card_clicked(|card| {
            println!("Text prop: {:?}", card.text());
        });
    }

    pub fn new() -> Home {
        glib::Object::new(&[]).expect("Failed to create Home")
    }
}

impl gtk_rust_app::widgets::Page for Home {
    fn name(&self) -> &'static str {
        "home"
    }

    fn title_and_icon(&self) -> Option<(String, String)> {
        Some((gettext("Home"), "go-home-symbolic".into()))
    }
}
// home.ui
<?xml version="1.0" encoding="UTF-8"?>
<interface>
  <template class="Home" parent="GtkBox">
    <property name="hexpand">True</property>
    <property name="vexpand">True</property>
    <property name="orientation">vertical</property>
    <style>
      <class name="home" />
    </style>

    <child>
      <object class="Card" id="card"></object>
    </child>

  </template>
</interface>
编写自定义小部件
上面的例子中提到了一个 card 模块。您可以提出自己的想法(就像主页一样),或者查看 examples/simple/src/card.rs。
可选:定义构建脚本
定义构建脚本
// build.rs
pub fn main() {
    println!("cargo:rerun-if-changed=build.rs");
    println!("cargo:rerun-if-changed=Cargo.toml");
    println!("cargo:rerun-if-changed=src");
    println!("cargo:rerun-if-changed=assets");
    println!("cargo:rerun-if-changed=po");
    gra::build(None, None);
}
安装 cargo-gra
cargo install cargo-gra
准备应用程序构建
cargo gra gen
并按常规构建
cargo build --release
您可以通过构建 flatpak 应用程序来实现
cargo gra flatpak
就是这样。
本地安装应用程序设置
GTK 应用程序定义它们的设置并需要 gnome 或 phosh 在全局上安装这些设置。当您运行应用程序而不安装这些设置时,它将崩溃并显示错误。
将以下 Makefile 添加到您的项目中
install-gsettings:
	install -D target/gra-gen/{{app-id}}.gschema.xml /usr/share/glib-2.0/schemas/{{app-id}}.gschema.xml
	glib-compile-schemas /usr/share/glib-2.0/schemas

uninstall-gsettings:
	rm /usr/share/glib-2.0/schemas/{{app-id}}.gschema.xml
	glib-compile-schemas /usr/share/glib-2.0/schemas
并用您的应用程序 ID 替换 }。然后运行 make install-gsettings,然后您的应用程序应该可以正常运行。
用不同的语言运行
LANGUAGE="de_DE:de" LANG="de_DE.utf8" TEXT_DOMAIN="target" cargo run
需求
Debian 依赖项
sudo apt install libgraphene-1.0-dev libgtk-4-dev flatpak-builder
Arch 依赖项
TODO
要构建 flatpak,需要安装 gnome-nightly remote。下载 https://nightly.gnome.org/gnome-nightly.flatpakrepo。
flatpak remote-add --if-not-exists gnome-nightly gnome-nightly.flatpakrepo
flatpak install org.gnome.Sdk//master
flatpak install org.gnome.Platform//master
flatpak install org.freedesktop.Sdk.Extension.rust-stable//21.08
示例
查看 carg-gra 中的示例应用程序。
编写自定义小部件
上面的示例已经展示了自定义GTK小部件。宏 #[widget] 使得创建自定义小部件变得简单快捷,但同时也抽象和简化了一些方面。GTK Rust 书籍是一个很好的资源,可以帮助你理解这个宏的功能以及如何使用它创建具有完全控制的自定义小部件。
https://gtk-rs.org/gtk4-rs/stable/latest/book/introduction.html
领域模型和GObjects
有时我们需要GObjects。小部件是特殊的GObjects。类似于 #[widget] 宏,gtk-rust-app 允许通过 #[gobject] 宏快速定义GObejcts。示例
我们有一个领域结构体 TodoItem。我们的应用程序状态将这些 TodoItems 存储在一个vec中,并且我们想在GTK组合框(或者更有可能在 AdwComboRow)菜单中选择一个。GTK期望组合框有一个后端 model,它是一个 GObjects 列表。为我们的 TodoItem 编写GObject将产生大量的模板代码,而且我们可能不需要整个 对象性,因为我们不是在编写面向对象的代码。尽管如此,我们希望组合框显示可能的 TodoItems 并通过选择ID来选择一个。
为了解决这个问题,gtk-rust-app 提供了属性宏 gobjectify。这个宏允许为结构体定义一组字段,这些字段将用于生成GObject定义。
#[gobject(id, name)]
struct TodoItem {
    id: String,
    name: String,
    text: String,
}
将生成具有属性 id 和 name 的GObject TodoItemGObject,以及一个公共方法 TodoItem.gobjectify() -> TodoItemGObject。
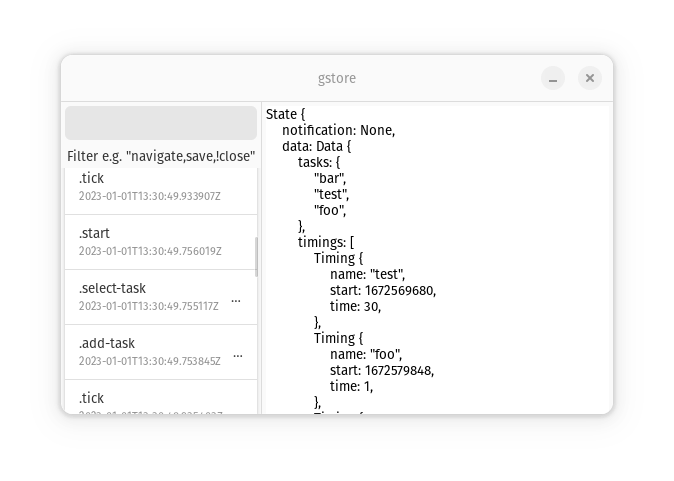
gstore调试
你可以按 Ctrl+Shift+G 打开一个用于全局状态和 gstore 中实现的操作的调试窗口。
注意:此快捷键和窗口仅适用于开发构建。

依赖项
~12–18MB
~234K SLoC