6 个版本 (3 个重大更新)
| 0.5.0 | 2023年12月19日 |
|---|---|
| 0.4.0 | 2023年9月26日 |
| 0.3.2 | 2023年6月9日 |
| 0.3.1 | 2023年4月28日 |
| 0.2.0 | 2023年4月1日 |
#735 在 HTTP 服务器
87KB
849 行
axum-restful
基于 axum 和 sea-orm 的 RESTful 框架。受 django-rest-framework 启发。
项目的目标是构建一个企业级的生产框架。
特性
- 为
sea-orm生成的struct提供了 GET、PUT、DELETE 方法的特性 - 支持
tls - 支持
prometheus指标和指标服务器 - 支持
graceful shutdown - 基于
aide生成swagger document
快速开始
一个完整的示例位于 axum-restful-restful/examples/demo。
首先,你可以创建一个新的 crate,例如 cargo new axum-restful-demo。
构建数据库服务
在开始之前,你应该有一个数据库服务。建议使用 postgresql 数据库。
你可以使用 docker 和 docker compose 来启动一个 postgresql
在 Cargo.toml 相同的目录下创建一个 compose.yaml
services:
  postgres:
    image: postgres:15-bullseye
    container_name: demo-postgres
    restart: always
    volumes:
      - demo-postgres:/var/lib/postgresql/data
    ports:
      - "127.0.0.1:5432:5432"
    environment:
      - POSTGRES_DB=${POSTGRES_DB}
      - POSTGRES_USER=${POSTGRES_USER}
      - POSTGRES_PASSWORD=${POSTGRES_PASSWORD}

volumes:
  demo-postgres: {}
一个 .env 文件如下
# config the base pg connect params
POSTGRES_DB=demo
POSTGRES_USER=demo-user
POSTGRES_PASSWORD=demo-password

# used by axum-restful framework to specific a database connection
DATABASE_URL=postgres://${POSTGRES_USER}:${POSTGRES_PASSWORD}@localhost:5432/${POSTGRES_DB}
最后,你可以使用 docker compose up -d 构建服务
编写和迁移迁移
更多详细信息,请参阅 sea-orm 文档。
使用 cargo 安装 sea-orm-cli
$ cargo install sea-orm-cli
在 Cargo.toml 中配置依赖项和工作区
[package]
name = "demo"
version = "0.1.0"
edition = "2021"

# See more keys and their definitions at https://doc.rust-lang.net.cn/cargo/reference/manifest.html
[workspace]
members = [".", "migration"]

[dependencies]
aide = "0.13"
axum = "0.7"
axum-restful = "0.5"
chrono = "0.4"
migration = { path = "./migration" }
once_cell = "1"
schemars = { version = "0.8", features = ["chrono"] }
sea-orm = { version = "0.12", features = ["macros", "sqlx-postgres", "runtime-tokio-rustls"] }
sea-orm-migration = { version = "0.12", features = ["sqlx-postgres", "runtime-tokio-rustls",] }
serde = { version = "1.0", features = ["derive"] }
serde_json = "1.0"
tokio = { version = "1", features = ["full"] }
tracing = "0.1"
tracing-subscriber = "0.3"
在 ./migration 中设置迁移目录
$ sea-orm-cli migrate init
项目结构变为
├── Cargo.lock
├── Cargo.toml
├── compose.yaml
├── migration
│   ├── Cargo.toml
│   ├── README.md
│   └── src
│       ├── lib.rs
│       ├── m20220101_000001_create_table.rs
│       └── main.rs
└── src
    └── main.rs
编辑 m20****_******_create_table.rs 文件,位于 ./migration/src 下方
use sea_orm_migration::prelude::*;

#[derive(DeriveMigrationName)]
pub struct Migration;

#[async_trait::async_trait]
impl MigrationTrait for Migration {
    async fn up(&self, manager: &SchemaManager) -> Result<(), DbErr> {
        // Replace the sample below with your own migration scripts
        manager
            .create_table(
                Table::create()
                    .table(Student::Table)
                    .if_not_exists()
                    .col(
                        ColumnDef::new(Student::Id)
                            .big_integer()
                            .not_null()
                            .auto_increment()
                            .primary_key(),
                    )
                    .col(ColumnDef::new(Student::Name).string().not_null())
                    .col(ColumnDef::new(Student::Region).string().not_null())
                    .col(ColumnDef::new(Student::Age).small_integer().not_null())
                    .col(ColumnDef::new(Student::CreateTime).date_time().not_null())
                    .col(ColumnDef::new(Student::Score).double().not_null())
                    .col(
                        ColumnDef::new(Student::Gender)
                            .boolean()
                            .not_null()
                            .default(Expr::value(true)),
                    )
                    .to_owned(),
            )
            .await
    }

    async fn down(&self, manager: &SchemaManager) -> Result<(), DbErr> {
        // Replace the sample below with your own migration scripts

        manager
            .drop_table(Table::drop().table(Student::Table).to_owned())
            .await
    }
}

/// Learn more at https://docs.rs/sea-query#iden
#[derive(Iden)]
enum Student {
    Table,
    Id,
    Name,
    Region,
    Age,
    CreateTime,
    Score,
    Gender,
}
编辑 migration/Cargo.toml 以添加依赖项
[dependencies]
...
axum-restful = "0.5"
编辑 migration/src/main.rs 以指定数据库连接和迁移
use sea_orm_migration::prelude::*;

#[async_std::main]
async fn main() {
    // cli::run_cli(migration::Migrator).await;
    let db = axum_restful::get_db_connection_pool().await;
    migration::Migrator::up(db, None).await.unwrap();
}
迁移迁移文件
$ cd migration
$ cargo run
最后,你可以看到生成了两个名为 sql_migrations 和 student 的表。
生成实体
在项目根路径下
$ sea-orm-cli generate entity -o src/entities
将生成实体配置和代码,现在项目结构已更改为
├── Cargo.lock
├── Cargo.toml
├── compose.yaml
├── migration
│   ├── Cargo.toml
│   ├── README.md
│   └── src
│       ├── lib.rs
│       ├── m20220101_000001_create_table.rs
│       └── main.rs
└── src
    ├── entities
    │   ├── mod.rs
    │   ├── prelude.rs
    │   └── student.rs
    └── main.rs
编辑 src/entities/student.rs 以添加 derive Default, Serialize, Deserialize
//! `SeaORM` Entity. Generated by sea-orm-codegen 0.11.0

use schemars::JsonSchema;
use sea_orm::entity::prelude::*;
use serde::{Deserialize, Serialize};

#[derive(Clone, Debug, PartialEq, JsonSchema, DeriveEntityModel, Serialize, Deserialize)]
#[sea_orm(table_name = "student")]
pub struct Model {
    #[sea_orm(primary_key)]
    pub id: i64,
    pub name: String,
    pub region: String,
    pub age: i16,
    pub create_time: DateTime,
    #[sea_orm(column_type = "Double")]
    pub score: f64,
    pub gender: bool,
}

#[derive(Copy, Clone, Debug, EnumIter, DeriveRelation)]
pub enum Relation {}

impl ActiveModelBehavior for ActiveModel {}
编辑 src/main.rs
use schemars::JsonSchema;
use sea_orm_migration::prelude::MigratorTrait;
use tokio::net::TcpListener;

use axum_restful::swagger::SwaggerGeneratorExt;
use axum_restful::views::ModelViewExt;

use crate::entities::student;

mod check;
mod entities;

#[tokio::main]
async fn main() {
    tracing_subscriber::fmt::init();
    let db = axum_restful::get_db_connection_pool().await;
    let _ = migration::Migrator::down(db, None).await;
    migration::Migrator::up(db, None).await.unwrap();
    tracing::info!("migrate success");

    aide::gen::on_error(|error| {
        tracing::error!("swagger api gen error: {error}");
    });
    aide::gen::extract_schemas(true);

    /// student
    #[derive(JsonSchema)]
    struct StudentView;

    impl ModelViewExt<student::ActiveModel> for StudentView {
        fn order_by_desc() -> student::Column {
            student::Column::Id
        }
    }

    let path = "/api/student";
    let app = StudentView::http_router(path);
    check::check_curd_operate_correct(app.clone(), path, db).await;

    // if you want to generate swagger docs
    // impl OperationInput and SwaggerGenerator and change app into http_routers_with_swagger
    impl aide::operation::OperationInput for student::Model {}
    impl axum_restful::swagger::SwaggerGeneratorExt<student::ActiveModel> for StudentView {}
    let app = StudentView::http_router_with_swagger(path, StudentView::model_api_router()).await.unwrap();

    let addr = "0.0.0.0:3000";
    tracing::info!("listen at {addr}");
    tracing::info!("visit http://127.0.0.1:3000/docs/swagger/ for swagger api");
    let listener = TcpListener::bind(addr).await.unwrap();
    axum::serve(listener, app.into_make_service()).await.unwrap();
}
StudentView impl the ModelView<T>,其中 T 是代表数据库中 student 表配置 的 student::ActiveModel,如果拥有完整的 HTTP 方法,则包括 GET、POST、PUT、DELETE。
您可以看到服务器正在监听端口 3000
验证服务
Swagger
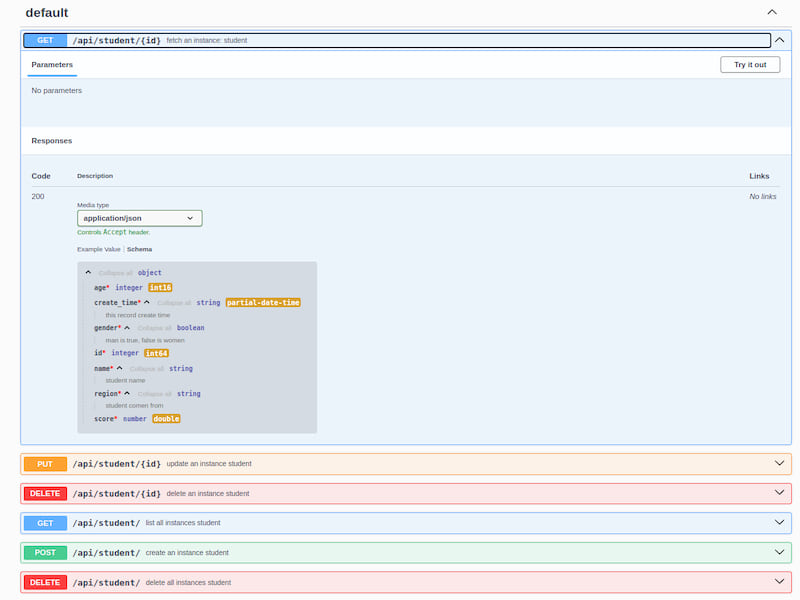
如果您在上述代码中实现了 impl axum_restful::swagger::SwaggerGenerator,则可以访问浏览器中的 http://127.0.0.1:3000/docs/swagger/,您将看到一个生成的 Swagger 文档

许可
根据您的要求,许可方式可以是以下之一
- Apache License,版本 2.0 (LICENSE-APACHE 或 https://apache.ac.cn/licenses/LICENSE-2.0)
- MIT 许可证 (LICENSE-MIT 或 https://open-source.org.cn/licenses/MIT)
。
贡献
除非您明确声明,否则根据 Apache-2.0 许可证定义的任何有意提交的工作贡献,都应按上述方式双许可,不附加任何额外条款或条件。
依赖关系
~54–73MB
~1M SLoC