| 0.1.8 |
|
|---|---|
| 0.1.7 |
|
#171 in #near
每月下载 24 次
310KB
访问控制NEAR
访问控制NEAR是一个用于在NEAR智能合约中实现基于角色的访问控制模型的库。它部分受到OpenZeppelin的访问控制实现的启发。
架构
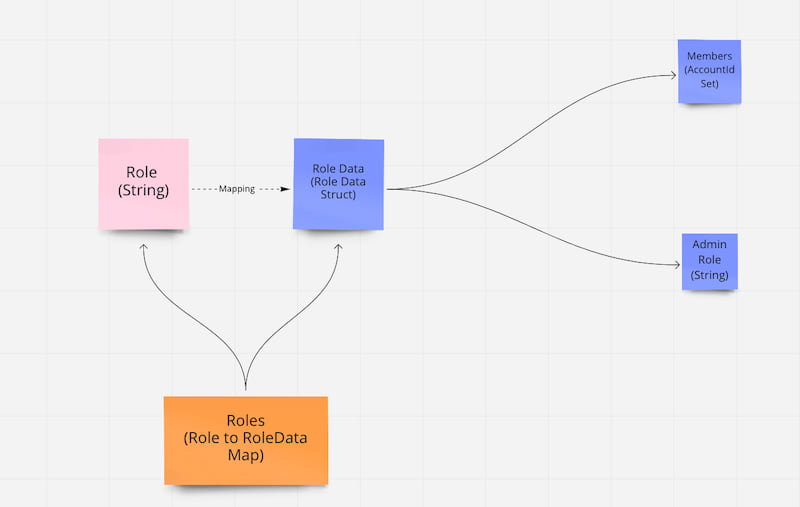
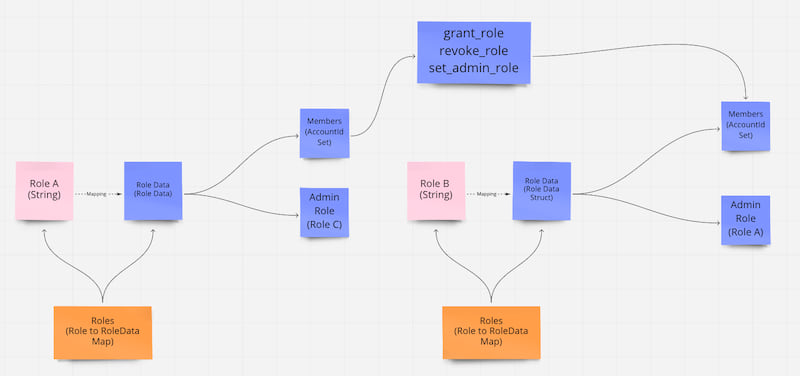
Roles 映射包含从 Role 到 Role Data 的映射。通过插入新的 AccountId 向 members 集合中添加新成员。每个角色都有一个 Admin Role,其成员可以执行对从它派生的角色的特权操作。所有创建的角色的默认 admin_role 为 default_admin
方法
有私有方法和公共方法。私有方法只能由智能合约本身调用。
公共方法
fn has_role(&self, role: &String, account: &AccountId) -> bool;

fn check_role(&self, role: &String, account: &AccountId);

fn assert_role(&self, role: &String);

fn assert_self(&mut self);

fn get_role_admin(&self, role: &String) -> String;

fn get_account_roles(&self, account: &AccountId) -> Vec<String>;

fn grant_role(&mut self, role: &String, account: &AccountId);

fn revoke_role(&mut self, role: &String, account: &AccountId);

fn set_admin_role(&mut self, role: &String, admin_role: &String);
- has_role:检查给定账户是否有给定角色。返回bool
- check_role:检查给定账户是否有给定角色。如果失败,则引发错误信息
- assert_role:检查调用者是否有给定角色。如果失败,则引发错误信息。内部调用 check_role,使用
env::predecessor_account_id() - assert_self:检查调用者的账户是否等于智能合约的账户。确保某些函数是私有的
- get_role_admin:查看方法。获取给定角色的管理员角色。返回String
- get_account_roles:查看方法。获取给定账户拥有的所有角色。返回包含所有角色的向量
- grant_role:只能由给定角色的管理员角色调用。将给定角色授予给定账户。
- revoke_role:只能由给定角色的管理员角色调用。撤销给定账户的给定角色。
- set_admin_role:只能由给定角色的管理员角色调用。为给定角色设置新的管理员角色。
私有方法
fn setup_account_role(&mut self, role: &String, account: &AccountId);
- setup_account_role:将给定角色设置为给定账户。如果角色不存在,则首先通过调用 add_role. 创建它。
私有辅助方法
fn add_role(&mut self, role: &String);

fn delete_role_member(&mut self, role: &String, account: &AccountId);

fn add_role_member(&mut self, role: &String, account: &AccountId);
- add_role:添加新的角色,并将
default_admin设置为 admin_role - delete_role_member:从角色中删除成员。
- add_role_member:向角色添加新成员。
用法
您可以在 example 文件夹中运行测试应用程序,该文件夹是 StatusMessage 的分支。通过调用 ./build.sh 然后执行 ./deploy.sh 来运行。请更新 ./deploy.sh 以添加您的账户。对于您自己的项目,您必须包含 access_control_near 和 access_control_near_attribute crate。
所需的所有操作就是将 #[access_control] 属性宏添加到您的主体结构中,以便开始使用此库中的方法。请注意,#[access_control] 宏已经包含了 #[derive(BorshDeserialize, BorshSerialize, PanicOnDefault)]。因此,请勿在已使用 #[access_control] 的主体结构上再次进行 derive 操作。
use access_control_near::AccessControl;
use access_control_near_attribute::access_control;

...

#[near_bindgen]
#[access_control]
pub struct StatusMessage {
    records: LookupMap<String, String>,
}
然后,为了开始使用访问控制 NEAR 的方法和设置初始角色,您必须首先在构造函数中调用 init_roles!() 宏,然后设置您想要使用的角色。
const DEFAULT_ADMIN: &str = "default_admin";
const MINTER: &str = "minter";
const MANAGER: &str = "manager";

.....
#[near_bindgen]
impl StatusMessage {
    #[init]
    pub fn new(owner: AccountId, minter: AccountId, manager: AccountId) -> Self {
        assert!(!env::state_exists(), "The contract is already initialized.");

        let mut constructor = init_roles!(Self {
            records: LookupMap::new(StorageKey::Records.into_bytes()),
        });

        constructor.setup_account_role(&DEFAULT_ADMIN.to_string(), &owner);
        constructor.setup_account_role(&MINTER.to_string(), &minter);
        constructor.setup_account_role(&MANAGER.to_string(), &manager);

        constructor
    }
这就完成了!从现在起,您可以直接在您的智能合约中使用访问控制 NEAR 方法。
未来计划
- 完成测试
- 为此库进行审计
- 创建一个更严格的版本,其中账户只能拥有一个角色
许可证
依赖
~11MB
~188K SLoC

